
Blogs
Our community blogs
-

 Latest Entry
Piston bmw m10, cr 9.5 BMW E30
BMW m10 Piston Stress Test(u30)
The pressure is 75kgs-cm2, which
corresponds to the pressure at the maximum power of a standard motor. the weight of the piston is 602 grams, the material is alloy 2818-T61
the analysis showed that the maximum stress is formed at the edge where the locking ring stands, the yield strength is not exceeded for this material. The maximum displacement of the material was 0.025 mm, on the piston heat belt.
the yield strength is exceeded at a pressure on the piston of 105 kgf-cm2, while the movement of the material is 0.035 mm., in the piston's heat belt. Solid-state model format (SolidWorks) who needs a file write . Or follow the link, there may be something you are interested in))https://grabcad.com/egor.reshetnev-1
P.S. I am writing through a translator so I apologize in advance))))
- Read more...
-
- 0 comments
-
- 4
entries - 14
comments - 1938
views
Recent Entries
Latest Entry
A Series of Firsts
I don't have the illusions that I'm some kinda experienced shade tree mechanic. In fact, most everything about this project that I'm encountering on a day to day basis is some kind of first time moment. I hope this gives a little optimism to gals and guys looking to get into maintaining old cars and maybe they think they're not fit or smart enough or experienced to take on a challenge and learn something new.
I've decided for a car that needs everything phase 1 will be rebuilding the original M10 that sits underneath the rusted out bonnet. When I showed up to buy the car from the original owner he looked at me and said, "it's a solid car but she's locked up". In my newbness, I thought he was referring to the fact he was also missing the keys and the doors were locked. Yeah no, dumb dumb. The engine is frozen due to the fact it's been sitting for the past 44 years and no one's bothered rotating it let alone drain the oil, coolant, remove spark plugs, etc, etc. So here comes a series for firsts for me starting with removing an engine so I can dislodge 4 frozen pistons. These are few of those firsts along the way that I feel are worthy of note.
1. removing all 8 copper nuts that hold the exhaust manifold to the block. Took about a week with heat, JB Weld and patience. But I retrieved all of them.
2. removing 6 guibo nuts and uncoupling the drive shaft from the transmission. 3 bolts come through the front and 3 back out the rear but only as far as the transmission. not easy.
3. removing the large pin from the shifter assembly.
4. asking my 8 y/o (almost 9) to work the jack trolley from the front of the car while I wrestled the transmission from the block. A core memory for both of us.
5. pulling the engine with a chain hoist and ibeam trolley. The i beam in my garage couldnt be more conveniently located where i only needed to back the car up a few feet to center the chain over the block. up up and away. My first time ever removing an engine from anything.
6. the oil sludge that i knew was sitting on the bottom of the oil pan from when i attempted to drain it and it took a screw driver to poke a hole through 2" of sludge before it finally came running through. So gratifying to scrape that out...but the smell I will never forget.
7. the particular hollow sounding thunk a chunk of wood and mallet make when they finally create enough force to drive a piston to move in its bore for the first time in over 40 years.
thanks to this forum for the tips on managing these firsts and the ones still to come.
- 4
-
 Latest Entry
Episode 1- the farce awakened
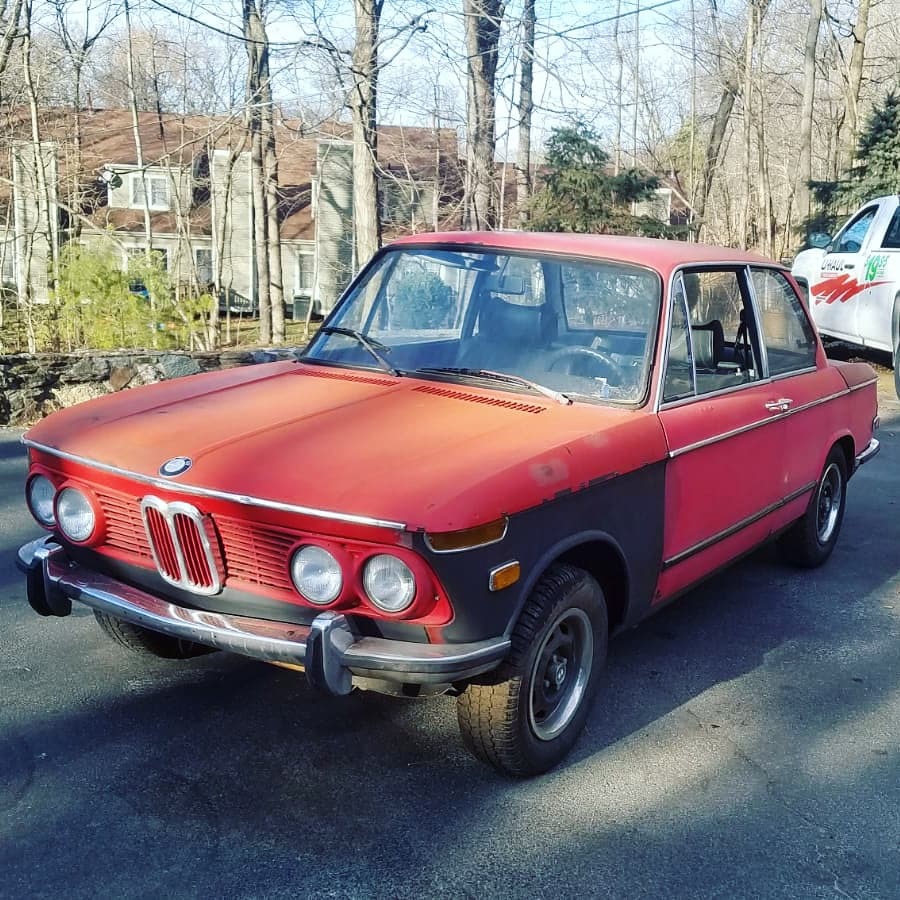
I finally did it. I've been wanting a 2002 for years. After having kids and starting a new career, life is finally settling into a more predictable routine and after some searching I managed to find a 73 locally. The owner was asking $20k on CL. I reached out and mentioned how inflated the price was, he agreed and said he wanted to keep the riff raff away and knew that it would sell for less. Here's a couple shots from the advertisement:
When I came to look at it, it was idling in the driveway. Sounded great. The body was in pretty good condition, door skins have rust, but a lot of the other problem areas looked good. The drivers side frame rail was mostly not there, and the car had no brakes. It had a set of Campagnolo wheels on it, but I'm not a fan of 4 spoke wheels (reminds me of Mazda). So eventually we struck a deal where he kept the wheels and threw in another 4 speed transmission, and I bought the car. It was a lot less than the asking price, but a bit more than I wanted to spend. I listed the reasons why I liked the car and kept telling myself that everything was going to be ok.
I grabbed a trailer and picked the car up and drove it directly to MooreSpeed. There are a couple of 2002 legends working there (Rob and Brandon) and I wanted them to help me get this car road worthy so that I could drive it and slowly tackle smaller jobs. After a few months the car was ready to pick up and my wallet was lightened even further than I had originally expected. The work that Rob and Brandon did was fantastic and they were super helpful with giving me their perspective on filling out my punch list. I drove the car home and it was rough! Lots of clunks coming out of the rear end, second gear isn't meshing and so it's really tough to get it to go in without grinding. The tires were about ready to pop and were split and wavy, but I had the biggest grin on my face all the way home!
And that's how things started. Here's a couple more pictures of the earliest state that I got it in
-
- 40
entries - 48
comments - 19729
views
Recent Entries
 Latest Entry
The details!
some final details I have been doing this winter in California!interior
grills
drive shaft alignment
wiper linkage
lighting relay upgrade
air filter 38/38 modified
- 40
-
- 5
entries - 23
comments - 3199
views
Recent Entries
 Latest Entry
Phase 4 - Some Body Mods Prior To Paint
After the car completed its transformation with Paul at The Son Of Cobra, the car got moved across town to Ronin Autowerks where Matt worked with me to get some mods to the body completed.
First up was a weld in roll bar. Matt and the team at Ronin build the bolt in roll bars for IE so they already have the roll bars down. I asked for some customization as I wanted it tied into the rear strut towers for additional stiffness. Originally the plan was to do a roll bar with an X-brace but at the last minute I decided it was over kill and since this car is all about weight loss I figured it wasn't needed.
Mocked Up:
After the roll bar was completed Matt and his crew did a full stitch weld on the body and then moved on to the pedal box.
We ended up going with a Tilton set up and E30 accelerator. Matt installed a steering column on the car to get the pedals as center as possible, and built out some custom floor boards as well to raise up heels slightly
Next step is back to Bart at the Resto Shop for final body work and paint.
- Read more...
-
- 0 comments
- 5
-
- 2
entries - 8
comments - 1108
views
Recent Entries
 Latest Entry
Eat, Sleep, Think old BMWs - 2017
2017's theme: The more I learned the intricacies of the cars, the more I wanted to learn. The more parts I found, the more parts I wanted to find.
Looking back on my phone at photos taken in 2017, I almost laugh at how naive and enthusiastic I was.
My car was running and driving but it had almost no interior and everything rattled around like a spray can. I wanted to collect the parts I needed to make it complete, and a year in, I was already thinking about buying another 02 or 1600. I tend to struggle with moderation, generally and 2002s were in my sights.
I began to read about the difference between early and late cars and realized that most of what the PO had installed in the car after painting it were low quality items from later model cars. But, there were moldy early rear door panels in the trunk. After 30 mins of very satisfying scrubbing, they were clean but still so sad and saggy looking I planned on only keeping the chrome ashtrays and finding a full set of panels in better condition.
So, I spent the year obsessively combing the marketplaces of the internet to build up my 2002 parts stash. Out of necessity, I was most attracted to interior and the shiny exterior trim parts correct for a 68-mid 71 car.
I was on the hunt, ready to run down 02 parts any day of the week, often before or after work. One of the ways I actually got to know SoCal was via Craigslist or Facebook ads. Covina, Redlands, Huntington Beach, Mission Viejo, all these names of suburbs and cities near LA became familiar to me. I drove everywhere to pick up parts. And almost every week I found something new to add to my stash. Craigslist was certifiably better for 2002 parts in 2018 and parts still felt cheapish.
I remember being so proud of myself when I would chase after a CL ad offering a solitary rear roundel badge, and on a Saturday morning, drive down to Diamond Bar or Duarte or wherever to surprisingly come away with a whole haul of parts, accessories, literature or paraphernalia after asking the seller if they had anything else 2002 related to sell. This happened multiple times.
I would come home with my parts and lay them all down and take photos like fresh kills for a man on safari. Then I would put the parts directly on car, or get to work refurbishing them.
One of my first experiences trying my hand at cleaning up an old part started with a beat up, early, Silver Dollar instrument cluster housing I wanted to use. My car had come with the faux woodgrain housing out of a squaretail car. People on the forum had inspired me to get into the details of my restoration, so I did my best to make the correct housing look good as new.
I should say maybe: I studied as a designer at the end of the 20th century into the dawn of the 21st, when the curriculum was strictly by hand for the first 2 years of general 2D and 3d education. You couldn't touch computers for your assignments. Later, as I chose my focus, my teachers were haggard printing pressmen and German and Dutch typographers who drew letters perfectly by hand. So, I had some familiarity with handcrafts and the patience they take, but a 2002 restoration felt like new territory for me.
Before
I did the gauge bezels separately because I think I saw someone on the forum do it that way.
After
I actually had two housings. A good one and a chipped one. I used the chipped one as my dummy and got my technique down with each pass before doing it on the one I wanted to keep and use. First pass, I used SEM Trim Black vinyl dye in the center area, masking off the rest. Then I reversed the mask and did the silver around the edges in a Krylon Metallic paint I got from Home Depot. Probably not what I would do to restore it with what I know now, but it was a good step for me along the way. It came out presentable enough.
The DIY-ness of chasing the parts and then putting in the effort and elbow grease to make them feel new again really touched my soul. My outlook since moving to LA had changed and scrubbing dirty parts I'd scored off the classified ads was cathartic.
Doing these menial tasks late at night form some of my favorite memories of our time in that first LA house.
-------------------------
Sometime, in October 2017, I had planned to visit my parents in bay area for a long weekend.
I had met @CoastalCrush and @MOJOJOY at the Bay Area 2002 Swap & Show in San Francisco earlier that May and knew they lived near my folks in San Jose. We made plans to meet up at the Neue Klasse Cars and Coffee they held monthly. Today, I only have a couple of photos from the event I was having so much fun meeting people and hearing about their cars. Along with Dani, I met the two other members who make up the infamous 2002 Colombians, Alex and Jan. The three of them are hilarious together, always down to help someone out with their car, and generally made me feel very at home. At moments they remind me of the 02 expert older cousins I never had.
Mr. BMW2002FAQ himself, @steve k., was also there that day with donuts. I remember talking to him about the SJ Sharks. The whole vibe of that Bay Area community felt right.
A lot of vintage cars have groups of enthusiasts. Very few of them have real communities that hang out and build with each other.
I'm not the first to say this, but the 2002 scene was/is just that to me. I still enjoy seeing all those same Bay Area folks anytime we meet up.
Max's celebrity Colorado 02, Crusty, and a very original '67 1600 he'd just bought. Both photos in front of the house he grew up in. Turns out the house is on the same street my parents lived on at the time. Dani lives around the corner from there. This super small world of 2002s was here in Bay the whole time, and I was just lucky enough to fall into a passion that many of these folks had been living for decades.
(fun side note, the Sahara 1600 now belongs to another 02 friend here in LA I met at a C&C, @mccusername)
----------------------------
By the end of 2017, I was getting my stuff together.
In December, I would buy a rebuilt 245 Getrag 5 speed from the BMW CCA judge Paul Cain and fellow judge HBChris when I went to pick up the transmission at their secret lair in OC. These guys were very experienced. I was fortunate to be given the time of day by them and asked a lot of questions. I started to pay closer attention to the details and the quality of 2002s and be more particular after learning what Paul and Chris look for when judging. I was not near their level, but the awareness of the concourse 2002 game is something I still am interested in and respect.
The day after Christmas, @kbmb02 helped me install the 5 speed and a 3.91 LSD I'd also picked up and we'd had rebuilt.
There was some momentum and I was having fun.
2018 would be the year I hot rod my engine, put together a presentable interior and maybe learn to drive the car harder with more control.
- Read more...
-
- 0 comments
- 2
-
- 2
entries - 71
comments - 1416
views
Recent Entries
 Latest Entry
Oh the Wheel Wells!
It all started one day many months ago when I inadvertently discovered rust lurking below the paint surface. Because my 76 spent who knows how many years with its tail end exposed to the elements, as it sat in a car-port style storage facility, the trunk area had obvious surface rust spots. One of the first over ambitions things that I started doing when I first got the car, was to strip paint on the whole trunk top. Sure enough, the rust spots were pitted and nasty, fortunately none went all the way through.
I have to say, what really amazed me was to find these randomly scattered really small surface rust spots in areas where the actual paint appeared normal to the casual eye, prior to stripping it. This was a head scratcher for me. How can that be!??. The paint looked normal and surface smooth and even, yet it really was not as it appeared beneath.
I decided to do a test after removing the trunk, knowing that it would be risky. You guessed it, I began to strip the nice paint finish surfaces inside the trunk area, including around the sides of the spare tire cavity where finish was rich and shiny and almost pristine looking. My fears were confirmed, there were these tiny little rust spots randomly scattered about and of various shapes all over in the trunk area, with no evident pattern in their spacing or locations. Interestingly, none were any larger than a small fire ant in any one dimension.
That settled it, it was then that the paint stripping priority began. Months into this adventure and treating the surface with Ospho (my favorite) and epoxy primer sealer as I progressed, I was mostly done in November, with the exception of the front clip areas and whole underside. I completely stripped the front and treated for rust. Last week as I surveyed my general progress, it occurred to me that I had done nothing with the wheel wells!
In the last few days I have been stripping the nice-looking textured surface of the wheel wells. They were in such nice shape as was the trunk and I sure hated to remove all the nice paint and semi-soft filler texture material, but it all had to come out. In the months of doing this, my findings have been consistently the same, all throughout the entire car surfaces, those tiny little irregular shaped surface rust appear. I suppose it is possible that left alone they could remain dormant with no cancer growth, peacefully under the paint. Somehow, being overly cautious I have my doubts.
I almost forgot to mention my paint removal technique as someone may surely wonder looking at the pics. The background on how I came to adapt it and why I continue to u se it is a subject for a different blog. This involves paint removal by scraping, using sharp edges/tools of various shapes and sizes. The scratches on the surfaces may be obvious in the pictures. I welcome your thoughts on this subject as well as any other suggestions. I'm always looking for different ways to doing things, experimenting and learning new techniques. One thing that I try to be mindful of since humidity is often high in Houston, is that after treating for rust, I promptly try to apply the sealer. I don't know how that will work out with these coming cold days!!??
- 2
-
- 126
entries - 307
comments - 31447
views
Recent Entries
 Latest Entry
Hilton Head Legends of the Autobahn
Attended the 2022 Legends of the Autobahn East in conjunction with the Hilton Head Concours.
Drove Vern down to Hilton Head over 2 days with my friends Wayne Killen with his 1987 Mercedes 190e 2.3 16v Cosworth & Doug Dolan with his 1972 S38 M Powered 3.0 CS.
Spent Thursday detailing our cars at the rented beach house with a 3 car garage.
Vern & I competed in the 2002 Class with Stuart Oberman's 1974 2002 Tii & Tim Wing's 1974 Turbo.
The juddge had his work cut out for himself. In the end, each 2002 was separated by 1 point.
Vern 3rd, Stuart 2nd & Tim 1st.
- 126
-
- 11
entries - 21
comments - 2460
views
Recent Entries
 Latest Entry
Ash Tray & Chrome Plastic Trim
Long time no updates so here are some before/after photos of my dash ash tray.
I have also acquired new plastic chrome trim for dash.
And I have a good feeling bodywork will start soon 🤞.
- 11
-
- 11
entries - 44
comments - 4345
views
Recent Entries
 Latest Entry
Enjoying the drive
Follow up, I did get my car on the road this spring with some short shakedown drives to check and double check everything. I do take it on longer drives now on the back roads of Central Oregon when I can and love how it runs, drives and sounds. It turned out better than I could have hoped for, all the hard work has its rewards. I would encourage anyone who takes on any level of rebuild to hang in there and see it through if at all possible.
- Read more...
-
- 0 comments
- 11
-
- 3
entries - 13
comments - 1146
views
Recent Entries
 Latest Entry
Metal work and New Nose
Hi everyone,
I bet you will be shocked when I tell you that this project is going *frustratingly* slow! I know for everyone else project cars are always simple and speedy. LOL. However, it is still moving and I am grateful for that. I removed the nose piece because I have purchased a new one which was made for the euro bumpers. The old nose piece had Bondo and metal problems that we decided were not worth repairing and since I wanted the euro bumpers anyways, it made sense. I removed the old nose piece but it did put up a fight. After failing to cut it off, we found out that it had been brazed on, borrowed a torch, and had no issues after that. I spent some time grinding and sanding the attachment parts to be able to get the new nose welded on. I am doing as much metal work as possible myself to save money and learn skills, but the welding and painting will be done by someone else.
Still some more metal work ahead of us, then hopefully soon paint! Just wanted to come in with an update and a couple more pictures.
As always, any tips, tricks, advice, encouragement, or just a hello is very appreciated. I am very glad to be here as a part of this community. I have a looooot more to learn about my BMW and about cars in general so I am always open to hearing from you all.
Talk soon!
- 3
-

-
- 3
entries - 10
comments - 1752
views
Recent Entries
 Latest Entry
Sidetracked for Good Reason
Since I last posted, a lot has changed. I bought a house across town from where I was living in my last post, and that took over priority. I also switched jobs- I am now working for a composite wheel manufacturer as one of the product design engineers, expanding my carbon fiber knowledge well beyond what I expected I would know at this point in my life. esecarbon.com for those interested.
Most exciting, I fulfilled a lifelong dream of building a proper garage of my own that will eventually house Rocan Motor Company. Despite not being totally done with the garage, I could wait no longer and decided 150ft of extension cord would do for the moment in getting back into the Euro 02.
1200sqft of room for activities! I've come a long way from doing subframe swaps while laying in the gutter on a Brooklyn street.
I ordered about $1000 worth of panels from Germany and started stripping things down further. Every commonly rusted panel is rusted, as well as the DS subframe mount, but my outlook is "I've dealt with worse". Some progress pics below.
I missed how simple this car is to work on after messing about with my TDI for so long. Check out that OEM "floorvent" option!
The fun usually starts after you strip things down.
Lots of porosity hiding. The entire panel will need replacing.
That's all for now. I've got to button up my TDI over the next week, so updates may be a bit delayed - it was due for a timing belt, ac compressor, and while I was in there I replaced the high pressure fuel pump with a more reliable version. The 02 should move quickly going forward.
- 3
-
does anyone know where to get this metal strip around frame?
-
- 6
entries - 9
comments - 3225
views
Recent Entries
 Latest Entry
New Drivetrain
My goal is to build a fun street car, and I recently had a completely new/upgraded drive train installed in my 2002. I set things in motion in August 2020, when I bought a used 1972 2002 motor from Kim in Herdon, VA.
In September 2020 I dropped the motor off with Bruce Shelton (Automotive Enterprises in Winchester, VA) and asked him to rebuild it. I was in no hurry, and Bruce worked on the motor over the next year. He had the block machined, provided an E12 cylinder head, installed JE 9.5:1 pistons, a 292 cam, dual Weber 40 DCOEs, a Carter electric fuel pump, and a long-tube street and track step header from Rogers Tii.
In September 2021, Bruce called and said the motor was done. I decided to have him install the engine along with a 185K-mile Getrag 245 5-speed that I had bought from ClayW in Silver Spring, MD.
I installed an E21 3.91 Limited Slip Differential I bought from Al Taylor in 2020, put my car on a trailer, and towed it Bruce's shop.
Bruce sent me some pictures as he was installing the rebuilt motor.
Outside Bruce's shop.
Automotive Enterprises is something of a time capsule, as it was an imported car parts business many years ago. Bruce races a Pinto in SCCA and supports the racing community at Summit Point Raceway. In April 2022, Bruce was done installing the fresh engine and doing a 5-speed conversion. I bought a driveshaft from Steve at Blunt. I brought my "new" car home. (The front air dam had to be removed to go on the trailer.)
Once I got my car home, it needed some sorting. The header was hitting a castle nut on the drag link. I had to file the corner off the castle nut until it cleared.
Note my washers on my drag link (or whatever it's called) have come apart almost immediately as mentioned on this site.
I also had a sticking throttle, the result of rust in the tube that the gas pedal passes through. I cleaned out the gunk and installed new bushings and a new return spring...problem solved.
I had to properly secure the console to the transmission tunnel as it was flopping around. The Blunt 5-speed conversion kit includes a BMW Z3 shifter.
I had a list of little things that had been waiting. I installed a brand new pair of flag mirrors that I bought from W&N a couple of years ago.
I made a template a drilled the door for the passenger-side mirror. I used riv-nuts to mount it, of course!
I installed new door buffers and replaced some missing door handle gaskets.
I put new webbing under my Recaro driver's seat. The old webbing was shot.
I painted the supports behind the grille the current body color and replaced the grille "hooks" which were missing.
I bought a set of underhood decals. All my original decals were painted over.
My license plate light lenses and taillight lenses were old and cracked, so I installed new ones.
I was doing all this work as the run-up to the Carlisle Import Show in May, but on the day of the show, the car wouldn't run right. It wouldn't idle and would eventually stall unless I kept my foot on the gas. When I tried to drive it, it stumbled and wouldn't accelerate. I guessed the problem was the old Crane XR700 ignition, so I order a new one (now FAST XR700.) Of course, once I installed it, it took a couple days of fiddling with the optical sensor before I could get it to run, but now it runs good, so the ignition was the problem.
My SiennaBraun paint is showing where the old Crane unit was mounted.
Well, I missed the Carlisle show, but I'll be at the Hunt Valley Cars and Coffee this summer!
- Read more...
-
- 0 comments
- 6
-
- 61
entries - 96
comments - 7774
views
Recent Entries
 Latest Entry
Early heater valve setback
I ran into a snag. I was about to install the center console when I notice a drip of blue coolant on the bottom of the heater box - isolated the leak to the early version heater valve.
After about two weeks of expletives later I pulled the heater box out (halfway) to get the faulty valve out.
That was this weekend- so I’m hoping a new O-ring will do the trick.
Have some, but not the right size- need to head to the store and see if I can find the appropriate o-ring. For every step forward there is a step back.
Setbacks like this, while minor in grand scheme, pile on top of other set backs and it’s all taxing my patience - my wife said “it’s all part of the ownership experience.”
I’d love to have it together for Vintage.
My target.I notice a drip of blue coolant on the bottom of the heater box - isolated the leak to the early version heater valve. After about two weeks of expletives- I pullEd the heater box out (halfway) to get the faulty valve out. That was this weekend- so I’m hoping a new O-ring will do the trick. Have some, but not the right size- need to head to the store and see if I can find the appropriate o-ring. For every step forward there is a step back.
Setbacks like this, while minor in grand scheme, pile on top of other set backs and it’s all taxing my patience.
I’d love to have it together for Vintage in may. My target. - 61
-
- 4
entries - 9
comments - 3757
views
Recent Entries
 Latest Entry
Body work by SCR
Matt and the guys did a incredible job on the body work of my 02. He has an eye for details and he has the metal bending shaping, cutting and fabricating tools to accomplish the job. Many hours were spent hanging the doors and aligning the hood and rear deck lid. After many hours of work the result is flawless body gaps. The defining body accents, the ridge on the roof and on the sides, we’re the result of hours of sanding and correcting.
Only the deck lid was replaced with a NOS part. All the rest of the sheet metal is original.
- 4
-
 Latest Entry
Finding the Unicorn!
Hello everyone!
Thought I would share my car, it's story and what I am doing with it. Here is a fun read about it if you have time.
Warning: Kinda long read - you might love it or hate it.
Finding the "Unicorn"
It was a December 2019 morning sipping on coffee "just browsing" car listings as we all tell our wives when I came across a unique overseas listing. It was a classified in Italy for a touring that was in what could be either primer or bristol. A few images into the listing showed a tattered color sticker that read bristol. As Eminem says "His palms are sweaty". Did I just find MY Unicorn!? Well for me, the touring is the model I have such a soft spot for and bristol, well, who doesn't love bristol. I didn't even know they existed! I thought use of bristol ended before the touring production? Quickly I sent an email to the seller asking if the car was still available and an email to BMW to verify the color with the vin. That's all I could do for now. Four days later I receive an e-mail from BMW confirming paint code 058 bristol to be factory on this Italian market touring. OK! Now my heart is racing and I am super excited. Later that same day I get an e-mail response from the seller. "Grazie ma è stata venduta!!. I google translate it. "Thanks but it was sold!!. Well damn.
January rolls around and I can't stop thinking about this car. I am stubborn and don't want to "give up". I send an email off to the seller asking if he wouldn't mind putting me in contact with who bought it. You never know right!?
Fast forward to March and we are all hit with Covid worldwide. My browsing of cars has ended and gone to focusing on my business and employees. That was a crazy time right?
A few months pass and in July feeling like we are in a "groove" I begin my morning coffee searches again. Let's be honest they were all day everyday with Covid keeping me on the computer at home. I recall that touring and send off another e-mail. On ebay there is this Inka tii that is for sale. Seems like a solid car and ticks all my boxes for what I would want in a tii. Make an offer and secure the car. Rad. Gotta tell the wife now. Have any of you done this move before?
So I get the guts to tell my wife I bought another 2002. She isn't too thrilled, obviously. Oh I forgot to mention I already had two! These cars are addicting right? No? Just me? haha. I tell her I promise to sell one ASAP and go back down to two. My wife is very supportive in my hobbies and says as long as it's never more than two. I agree. It's a deal!
Over at my best friends house I am having a conversation with him and his wife. I tell her the story of the tii I just bought. She asks me "Are you done?". Which I answer "Yes". I have two cars that I really like for different reasons. My sons can each "inherit one" I also joke about. Then I recall the touring to which I tell her, "well, if this one car ever resurfaces". But I say there is no way as it was a literal unicorn that is gone for good. I vividly remember her asking. "But what if it comes up again". My reply.... "I'd do everything I could to get it"
With having three BMW 2002s needing to sell one you would think my searching would stop right? RIGHT!? The tii literally has been home for weeks. Its September now and I do the morning search. THERE IT IS! Again on an Italian classified listing is that same touring I had been thinking about for 9 months! NO WAY NO WAY! I quickly fire off an e-mail to the seller. What am I doing?! I have a problem. The seller responds that the car is available and willing to work with me to arrange transport. The Unicorn can be mine, I just need to grab it.
During dinner I utter the words to my Wife, "The Unicorn can be mine". You should have seen her face! "We will talk about it later". Ouch. So we sit and have a talk about the touring and all the cars I now have in my possession. She reminds me of our deal, no more than two. Currently I am breaking the rule as the third has not been listed on BAT yet and here I am talking about a fourth. A little reluctant she agrees to look at the pictures and talk about it some more, you see her favorite model is also a touring. I show her about a dozen cell phone photos (none of the typical 2002 rust areas). It is a gamble. A BIG GAMBLE. After some back and forth we decide to go for it. It came down to me asking her a silly question. "If anything were to happen to me, which car would you keep?". Her answer was the touring, of which we didn't even officially own. We were ok to take the risk, rust and all. YOLO right!?
After some emails, wire transfers and sleepless nights the touring was on a boat headed our way from Italy in October! I of course I am beyond excited. I am possibly a crazy person who now officially owns four versions of the BMW 2002 but that's ok right? I mean I am in no way a car collector, nor do I have the means to keep all these, I am just a guy who was originally looking for his High School dream car.
The day has finally come for the touring to be delivered! December 7 2020. I sold one of the cars and am back down to three, but still above the "rule of two". It has been two months since it left Italy and exactly 365 days from the first time I saw the car online. We as a family were super excited to see it in person for the first time. My wife was really supportive and said the car is "so you". You guys, I have my unicorn!
After a quick wash to get the two month shipping dust off I take it out for a spin. I am actually really happy with the amount of "rust" and feel like the gamble was ok. The engine sounds decent but transmission is absolutely trash. Let's go for it. By myself and maybe 5 miles from the house it overheats. Dang it. I wait at my best friends house after just making it there to wait for it to cool. He wasn't home but his wife was. She was kinda laughing and remembered our conversation. "So now you have three again!?" she asked. "I am selling one", I reply and also laugh. After cooling down I drive it the 2 miles home and park it in the garage. Good night touring, I love you but you need some love.
Fast forward many months, selling the third to a local (now a friend), back to my rule of "only two" and conversations of what to do we are in the process of what I call "Stage One". I will start posting that process overtime as I think we can all agree this initial entry is long enough.
If you have read all the above. WOW! Thanks!
QUESTIONS?
If any of you have any questions for me regarding my experience importing a car from Italy to California. Send me a message. I'd love to talk.
Or any question or comment for that matter. This community is amazing!
Until next time,
HAPPY NEW YEAR!
Keith
-
- 2
entries - 3
comments - 1169
views
Recent Entries
 Latest Entry
SAVE THE BAUR - 2 The Failed Restoration
Many of you already know how this is... As soon as the car entered the workshop it was completely disassembled.
But restoring a car is much more than restoring a car!
Restoring a car takes more time, dedication and work than the one you can appreciated on a body, an engine or an interior. Many may think that taking an inventory of car parts is a waste of time, but in reality it is a very important task that helps determine which parts to buy, which to fix, etc.
The ex-employee thought about doing a good job, but as quickly as possible, so the parts that were being removed from the car were not cataloged, or stored correctly. The whole process was quick, but messy, not very methodical and not very intelligent. After a while, the ex-employee understood that a restoration work would take more time than he had imagined, and the work stopped progressing, the time that was devoted to carrying out the restoration was less and less, until finally work was completely stopped.
The car was left abandoned in a corner of the workshop, it began to be used as a work table or even to store parts of other cars.
After a long time of arguing with the ex-employee, my cousin decided to take the car to another garage, where the situation was even worse!
Some pictures of the car in the second garage:
- 2
-
 Latest Entry
Spechuy's 02 Build Thread
What’s up everyone - couldn’t find an intro section but just inherited a ’69 02 from my in-laws and will likely be a frequent visitor on here over the next several years. Not sure what’s in store for the car yet but first step is just figuring out what I have in front of me..
Will post updates as I go but wanted to say hello and glad to join the community!
Update: Jan 2022 - The car is going electric so pulled the motor & stripped interior to prep for mild restoration & conversion
Update: Mar 2022 - New parts have arrived
Update: Apr 2022 - Started to build out wiring harnesses & got frames made for the battery boxes
Update: June 2022 - Wrapped up all high-voltage & EV-specific wiring so it's ready to drop in & run final connections. Got a coupler made to mate the motor to the original trans w/ a new clutch & flywheel setup
Update: July 22 - Meanwhile, car is being repainted
Update: Aug 22 - wheels & tires arrived!
Update: Sept 22 - Car is back from paint and started dropping in the electric motor, frames, and routing wires
-
- 6
entries - 26
comments - 22672
views
Recent Entries
 Latest Entry
From first fire to dyno day
I spent most of 2014 installing the engine and trans, finishing and fine tuning the Megasquirt installation, and a bunch of other miscellaneous tasks to get it ready to turn the key for the first time. Also a million and one other "while I'm there" jobs like LED bulbs for the dash, securing the oversize spare wheel, fixing the hood support, etc., etc.,...
Then it was off to a local dyno shop for tuning with some great results for a first effort.
Installing Engine
Wiring
The part I dislike the most. It's tedious and I suck at it. Wiring errors and "on the job learning" is perhaps the thing that slowed me down the most. And because I suck at it, it's all the more rewarding when I do get it right and stuff works as it should. The first pic is what caused me most grief - it's the VR sensor. I triple checked I had it wired up correctly, comparing dozens of posts online, and I still didn't. Yes, those are crimps for speed of mock up assembly, and yes they were insulated before use.
Megasquirt/TunerStudio would show cranking with the VR sensor polarity reversed, but never get a clean tach signal. I spent days trying to figure out why it would crank but not fire until I ripped it all apart and went back through it for a second time and flipped the polarity for giggles. Et voila. First fire.
I should add that at this point I changed course several times about how to fire the coil(s) and what coil(s) to use. I was originally going to use EDIS and a DIYAutotune four-post coil. See the EDIS and four plug wires in these early pictures.
...then I dropped EDIS and got the MS3X daughter card to fire smart coils directly for a cleaner install (less under the hood) and contemplated the "Yukon" LS coils.
There were no easy/clean ways to mount the Yukon coils with the stock GM bracket, and I don't have access to a shop to create my own, and there were none on the aftermarket that were suitable, so I started looking at coil on plugs with ignitors (aka "smart coils"). The VAG COP of choice seems the be the ones from early to mid VW Golfs and Jettas. Plenty of information out there in the Megasquirt documentation and forums about what to look for and how to wire them up. Be aware though that the part number revisions given in the documentation did not guarantee compatibility with Megasquirt. I burned out several coils before I learned that the only real check was to measure resistance across pins 2 &3... just like the documentation says to do ?
I did find it necessary to trim about 1cm off the lower part of the metal shroud on the coils (trim it back level with bottom of the rubber insulation beneath the metal shroud) to get a good fit on the top of the plugs. They are regular plugs for our cars. Can't remember which type exactly, except they are of the resistor variety with the bulbous tops instead of the threaded posts for connecting to the spark plug wires.
You can see the VAG COPs fitted and wired up in this pic.
So that's where the ignition landed. VR sensor feeding tach to MS, MS firing the VAG COPs directly using the MS3X daughter card. At this point It was time to fire it up.
Air intake
Due to limited room, I had to do some creative doodling about air filtration.
I bought some stubby air horns from a VW shop that are straight with no radius (so they aren't really air horns at all), some angled silicone hose, and a Ram Air filter and base plate. Here is one of the stubbies in situ:
Bolted them all together in the following order (except the thick spacer next to the real air horn - that was not needed):
I ended up with the following contraption:
With the thick spacer removed and all four attached with the actual filter, this is what it ended up like:
The hoses are now firmly secured using stainless t-bolt bands (not shown in the mock ups). I ran the car with no hood for several weeks because I was still spending a lot of time working under there tweaking stuff. When I reinstalled the hood, I found one of the support channels attached to the underside of the hood interfered with the filter when the hood was latched closed, so I had to trim another 2cm off the hose to lower the height of the filter.
Another problem, which I have yet to solve, is that the filter is too high for the strut bar I bought. If I don't fix the issue, look for the strut bar in the classifieds!
Throttle Cable
My first throttle mechanism was bodged together from whatever materials I could find in my garage plus some barrel adjusters from eBay and it was not pretty. It used the cable supplied with the Jenvey ITBs but the cable was incredibly sticky inside the outer sheath which made throttle modulation difficult. I think the first pic shows a piece of old carb linkage being recycled - like I said, it was a case of making do.
It worked well enough for a few weeks before two things happened:
- the gas pedal fell off while driving
- the throttle cable snapped
The "evil nubs" had not yet given up so I ordered a new pedal and a Lokar throttle cable kit. No pics of the new cable set up.
First drive
Here it is with a basic Megasquirt tune. There will still any things to complete before it was ready for the road.
Once it was ready, I took it out for it's maiden voyage in the computer age.
Wiring Revisited
The Megasquirt documentation is insistent on proper grounds. Here's what happens if you (inadvertently) get it wrong.
Again, I thought I had done it correctly, but the engine kept cutting out on drives over say 15 minutes. I would be powering along nicely, or just cruise steadily and then silence. RPMs would drop, no power, then nothing. Glide to the side of the road, switch the ignition off, switch the ignition back on again and it would instantly fire back up as if nothing had happened. Megasquirt logging several of these events showed the ECU saw voltage drop from +13.7V to 6V then nothing. Checking the relay/fuse holder and I saw the melted goey mess that used to be a fuse. Resistance was causing significant heat build up. Begin complete re-wire number three!
Hood Support
I broke the passenger side weld on the hood support torsion bar when removing the hood back in 2012, and my friend Kenny finally dusted off his gear for me.
Dyno day
While I had been able to get it to the point where it was drivable, I wanted an expert to take a look and tune it. My goals were twofold:
- ensure a professional tunes it safely so I don't break anything with my basic tune
- "more POWWWWAAAAAARRRRRR!!!!" (in your best Clarkson voice)
Got her all strapped in for her big day.
In the following videos, I am the very nervous looking guy in blue. Having never heard an M10 at full tilt (well, almost) from a few feet away, it was quite the experience for me. We agreed on an upper limit of 6400 RPMs but it sure sounded like it was going to grenade at about 6000. The operator didn't bat an eye though. One of the early dyno runs:
Nearing the end of the day:
The end result was a good 134rwhp (150ish at the crank?) and 129TQ with a really flat curve.
We finished up at about 7pm and the dyno operator, being the consummate salesman, said that there are two issues I need to fix and to "bring it back for another session, there's more in there!" The two issues (O2 sensor reading low, erratic CLT reading) have both since been fixed.
The Future
I tried most of the home brewed methods of getting the stock tach to work with Megasquirt and the COPs and gave up. The tach is now with North Hollywood Speedometers to be fitted with a custom PCB that will be driven directly by Megasquirt's tach output.
There may be forced induction in my future. There, I said it. I committed that thought to paper. It must be, like the EFI build, a "no cut" FI build though. I do not want to gut the front of the car or otherwise change the body work. Yes, that will force compromises, and I am absolutely ok with that. Here's my though process, and a failure on any one step below will cause the whole FI plan to be dropped:
- Move the alternator to the Tii position to make room for an airbox that can be pressurized
- Find an air box that will fit without moving the booster, etc.
- Find a place to mount an intercooler without cutting
- Find a turbo manifold and turbo that fits without cutting
- Run intake tubes everywhere
I am at this point today:
..and waiting for a XPZ962 fan belt to be delivered for Christmas.
- 6
-
- 29
entries - 59
comments - 25502
views
Recent Entries
 Latest Entry
What's the Point?? (what had happened was...)
After getting the exhaust squared away I took to figuring out why the headlights didn't work. Had to again sponge until it became apparent the turn signal column lever was bad.
Drove the car thru summer and into the fall while adding cosmetic items and learning what the Guibo is. Wish I had the photos but you know the story. Thumping in the trans tunnel when shifting (only subtly at first) lead to multiple crawls under the car until through researching I decided to order one and replace it.
Since I liked the look of the euro turn signals and found a pair I replaced them and also found some bottle cap wheels and a Momo steering wheel.
Winter came and the suspension became something I thought I could get sorted so I began gathering the parts to refurbish. Punching out old tired bushings was not easily accomplished with the subframe on the car. I learned the hard way it needed to come off so...
One thing led to another while getting the front end together. Looking up at the oil pan and oil covered steering box had me pouring thru threads using my friend the search function and being subtly hypnotized by all the build threads and Articles on modifications and upgrades.They all led to an evolution that started with front bushing replacement. While looking up at the subframe I notice the oily steering box so...
and the pedal box grunge...
and the oily oil pan...
etc...
well, you can see where this is going. Needless to say project scope creep took hold and fast forward to the most recent change when I decided to go the full Monty tear down for body repairs and paint.
I really liked the paint (original) but due to the PO weak attempts at matching the color at front quarters and a rear end in need of straightening chose to repaint. Here are some of the planned mods after the body work and paint include: big brakes both ends, shortie bumpers, Hella 550's, dual Dellorto 40's, Stahl header, stainless exhaust, Motorsport 300 degree cam with IE head bits, high compression 10.5:1 pistons, 5 speed G245, LSD, urethane bushings, HD struts and shocks, Alpina wheels, new carpet set (ESTY order coming later), 1 piece dash, new rubber window gaskets, new headliner (thanks Steve), deleted side markers and lower trim, under seat trunk mounted battery, low profile under seat subwoofer, kick panel and hidden package deck speakers (from an faq thread) and other stereo bits.
And on it goes...
- 29
-
 Latest Entry
Car Mod List
This is a simple list of non-stock components that I have put on the 02, plus those in the future when they happen. I will add photos where/when I can.
Engine:
- Italian Weber 45 DCOEs
- Vintage Cannon 2 piece intake manifold and rod-style linkage
- 8mm spark plug wires
- 123Ignition distributor
- Oil pan baffle and windage tray
- Mechanical fuel pump delete (now electric in trunk)
- Vintage (and kind of small) long tube header of unknown brand or origin
- Condor solid mounts
- IE sidedraft silicone coolant hoses (blue)
- Ebay special 50mm aluminum radiator
- 14" electric fan (mechanical fan delete)
Suspension:
- Unknown brand 80s lowering springs (gold paint, anyone know?)
- Bilsteins strut inserts/shocks all around from the 80s, unknown mileage
- Old fixed camber plates (just an offset for the stock strut hats)
- IE offset roll center spacers
- Boxed and reinforced front control arms
- Black poly bushings in all front suspension points (haven't gone through the rear yet)
- Reinforced motor mounts and front subframe
Brakes:
- Haven't even gotten there yet
Exhaust:
- I guess currently none after the header is technically an answer (sorry neighbors)
Drivetrain:
- AKG chassis-mount short shifter with white DTM style knob (4 speed)
- Condor poly trans mount
Wheels/Tires:
- 14x6 (might be 7, will check) vintage Panasports
Body:
- A few custom small dents in the hood and roof from when the PO was having roof work done on the garage the car was stored in
Interior:
- There isnt any currently haha
- Vintage MOMO Lauda wheel, 11/80, 350mm
- Read more...
-
- 0 comments
-
 Latest Entry
Engine compartment
The engine and transmission are out. The engine is at the shop having both the head and block worked on. We will have to bore out the cylinders and replace with oversized pistons. I couldn't find any pistons off the shelf, so I am having them made, which could take a couple of months. I plan to use that time to repaint the car.
- Read more...
-
- 0 comments
-
- 22
entries - 40
comments - 4058
views
Recent Entries
 Latest Entry
Quick project update
My new job and moving has slowed progress on the car, but it's still inching closer to completion. If you followed my previous posts, i said the mission of this project was to have an almost original 1969 BMW 2002... but the car has become something else, something that is more custom.
Fuel and Carbs
Final routing fuel and cable routing is being done around the TI air cleaner that I modified for the DCOEs. The fuel regulator impinged on the air cleaner so I moved it to the drivers side, which incidentally makes it easier to adjust. The fuel lines are still being adjusted and experimented with.
Fuel and Carbs
I am fabricating a custom battery tray from a TII tray... but mounts lower and using the original bolt locations.
DiffI switched the diff to a 3.65 LSD, which was made by Dave Varco
Interior
One big setback has been the dash, which was redone by Just Dashes. Unfortunately it didn't line up to the body after it was reworked and I had to send it back... which has delayed finishing the interior for 4-5mo.
- Read more...
-
- 0 comments
- 22


.jpg.77050d3a2fd138d44fb789fb66d61905.jpg)


.jpg.c98848c7f663231f7f2d89f560978b82.jpg)

.jpg.549a7b4d668ff73c7d260b9ccd3535f6.jpg)


