Information on modifications and repairs to Body and Interior of your BMW 2002 and Neue Klasse car. Hoods and bonnets, trunks and boots, fenders and wings. Submit an Article if you have something to share.
I'd first like to credit @Mike Self with finding this fix. He published a column on this back in 2007 (which he'd be happy to forward you), I'm just adding photos to his findings.
SYMPTOMS:
Main symptom - Your speedo needle pins to 120mph when you hit highway speeds.
Secondary symptom - Your speedo is slightly off and or you get needle fluttering below 10-ish mph.
Unrelated symptom - If your speedo needle is constantly fluttering throughout the speed range it's more likel
How to Install a Headliner in a BMW 2002
*All the typical warnings apply. Be careful. Don't cut your fingers off. Read the labels on all tools and chemicals and try not to maim yourself.
If your 2002 is in need of a headliner, a professional shop can do the job for $500-1000. I've heard of people bringing their stripped car in with the parts in hand and only paying $100, but I haven't yet found that shop. So, the following is a guide to install a headliner in your 2002 in your garage. It's
I really struggled installing these seals, they are a real barsteward to fit and there are a few tricks that are not immediately obvious. So, I have decided to share "my" method, it may differ from your method, but it works, so please if you've done it a different way, that's fine, so long as it works for you.
Firstly tools I used:
Nylon hammer
Razor blade
Plastic trim tool set (Ebay - less than $2)
Sharpie pen
Hole punch tool
Installation of BMW 2002 Door Glass and Door Components
Larry Gray @2002#3 and Karl Bergmann @bergie33 (6/27/23)
A door or window component installed out of order can easily block the installation of a subsequent part(s). The result can be wasted time, lost energy, and mental, physical, emotional, and spiritual upheaval. Therefore, a reasonable and practical order of installation of components is important to overall '02 happiness. This tech article will cover the proper ord
A few months ago, I wrote an article about repairing the heater valve bracket. You can see that article by clicking the link here. I really thank all of you for reading and all the responses received from the 2002 community. I had a tremendous request on the parts that I designed. Therefore, I decided to make some improvements to the bracket as well as additional parts that make rebuilding the heater box easier.
I have gathered and made some special components/parts for those who wan
Hello!
If you're reading this, your seat-tilt mechanism has broken, and your passengers are complaining about having to get in on the same side. Worry not, for this guide will explain how to replace that rusted-out cable with little egress. First, however, it is best to list all of the parts needed for your disassembly, repair process, and reassembly. The following guide will focus on the Long Inner Cable Rope, but the steps can be replicated for the shorter side. The process is quit
Are you a proud owner of a classic BMW 2002? Join me on a thrilling journey of steering wheel transformation inspired by the captivating manufacturing video on azaautowheel.com. Discover how to infuse your stock wheel with a fatter leather rim, elevating aesthetics and driving pleasure.
I have had many different steering wheels on my 1973 2002 over the years. The manufacturing video gave me the idea of how to put a fatter leather rim on my stock wheel.
Written by Curt Ingraham Tuesday, 06 June 2006
(edited by Scott Sislane 4/12/2020)
If you're driving a BMW 2002 vehicle and your speedometer is still working, but your odometer has stopped counting miles, you may be dealing with a common issue known as the 2002 odometer failure. Fortunately, several options exist to fix it without spending much money.
One option is to take it to a speedometer shop and pay between $75 and $150 for a repair. Alternatively, you can find
I am putting in an Esty carpet kit, so i figured i would take some pics along the way. any suggestions to make this process better are appreciated!
When you get the box with the kit in the mail, open it up and check out all the cool pieces.
Do not lose or misplace one and think Esty forgot to put it in the box. She didn't, you lost it.
?
I used Esty's posted instructions as a guide.
Things you need:
-the carpet
-3m super 90 spray adhesive
-set of misc clam
I've used the whole afternoon trying to restore my vent window mechanism. As you all know, the unit is sealed and generally replaced with an alternative working mechanism when it stops working or become harder and harder to turn. I had 6 pairs of these in my spare part stash so decided to pickup the worst and try to refurbish it. This method worked for me and made the mechanism movement feel like new. You're welcome to follow this process if you decide to refurbish your window vent mechanism. Pl
The task of refurbishing a BMW 2002 heater box may be intimidating for the newbie, but is well within reach of almost anyone willing to put the effort into the job. Because this refurbishment procedure includes work with potentially dangerous materials, parts, and tools, many of which could cause personal injury to you or a helper, as a prerequisite to doing this job you should be familiar with basic car repair and use of tools and workshop equipment. If you have any doubt about the meaning of,
Yesterday I did one of the most fun and rewarding little projects recently on our 1973 tii. The two lower passenger door "chrome" strips were pretty beaten up with a peeling finish and bare spots. We acquired a roll of Blick Metallic Film Tape Silver a few months ago, and I procrastinated on trying it out for several reasons. Most importantly, our car is very original, and I didn't want to do anything to detract from that. I checked with Maximilian and W&N to see if anyone had a replacem
I had seen this idea mentioned somewhere but never saw anyone try it. It works!
So the 50 year old hard and crunchy gummihaar seat pads in our cars just turn to brown dust and slowly disappear. While new FRONT seat backs and bottoms are available ($$$) we have not had rear seat ones forever. Working off the knowledge that other manufacturers also used the product opens up new possibilities. So the vintage VW folks have gummihaar pads available and at a reasonable cost — hummm…
I have gone through a few heater valves. guts break, replace whole valve with another used valve, repeat. enough.
this time i bought a rebuild kit from BLUNTTECH. why buy a new valve when the brass part does not wear out, the kit includes EVERYTHING but the brass shell. rebuild is a VERY simple process.
so what do you need for this job?
old valve
rebuild kit
flat blade screwdriver
phillips head screw driver
7mm wrench
small pick
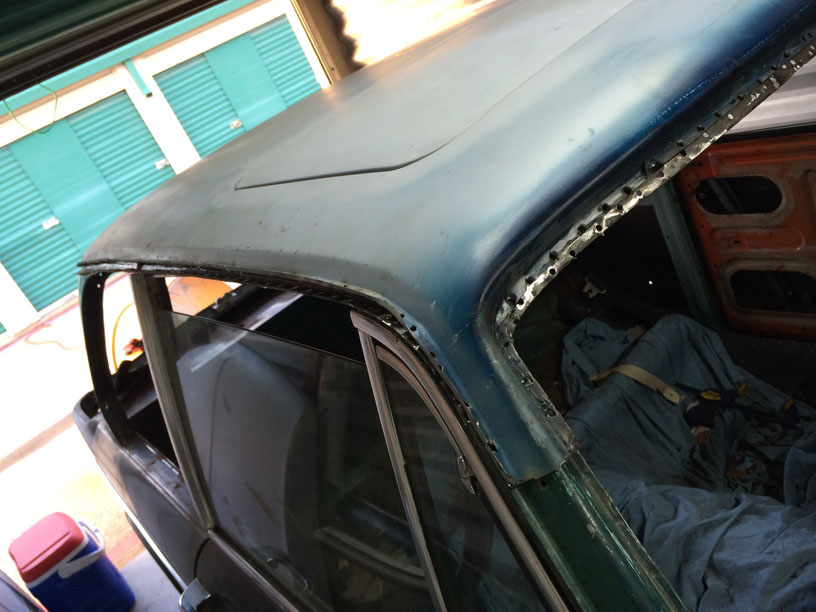
So after a lot of reading how to tackle the new seals for the quarter glass seals, it is clear some lubricant is needed. So today was the big day, new seals are going in. I read about Dawn, water, silicone and other recommendations for lube. Unfortunately all of those have some downsides. Dawn will be leaching out for months or years. Silicone, great stuff, just not for seals, let alone the permanent contamination, let’s hope you will never be doing any paint work. What I found is industrial KY
Having recently completed my air conditioning system, i thought i would layout what it takes to install your own modern air conditioning system. Air conditioning is one of those mysterious things that everyone is afraid of when in actuality its not much more complicated that the coolant system on an M10. There is a liquid that gets pumped around a sealed system and as it expands it cools and then we compress it again through the compressor, lower its temperature though the condenser and then rep
Found yourself with rotting, crumbling door cards like this? Is the vinyl still nice and supple, and you are struggling with the idea of spending hundreds of monies on replacement look alike cards? Welp, here is a quick tutorial on replacing just the cardboard in your door cards with the Ireland Motorsports aluminum door cards.
Found here: https://www.iemotorsport.com/product/aluminum-door-cards-front-2002/
These cost $155 for both front cards...plus shipping of course.
How many of you out there have experienced a bent door panel or dinged up door moulding because the door doesn't stop when opened? Another annoying thing is the loud popping noise when you try closing the door after. Many of you have most likely experienced this, which is caused by a broken door check/stopper or the U-bracket at the A-pillar.
However, the door check/stopper can be easily replaced - The part is still available, but the U-shaped bracket is another story. It's not easy
Parts:
Windshield Seals
Front - p/n 51317440154
Rear - p/n 51311817764
2 X Lockstrips - p/n 51311803265
2 X Lockstrip Cup p/n 51317440106
Materials:
Clear Silicone Caulk
Spray Bottle of Soapy Water
25 ft. of 3/16” Cotton Rope
Masking Tape
Tools:
Caulk Gun
Small Flathead Screwdriver
Lockstrip Tool (I used this one from Aegis Tools.) Apparently, AEGIS Tools no longer sells the roller lockstrip tool. You can get it here now: https://www.hitechglazing.com/product/278100
So as many of us face with old cars , some parts no longer exist or are just crazy expensive. This is one solution that I think may be helpful to some of the folks trying to keep our 02 alive, and how to install a a non factory part gasket into the rear taillight bezel.
Remove the old "crusty " one, now is a good time to get the bezel on the buffing wheel.
Sure most of the 40 year old gaskets look like this, if even there
From McMast
The BMW 2002 sunroof models enjoy the perfect combination of open air and security. Designed before wind tunnels and coefficient drag ratios were considered, it was placed squarely over and *in front* of the driver's view. Peripheral vision included whatever is happening in the sky overhead as opposed to modern day sunroofs which are positioned over and slightly behind the driver due to a raked roofline. When new, the sunroof option cost an additional $276, which doesn't seem much for a car with
Door check bracket OEM style - Version 2
A little over a year ago, I wrote about repairing the door check/ stopper bracket repair the easy way. Since then, I’ve kept thinking about how to improve it - This time I thought about trying to make it similar to the OEM style. Our original bracket repair kit is a two piece design and externally mounted. It can be used when you have the factory bracket completely broken off or just the earpiece only. The new version is a one piece design an
If you found some rust on the body of your car, and want to both make your car look fabulous again AND prevent the rust from spreading like the cancer it is....Here ya go
Step 0: First, you gotta clean the car. Good ol'fashioned car wash. Make sure it is dry afterward.
STEP 1 - GETTING RID OF THE RUST
Depending on the depth of your rust, you may be able to start with hand-sanding, or you may have to use a dremel.
1. Use 250 grit sandpaper to sand the paint and loo
After suffering through a hot Michigan summer with a non-functioning A/C, I decided to remove the A/C hardware and build a new center console that included a fresh air vent. So far I am very happy with the result.
Here is the "Before" view, showing the non-functioning Behr A/C. Because the evaporator is so bulky, the radio needs be crammed underneath too close to the shifter. Whenever I shifted into reverse, I would inadvertently turn the radio on or off. A/C removal was the us


.thumb.jpeg.e8e85bd1a4c96006e4138946fbef9624.jpeg)


.thumb.jpg.d0a5012b4343651bde18fc9a8119c0e3.jpg)
