Blogs
Our community blogs
-

- 20
entries - 43
comments - 22538
views
Recent Entries
 Latest Entry
BMW M2 with S54 engine - As it sits
Haven't posted in a while. Thought I'd provide a pic of the car as it sits now. Drove this junk up from Texas through New Mexico, Oklahoma, Missouri (Misery), Illinois, Indiana, Ohio, to PA. Handles beautifully, not too harsh considering the suspension spring rate. The Toyo HP's performed flawlessly when I hit a snow storm on the Penna Turnpike. You may notice I lost a wiper blade and arm, also on the turnpike. If anyone has a wiper arm with the airfoil please let me know. Waiting till spring to get the seats and door cards reupholstered, but otherwise I am super happy with the car. The thing is stupid fast.
- 20
-

 Latest Entry
Head came back today.
Head just came back from the machine shop today. Bored for the 84.5mm forged piston set.
- Read more...
-
- 0 comments
-
 Latest Entry
as bought
New to me. 1975 bmw 2002.
Full 320 is swap. Motor, Tranny, LSD and recaro seats from an e21.
1.8l M10 Factory remanufactured motor with approx 20k
5- speed upgrade with UUC short shift kit
lightweight aluminum flywheel
rebuilt 32/36 with sync link, rejected by patrick at midnight motorsports
polished valve cover
electric fan
stainless steel header
5mm plug wires
e30 m3 starter
e30 alternator
new transmission mount
lsd rear diff
new ball joints
steel braided brake lines
elegant supply upper strut bars, front and rear
bilstein sport struts and shocks
h and r rear springs
15x7 and 15x8.5 alpina reps
rear battery
front and rear euro bumpers
italian front turn signals
new world upholstery kit
momo prototipo steering wheel
volvo big brake kit, midnight motorsport install cross-drilled
320i radiator upgrade
vintage hello 160 lights
bosch spark
dyna mat floors and doors
urethane bushings in front
fuel line rerouted outside car
all lights and blinkers work
stern with bluetooth and rear speakers
5 series cup holder installed
recaro front seats 9 out of 10 condition
rear seats have been swapped to 635csi bucket seats with custom parcel shelf
coco mats front and rear
-
 Latest Entry
Starting post
It's been a while since I've posted but I'm back and working on the old girl. Finished the headliner, horn, passenger window, and quarter window installation. Took some pictures of what's under the car. Sorry to everyone asking for updates. This project had taken a backseat and I've recently picked it back up. Bonus pic of my dd and the bimmer in the background.
- Read more...
-
- 0 comments
-
- 3
entries - 1
comment - 1030
views
Recent Entries
 Latest Entry
It's a 1802 automatic and it flies !!!
This thing flies when you floor it and with the 4.11 diff. it leaves new cars way behind but ... i think i do 4mpg ... lol
I replaced the one barel pdsi solex that i had from a 2002 engine cause the jets were not matching and made a mess somehow ...
The engine is smooth, idle is perfect , it only drinks too much ... , maybe the electric fuel pump has anything to do with it or it's just the wrong jets ?
32 liters - 117 km ...- Read more...
-
- 0 comments
- 3
-
 Latest Entry
Fuel injection for the Win!!!
**I DID NOT PAINT IT OLIVE DRAB GREEN THE PREVIOUS OWNER DID**
I just completed my fuel injection today!! This should have been my first upgrade. Ive been slowly collecting everything and the weather was in the 50s today which for spokane is unheard of, it should be in the 20s. I chose the lh2.2 because it was cheap and simple. Wiring makes my head hurt just thinking about it, so the plug and play-ness was quite appealing. not counting the battery relocation, it took me about 6 hours for everything. I scored big time on a throttle cable bracket which seemed like it was going to be the biggest hurdle. I got some pieces from an abandon project from Tom at 02again. the rest of it is just brake cable from the bike shop.
I relocated my battery a few weeks ago with the e30 cable, I just bought and marine battery cover for $13 from Oreilys and screwed it down. the today pulled out all the carb stuff and slapped on my 318i manifold. I had the harness all plugged in on my spare motor on my stand so I was able to extend t a couple of wires and figure out all IAC stuff. initially the car idle very very high like 2500-3500 so i figured it was vacuum leaks, spent some time figuring that out and it still idled high.. I ended up clamping some vice grips on the IAC hose to limit air flow and got the idle perfect.
Ill just upload some pictures. I know my car looks like garbage, but I wanted to make it a fun and reliable driver before worrying about cosmetics.
-
 Latest Entry
Oops I bought it.
After years of E30's (among other things), I got a line on a very well priced, running and driving 1974 2002tii. I inspected as best I could, paid the man and took her home. I'd like to bring this car up to a "solid driver" standard, which will include rust repair, a repaint, interior refresh, and addressing any mechanical issues. I'd like to keep modifications to a minimum and just enjoy the car as it was designed, but I'm sure there will be some exceptions.
My previous automotive endeavors: https://www.r3vlimited.com/board/showthread.php?t=340688
I'll be looking to you guys for some pointers / general direction on a few key items, but for now, the to-do list:
Chassis:
- Overall Panel Fitment is poor (trunk rubbing, alignment, doors don't close well). I'd like to make any adjustments prior to stripping/inspecting for rust.
- Known rust in the trunk, nose panel and driver's floorboard. I'll likely need a new panel for the floor, the trunk will need to be fabricated. The nose panel will be interesting. I believe there is some rust near the headlight buckets, but nothing external. However, the lower part of the valence does seem thoroughly done. I'd like to replace this lower section entirely with an aftermarket unit if possible, open to suggestions.
- Sunroof is very tight while moving. This will need to be resolved prior to paint/disassembly.
- Overall front panel alignment with the fenders and hood is poor. This section may need replacing, any suggestions or input is very appreciated!
- PAINT! This will include stripping numerous areas to make sure rust isn't present. PO did a good job in the fender wells and roof, but didn't address the floor or trans tunnel.
- New window seals will be needed throughout.
Interior:
- Carpet is done, needs replacing
-
Door panels have been screwed on , will need replacing as well.
- Seats should be salvageable, would like to redye to a single black color.
- Console was made by the PO, would like to find an OE solution or delete entirely.
- New steering wheel will be needed.
- Dash is cracked, will need replacing or mending.
- HVAC is missing/nonfunctional? Need to investigate.
Mechanical:
- KFish is contributing to a pretty consistent stutter under high load. Need to investigate.
- Distributor may not be original, any hints folks?
- Fuel Gauge is not operating. Possible grounding/wiring issues throughout the car.
I've seen folks around here save much rougher cars than this one, it just seems to have too much potential to throw away. BMW Archives confirmed it as an original tii based on the VIN. The original color was Turkis, that's what it will go back to. Engine bay/trunk/undercarriage/floor will all get POR15'd and remain black.
Outside of the bodywork, my main dilemma is with the tii mechanical injection system. If this miss proves to be something that requires serious effort / $$$, how much will I hurt the cars value by going to a nicely implemented aftermarket EFI system (i.e. megasquirt) and a set of ITB's? Are tii's worthless without the KFish system? How original should I stay given that this won't be a rotisserie restoration? Looking forward to hearing your thoughts.
As she sits;
-
- 2
entries - 1
comment - 1411
views
Recent Entries
 Latest Entry
Metal fab and rust
Here we cut out all the rust to get ready to build our trans tunnel, and rear trunk floor with diff mount....
After firewall is built, we will install motor so its running and driving to make sure if we have to add anymore brackets we are doing so before paint...The cars body will also be stripped down to bare metal to make sure no hidden rust holes are found.
- 2
-
Latest Entry
Starting to strip vehicle down
Here what we would do is fully strip vehicle down to bare chassis and have it stripped down to bare metal to see if any spots need to be addressed. So far its looking like front fenders, and rockers, and rear lower quarters...But overall for a Michigan car that was parked in a bar and garage most its life the floors are solid!
-
 Latest Entry
1975 Baur Build
1975 2002 Baur Build
VIN 3590497
Karossrie (Coachbuilder), Baur built 1,963 left- hand drive cabriolets, and 354 right hand drive cabriolets between the periods of July(1) 1971 – December(31) 1975. This information is according to VIN coding found on the most complete site I have come across for such information -http://bmw2002.terraweb.com.pt/producao.htm . This blog is about the restoration of my 1975 Baur built on February 21, 1975 and delivered to the UK a month later. The car retains its original Chamonix color. This specific information can be found by contacting BMW at the following email address info.grouparchiv@bmwgroup.com. As with any restoration , there are always new things to learn, and I will point out facts along the way that have challenged the process – much to do with one- off parts that are no longer available (NLA).
Pre 1971 there were a handful - (200) full cabriolets built. It was decided that a roll bar feature would increase safety in these cars, and the “Targa” was developed. Porsche had the rights to the word “Targa,” and it is used loosely to describe the Baur with the “roll bar” solid roof piece separating a lift - out front roof piece and fold – down rear flexible window piece. Baur also built the TC1, TC2/TC3 and TC4 - E21, E30 and E36, respectively, TC meaning “Top Cabriolet.” Below is a link to the support of these models – http://baurspotting.blogspot.com/.
Along the way I will give credit to those who helped with this restoration.
US parts suppliers; Lajolla Independent, http://www.bimmerdoc.com and Maxamillian Importing, http://www.bmwmobiletradition-online.com/. When buying parts through a US supplier a European Title is required in order to purchase two of any one part in a year’s time. This can slow the parts procurement process. Parts suppliers in Europe used for this restoration include; Jaymic Limited, http://www.jaymic.com, and Wallothnesch, https://www.wallothnesch.com/e/frameoffer.htm.
Chrome pieces requiring straightening, re-anodizing, or polishing, and ceramic coating services were provided by “Finish Line Coating” in Portland, OR. www.finishlinecoatings.com.
The Baur is about 1 ½” shorter, not in wheel base, but in height - 53.54 in. vs 55 ½” in. All other dimensions appear to be the same. The weight is about 160lbs heavier than a standard 2002 due to added structural reinforcing in the rear floor area between B pillars. The Baurs had unique one-off details that set them apart: smaller windshield size with a two piece rigid stainless steel locking strip, inoperable front wing windows, vinyl clad 1/4 window latches with a screw mechanism vs a flip latch, latches associated with the removable top and retractable rear top, including numerous seals, and riveted on stainless steel rain gutters are several notable differences. The B pillar trim and rear ¼ window hinges are shorter by 1 ½” as noted above. Neither are available, so carefully modification of standard 02 parts is required. And, as you might guess, all door seals and ¼ window seals are different and long gone NLA. I was lucky to source both from Carl Nelson at La Jolla Independent who has the only other Baur I have seen in person. The gas tank is noted as 11 gal where a standard 02 is noted at 12.1gal although there is no difference in fitment. The gauge cluster reads kilometers per hour as expected and came standard with a clock instead of a tachometer as a factory upgrade. Rear seat belts were also a factory upgrade. The original engine was an 89mm piston, 1990cc M-10. I can’t find any mention of a Baur as a tii or ti. However, I have seen dual side draft installations. My intentions are to create a pseudo ti car with tii struts and brakes and a rebuilt M10 engine with dual 40 DCOE side drafts and a ti (4) port air Alpina box.
Our 1600, 2002, and E9 BMW’s are susceptible to rust as we all know. Baurs are no different. Any time water is invited into the body as like in internal draining doors, rust will present itself. The Baurs have a nice open well where the rear retractable window stores that provides a good place for moisture to find its way through and un-perfect rear sealing arrangement. This car had its share of rust issues. The body work was expertly repaired by Coupe King in Long Beach, CA. There are several images of the extensive repair work on their web site, http://www.coupeking.com/. The car sat in Coupe King’s shop for a dozen years or more before I started my search for a Baur project. They are professionals to the nth degree, and I knew this would be a sound starting point. I purchased the car from Coupe King in February 2015.
The car was stripped to the bare minimum and rotisserie painted with the original Chamonix and a durable multi coat undercoating.
The car came to me as a shell with a truck load of original parts. The build began with disassembly of the front and rear suspension parts. The only thing(s) saved for reuse were the front sub frame, pitman arms, tension struts, steering box, and rear sub frame, trailing arms and axle shafts. After cleaning and powder coating, the front suspension was rebuilt with all new parts and cad plated hardware unless otherwise noted including: used tii struts, rebuilt tii brake calipers, bearings, resurfaced tii rotors/hubs, rebuilt steering box, brake backing plates, control arms, tie rods, etc etc. All rubber was replaced including upper strut bearings with .5 deg negative camber plates. To finish off the front end, Eibach Springs, HD Bilsteins, and a 19mm sway bar from Jaymic were added.
The OEM fire wall insulation is cumbersome, so a custom piece was provided by Coupe King along with a complete set of custom-formed brake lines. For those of us who have “bent” our own brake lines – it is a chore…
The European car front light buckets and lenses are quite different from the US reflector plate drop-in adjustable H4 Hellas. To make things more confusing, several versions of the European lights were provided over the years. Sourcing these is not easy but a true Euro restoration requires such detail. If you look closely in the images below, my Euro front lights are not installed but have been sourced – thank you Carl Nelson, - and are being restored.
The rear suspension build is quite straight forward – bearings, bushings, rebuilt axle shafts, all cad - plated hardware, Eibachs, Bilsteins, and all new rubber to finish it off. The original 3.64:1 diff has been retained.
She is a “roller” now and onto other tasks like rebuilding the heater plenum box and components, a re-soldered and pressure tested heater core, reinforced valve purchase, lubricated Bowden cables, etc. Thanks to help from faq contributor Auto Dynamik in San Francisco. The next task is sorting the wiring harnesses - checking every wire and making repairs as needed - tedious but necessary and a great lesson on what goes where. Not all harnesses are the same, and not all 12 fuse boxes are the same, i.e. model 71 vs model 73. The electrical portion of the renovation takes lots of quiet time to sort out unless this is your day job – which it is not for me!
The Baur came to me without an engine or drive train, so I set off to source an M10 engine. Only days into my search I found a donor car from NW European Auto Works in Bellingham, WA. It was a 74 tii that had sat in a field for almost a decade and in the rainy northwest was in bad shape but traded to Ron for repair work on another German car. The price was right although I didn’t really want an entire car which is the way it was offered. It was a quick trip to Bellingham and back with a donor on a trailer. I set about pulling out the motor, transmission, etc.
With the engine out and off to C and D Engine Performance www.CDEngines.com for rebuilding, I continued with the restoration in my cramped garage.
The next long-lead item is a European dashboard. The Euro dashes do not have the “fasten seat belt” telltale on the upper dash. In the US I have found them difficult to find. However, I was connected through faq to a great resource in Denmark who was in search of some parts I was able to provide; and, in return, he had a very good two-piece dash from a tii. A tii dash with clock is not correct for a Baur but given the scarcity of Euro dashes I made the purchase and sent it off to Just Dashes for recovering - http://www.justdashes.com/. The dash came back looking factory new. The recovering work was excellent. Now with a gauge cluster with a tachometer, a clock seems reasonable and adds a bit or recognizable character.
The engine build came to a screeching halt with a cracked block from the donor tii. Back to square one and the need to source another M10 short block. One phone call to my friend Mike O’Hara at Mike O’Hara BMW Service in Portland, and I was back in business – a 74 tii long block and a 74 short block.
The engine is in its final stages of assembly and will be installed by Race Craft in Woodenville, WA. http://racecraftnw.com/.
The car is meant to be a street car for limited use, but a 292deg. reground cam from Ireland Engineering http://www.bmw2002.com/ in a ported E12 head with 100% replacement valve train parts, 40 DCOE Weber side drafts, and 1mm oversized K & N pistons with about a 9.5:1 compression ratio will give the Baur a sporty punch on a Sunday drive. Add a balanced 228mm flywheel/clutch assembly, and we have a tidy power plant.
During the protracted engine build I decided to complete the interior work. The removable hard top that came with the car looked to be in decent shape. The retractable rear section needed to be replaced entirely. The retractable frame went to the powder coater while Jaymic in The UK ordered a new top from BMW. It is very surprising that these are (were) still available. The hard top is NLA with a delivery date from BMW of July, 2017. The date came and went with no new production, so it was time to rebuild the original top. Fortunately I found All City Convertibles in Kirkland, WA. https://www.allcityconvertible.com/. They provide expert work with years of classic car upholstery repair and installation experience. New German wool loop carpets were sourced from Europe. There is no substitute for properly cut, marked, and hemmed with proper vinyl trim pieces, than carpets from Jaymic. The carpet install was painless – the hard targa top restoration was a different story. Once the damaged top covering material was removed, it was clear the top had likely flown off the car and was tweaked out of square and had been poorly repaired with epoxy filler among other things. All City did a fine job, given their starting point, with resurrecting the top - requiring removing the old repair material and properly bringing the shape back to true form. Recovering the outside and re-stitching a new underside headliner to match the pleated original completed the job. The original seal along three sides of the top had to be reused and is NLA. The rear seal is still in production but chrome latches and other joining pieces and NLA and had to be rechromed and polished.
This blog will be amended once I have more to share. Thanks for taking the time to read this. If you have a particular interest in any part of the article I can be reached best by email
-
- 4
entries - 8
comments - 2240
views
Recent Entries
 Latest Entry
Seats and seatbelts
While not currently a well "handling" car, that is one of the eventual goals. At some point fairly soon, I'll see new wheels and tires, stage 1 or likely 2 kit from IE and upgraded brakes. For now, the stock seats and seatbelts left something to be desired. The vinyl on the fronts had been redone at some point, so they were really clean, but the hinges on the driver seat aren't great, the back seat was original and in very rough shape (especially inside it), and the seatbelt retracting mechanisms were completely shot. I had read that lots of seat upgrades go toward Recaro seats with increased side bolstering. I found an automotive upholstery place here in Seattle that had a bunch of seats up front, and while the Recaro seemed nice, I chose a ProCar seat that has great support, but was smaller overall and looked a little more "period correct", although looking correct isn't my top priority. I also bought all new seat belts from @bluedevils here on the forum and they seem to be working great so far! I also had the upholstery place install the 3 point belts in back while they had the seats out. The driver seat had to be sent back (they shipped one without a head rest), so here is the current state which shows both old and new seats.

- Read more...
-
- 0 comments
- 4
-
 Latest Entry
Interior stripped, treated and coated
I was able to make some progress on the interior today. Got the rest of the floorpans striped and inspected for rust then treated and sealed. Driver floorpan left untouched as it will be completely replaced when it goes to paint.
The exposed wiring above is the custom wiring harness that in progress.
Until next time
-Tyler
-
 Latest Entry
Update November 2017
Since my last entry in this build blog a considerable amount of Life has happened. One, I purchased the house across the street from the one I was renting here in Texas,Second, the day after we closed on the house my better 3/4 and I had our second child(a healthy baby girl), and third a major hail storm .Although this has not stopped the progress on Doug's car, to start had to partially reassemble the car to move it After which I proceeded to buy a used rusted out e30 318i for parts and stripped it in my driveway. I gave the shell away to a friend who made into a Max Max style vehicle (more on this and pics soon). In March of this after the family and I were getting settled and dealing with the Hail damage on the house and cars, I had a few friends over to help get the car the rest of the way stripped and get it in the driveway to pressure wash it inside and out ( no pics sorry). Last month I took to removing all the sound deadening inside to see the extent of the rust that occurred due to water/spilled brake fluid intrusion from the cowl area. The good news is the rust is only on the surface and should be easy to clean up. During the Thanksgiving holiday while on Craigslist, I found a deal to good to pass up, so now Doug's car has a older (71) box flared brother. The actual need for the vehicle was like another hole in my head but with 2 sets of Panasport rims, Brembo brakes,M42 swap, roll cage,fuel cell, and a NASA log book who could say no.(Again I have the most understanding wife ever.) I plan on finishing the rest of the tar and adhesive removal tomorrow, and should have the all the rust reformed and POR 15-ed by Mid December. I intend to make this Blog more regular and hope to include some time lapse video links to YouTube to keep all updated. If anyone has questions, comments, advice or wants to help please let me know.
- Read more...
-
- 0 comments
-
- 8
entries - 6
comments - 2742
views
Recent Entries
- 8
-
- 18
entries - 22
comments - 6813
views
Recent Entries
 Latest Entry
More Fab Work / Big bars, more interior work
Over the last few weeks Ive been driving Meintii everyday! As of today Ive put about 450 miles on her. Im trying to drive as much as possible to prepare for a cannonball run style rally/race Im participating in GA in 2 WEEKS! Im driving there, 1000 Miles each way, PLUS the race which is about 400 miles, PLUS driving around after the race at the beach! Should be an epic trip, however I am feeling the pressure to get the car ready in time.
Attached pictures show - My 3d-printed center console face, covered in brushed metallic vinyl. I shortened my handbrake by 4"s to allow for my custom center console made by @esty to fit without clearance issues. I should be installing that soon! More interior work continues with sounds insulation installed on both doors, along with the door panels installed as well. Hopefully carpet will go in this weekend along with the passenger seat!
Pictured - Comparison shot of old tii rear bar and the IE bar I installed last night. Biiiiig difference! I already had the BIG IE bar up front, car feels waaaay better with both on now
Im still having cooling system woahs, the cap on my plastic coolant reservoir continues to leak when the car is hot - Ive replaced the cap and the RES with new bmw parts, they still leak. Im over it, bought a JOES racing reservoir and a couple different PSI caps, that should solve my issue, plus it will look real racey
This week/end plans are to install carpet, passenger seat, finish wire looming under dash, mount console face in console if its arrived. Change coolant reservoir, verify issue is gone. Possibly change rear subframe/trailer arm bushings to urethane. Hammer out dent in fuel tank to regain proper pick up and fuel range for road trip/race. Finish wrapping turbo spoiler, trim fender flares and mount it!
Stay tuned folks! Im trying to get back in the habbit of taking more pictures
- 18
-
- 4
entries - 3
comments - 2946
views
Recent Entries
 Latest Entry
It Fired, not Fried!
So, enough time had passed. The new garage didn't have anything urgent to do, house siding was done, no circle track racing to help with, and nothing else had broken, so it was time to fire up this lump that I've been hanging cords on for the last year.
Ran some fuel lines for return from the pressure regulator, and one for pickup.
Tried using my old tii fuel pump. Stuffed the hoses in a jerry can, cycled the power a couple times until the pump changed noise (loaded up), went to get my fire extinguisher , turned around and there was a puddle of fuel on the ground. Not much, maybe a foot across, but damn, I wanted to fire this up. Upon closer inspection, it was coming from behind the wiring plugs. Not today.
A quick trip to rock auto (ask me later how much it hurts going to local parts stores for generic parts) and a 3 bar 044 type pump was on its way. Time to wait.
Once it arrive, hooked it up, and no fuel made it to the floor. Checked some settings I did quite a few months before, entered the license key into TunerStudio (I bought the copy so I could use the auto tunes), and finally hit the starter button. Lots of cranking, and could tell it was trying to fire but never really did.
On a whim, since I wasn't sure I had tuned it right, I put my thumb over the Idle Control Valve inlet. It was sucking lots of air while cranking. A few more pops from the exhaust.
These were the original injectors from the 318 (15 lbs I found out later) and hadn't been used in who knows how long.
A few more pops, and it took off. I had to play with covering the ICV to keep it running. I ended up swapping it out for a different style (I may still revert), which required some more playing to get it to close (which it really doesn't ever seem to seal completely). I was, at that time, still running the original B&G 2.9 firmware, so the options for testing the ICV were a bit primitive, but it ran, and I ran through warmup enrichment auto tune a couple of times, which showed a small leak in the rad, which I expected from some seeping that showed it self earlier.
I had kind of decided that I am going to use a set of Motorcycle throttle bodies, and the MSExtra code has provisions for ITBs, so I decided to upgrade the firmware now. TunerStudio connected to MSExtra has better testing for ICVs. Most of the the other benefits require rewring/mods to the MS unit, but I don't think I'll need them for this little M10 (sequential fuel injectors, coil on plug, etc).
I re-set up everything (which worked better than expected). Tuner Studio had done a major upgrade(2.x to 3.0), and 'moved everything', and the interface changed when you switch from the B&G code to the MSExtra. A couple of runs through the Warm up Enrichment, some VE tuning, and it's not too bad now. I had the VE tables way to low, so the auto tune couldn't do its thing (Air/Fuel very lean), initially, so I bumped them up and it got it close enough it could do its magic.
I'll try to get a video of it running soon.
I've got a set of 2000 GSXR 750 itbs ordered from Ebay, so I'll have to build a manifold. Since the GSXR has 80mm cylinder spacing, and the M10 has 100mm, some creativity will have to occur. I'm not sure if I'm going to split them (they are 2 sets of 2 itbs), which would require fabricating a fuel rail, or just leave them and offset # 1 & 4 30mm with 2 &3 10mm.... Half the runners longer than the other is like a dual plane manifold right?
Lots of options.
It may be time to look for a slightly larger cam, so I can work with the flexibility that the megasquirt provides.
Did I mention I may skip putting this in my tii while I rebuild that, and just build a Locost using this motor, so have something more fun to drive than a TDI while I redo the tii? Who knows what will happen....
If you've made it this far, congrats, this is a rambling mess
Thanks for listening.
p.s. the look of the setup didn't change much, so no new pictures are required
- Read more...
-
- 0 comments
- 4
-
- 3
entries - 14
comments - 1510
views
Recent Entries
 Latest Entry
Summer has come and gone...
Like everyone else, Summer was a busy time for me. I was in 7 weddings, I know, ridiculous. It left me with limited garage weekends and even less time to post any progress reports. I also work for a small restaurant company and we opened 2 new stores this Summer, again detracting from my garage time. But I got a fair bit done. Still in tear-down mode. Lots of little odds and ends came off. Both headlights and front grills, tail lights, doors, most of the glass, exhaust, some miscellaneous engine components (intake and carb mostly) and I've almost got the entire rear end out.
The prop shaft will not budge at all, which means some of the bolts on the diff and the trans are just a pain to get to. I'm thinking either the engine or the diff is seized up, or both, or I'm just a nancy. But once the prop shaft is out I will be able to remove the rear subframe/diff/axle assembly and the rest of the engine bay electrical and the steering components and hopefully drop the entire front subframe as well. The dash and a little bit of stubborn sound-deadening material is about all that's left in the interior. Unfortunately, I found that the passenger floor is also swiss cheese so that will need to be cut out and replaced just like the driver's side.
Here's some pics for those interested in the carnage.
- Read more...
-
- 0 comments
- 3
-
 Latest Entry
Found in Idaho
- Read more...
-
- 0 comments
-
- 4
entries - 7
comments - 4755
views
Recent Entries
 Latest Entry
The Build Rules
As I mentioned before, the goal of this build is to build a car that meets the regulations of group 5 while implementing modern technology to make it faster. A set of the rules is located at https://argent.fia.com/web/fia-public.nsf/whistj?open . The specific rules im following are the 1976 versions since that is the year of my car. I will cover in brief the simplified versions of the rules as i have read them. I would ask if you have time please read them as well to make sure i haven't misinterpreted anything.
The Main rules are in articles 268 and 269
Part A states the minimum acceptable weights as a dry weight(actually at end of race but lets add a safety factor)
Part B ) The shape of the body must be retained but sections can be removed for weight savings. The Doors, hood and trunk may be made of different material but cannot change shape.All but windscreen material can be replaced. The Fenders are open but must retain the wheel arch shape and cover at least 180 around the tire and the full width of the tire. The interior is open but the driver should remain in the same area of the vehicle, with no sharp edges present.
Part C) The block must be same as the original vehicle with displacement open. It must also be in the same orientation as the production vehicle.
Part D) Gearbox and diff are open but should remain in same location in the vehicle
Part E) The suspension type should be the same type as the production vehicle but points can change location
Part F) Steering system is open
Part G) Widths should match chart based on displacement
Part H) Brakes are open
Part I) There must be a safety cell. It may not be in drivers compartment or engine compartment.
Part J) Aero Devices may not protrude out past the frontal projection of the car. Front splitter may not be longer than 10% of the wheelbase as measured from the furthest forward point on the original bodywork. It must also be installed below the plane of the wheel hub. The rear wing may not exceed 20% of the wheelbase as measured from the outermost part of the bodywork
There are more rules in the earlier sections regarding cage material layout and size but that's a bit too technical for this post.
Now time for me to explain the game plan. I have taken lots of inspiration from articles and pictures i have found on the internet. The most helpful was a speedhunters article on the Zakspeed Capri. It had great explanations as well as great pictures of the car less bodywork. http://www.speedhunters.com/2013/02/fire-breathing-neck-snapping-the-ultimate-capri/
Chassis - The main frame structure will rely on a 4130 Chomoly tube frame structure that will include all the major mounting points. This means both front and rear sub-frame structures disappear in order to reduce weight. Also the whole front clip will be removed. This frame structure allows for easier repair and modification to meet the needs of the car. It also increases the structural rigidity of the vehicle. This frame structure will also replace the rear of the car and provide safer mounting for the Rear wing and fuel cell.
Suspension - Both ends of the car will have the original parts replaced by custom structures in order to reduce weight and have better kinematics since point dictation is free. Both ends will receive coil-overs with external reservoirs. Hubs will be upgrades to a modern 5 lug BMW setup in order to easier obtain aftermarket big brake kits and for easier choice of rims. Rims will stay a traditional 3 piece but with turbine fans in order to aid under-body air extraction. These wheels will be complimented with modern race rubber. Steering will be converted to forward mount Rack and Pinion Setup(I work for a steering company, its easy to get a spare one)
Driveline - The Motor will stay an M10 Block but the head choice hasn't been finalized. The plan is to sleeve the engine down to 1.6 liter or a similar size that allows an already in production race piston. which will be paired to a lightweight con-rod. AS with the spirit of Group 5 the car will have a nice healthy turbo mounted to it. The goal is for around 450HP at the crank. The exhaust will have a side exit just before the passengers door. The Motor will also be equipped with a dry sump system and an external electric water pump. The Radiators will be moved rearward to in front of the rear wheels. This is because the front will have an oil cooler and intercooler. The transmission will be a 6 speed sequential that can either be set up for lever or paddle actuation. The rear differential will be from a newer BMW that can handle the power. The engine itself will be shifted back in the car balance out the weight and to reduce the rotational moment of inertia.
Aero - The front will include a larger front spliter with side shields in order to maximize the available front downforce. This will transition into 2 small tunnels that open to the suspension area. The Front fenders will vent on top and out the back and include wing elements before the wheel to produce extra downforce. The side of the car will have large sideskirts in order to minimize air bleed over. The underside will be flat bottom until after the rear diff where a diffuser will be located. The diffuser will extend past the bodywork slightly to help with downforce. The rear fenders will house the radiators so they will have a forward intake and the air will be routed to vent in conjunction with the rear wing. Extra winglets will be mounted on the fender behind the wheel as well as the lower section of the fender will be used as a smaller diffuser section. The rear wing will be mounted with large endplates and in a location as to balance out the aero. All bodywork will be replaced with fiberglass except the roof. The doors hood and trunk will only change material not shape.
Other - For safety and easy of use an airjack system will be mounted in the car. Also a fire suppression system will be mounted in the engine compartment. The dash will be replaced by a digital readout. The engine will be controlled by an aftermarket ECU from MOTEC. The race seat will be a proper FIA approved seat.
The car will most likely look like Formula SAE met Group 5 which is basically whats happening. Let me know what feedback or questions you have about my plan. I haven't covered everything and there is still plenty of time to change things.
- 4
-
- 2
entries - 0
comments - 3534
views
Recent Entries
 Latest Entry
Ordered a License Plate
Not much has happened since I bought my 2000 in July 2016. It's been under a tarp at my family's house waiting for me to retrieve it and bring it back to SF to start the teardown..hoping to make that happen this fall. I have ordered a few small things for it though... first is a new model designation badge for the trunklid. Being produced in late '66, my car originally came with the 2000 lettering above the trunklid trim line...definitely proved hard to find, but BTS Autoteile really came through:
I also just ordered a set of plates for the car. I'm still quite far from registering the car and driving it, but I wanted to be sure to get the plates I wanted:
That's all for now =)
- Read more...
-
- 0 comments
- 2
-
- 8
entries - 48
comments - 5028
views
Recent Entries
 Latest Entry
Prime Time
After all the metal work, it was time to prime!
(Note to admins and readers- I couldn't format photos on this post correctly! Any time I tried to click a photo to edit it, it brought me to new page and lost all my previous saved writing! So, sorry the photos aren't like I want them to be...)
I've used a few epoxy primers, but in terms of protection, ease of use,customer support and price, SPI's epoxy primer is easily the best for me. So I ordered some paint and prepped up the
garagespray booth. Since it is not a real spray booth, I am very dependent on the weather for being able to paint, and it just so happened that I got the perfect weekend weather-wise for using epoxy a couple of weekends ago: mid 80s during the day and mid 70s at night, low humidity and no wind.Everything went on smooth with 2 coats on everything, except for the bottom which got 3 coats. After it set for a few days, I went back with some 3M seam sealer ( photos towards the bottom ) everywhere I had welded, to make sure any pinholes would stay water tight, and then hit those areas with another light coat of primer as well.
My next step is to get it rolling so that I can move it around a bit more easily for the filler work. More on that later!
- 8
-
 Latest Entry
It Begins
Its a classic tale of a 19 year old kid buying his dream car, driving it, rebuilding the engine, and before he knows it life makes him put it all on pause. 20 years later he finally gets to start the process of bringing the car back to life. My good friend Erik agreed to partner with me on the restoration and with that we started with the first steps. Day one involved much cleaning and organizing. 60 lbs of dry ice, some popping and cracking and the floors were free from the tar paper. This trick is well worth the $150 in dry ice. As its been stated before. The more the better. Outside of the typical spots around the heater box and pedal box the floors are cleaner than we were expecting.
-
- 4
entries - 12
comments - 2811
views
Recent Entries
After getting the car back from paint, I was happy with how it turned out. My buddy who is a painted shot the car for me.
- 4
-
- 7
entries - 26
comments - 2527
views
Recent Entries
 Latest Entry
Top end rebuild done!
Well, top end rebuild done now, thanks to Mark Hutto, my great mechanic. Running very well now, but we detected still a rattle potentially in the bottom end... but that is the next chapter. Will drive for a bit to see how it goes, then determine next steps and whether a bottom end rebuild may be in my future.....
- 7
-
- 21
entries - 35
comments - 9769
views
Recent Entries
 Latest Entry
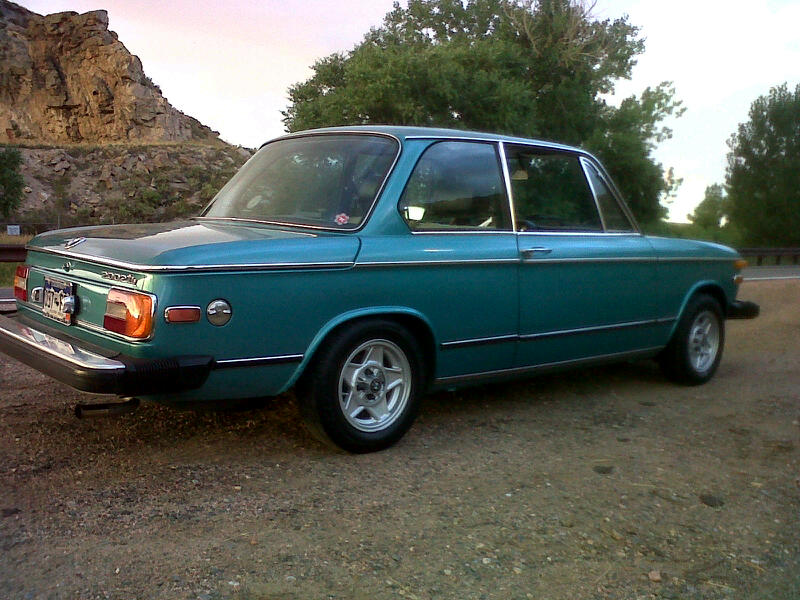
Final Entry - Off to a new home
So, a bitter sweet end to my 1975 BMW 2002 Mintgrun Lite Restoration has the car being shipped off to its new owner in Dix Hills, NY. I really enjoyed the journey and although it is not practical to own 2 2002's with a 3 car garage, I look forward to finding another car to work on. Just don't tell my wife!
I hope the new owner enjoys this car as much as did and starts a new blog on his journey.
Mark92131
- Read more...
-
- 0 comments
- 21