


jerry
-
Posts
2,986 -
Joined
-
Last visited
-
Feedback
0%
Content Type
Profiles
Articles
BMW 2002 and BMW Neue Klasse Wheels
Colors
Steering Wheels
Production Years
Models
Registry
BMW 2002 Vendors and Shops
BMW 2002 Books
The Hack Mechanic
Forums
Blogs
Gallery
Events
Store
Books
Community Map
Videos Directory
Everything posted by jerry
-

body and interior Rare Dash Vents On Ebay
jerry replied to Chamoix's topic in BMW 2002 and other '02
-
steering and suspension Cr Steering Box Worm Gears
jerry replied to pehlivanov_tii's topic in BMW 2002 and other '02
i posted photos several years ago in the FAQ Construction forum clicky here: http://www.bmw2002faq.com/topic/49431-front-end-rr-steering-and-suspension/ scroll down a little for the appropriate photos -
wow, that looks fast, but really, ..... driving like that on a public road with other cars nearby, i'd probably be giving him a one-finger salute. i do appreciate his lack of concern for potential decimation of his very valuable toy. sounds good too.
-
tires and wheels New Tii Alloy Wheel Center Caps Any Interest ?
jerry replied to LimeySteve's topic in BMW 2002 and other '02
center caps for Borrani steelies would be a nice item..... hint hint... -
other A Beautiful Day For The Show In Brisbane
jerry replied to Grover's topic in BMW 2002 and other '02
it was great to run into you today tom. your workmanship is top shelf. i was too busy socializing and forgot to take photos.... thanks to all for putting this on again. i look forward to next year. -
other Does The Budget "driver" 2002 Exist Anymore?
jerry replied to Matt_P's topic in BMW 2002 and other '02
As recently as 5 years ago, 02's could be had for under $800 in runable condion here in the SF Bay Area. Unfortunately, at the time, i had more yardspace and as a consequence, i didn't realize that i had acquired more dead 02's than any amateur should have. it caused me to sell off 2 of my better cars because i wanted to reduce the herd. even with hoarding parts over the years, there's just no substitute for new rubber to keep rainwater out of the cabin. The cost to do that in and of itself has made it more challenging to rehab these cars on a shoestring. it helps if they will never be exposed to wet weather. I'm currently driving a 6-fuse car that i got with a dead engine, but otherwise intact for $200 about 8 years ago. i've done all my own work including rust repair, and i am a big proponent of inspecting used parts for serviceability and reinstalling if appropriate. I have spent more money on door weatherstripping than i paid for the entire car. the car looks like hell, but is pretty good mechanically and is my daily driver now that my former non-bmw DD died a couple months ago. to move past its current condition would require several thousand dollars of parts and paintwork. -
electrical and ignition Proper Use Of Dielectric Grease?
jerry replied to SallyBernard's topic in BMW 2002 and other '02
this may not be a direct answer to your question, but, i only use dielectric grease on terminal ends of exposed wires subject to exposure and/or moisture, such as grounds, fuse box connections (underside), tail light connections, etc. i personnally have not used it on spark plugs or associated bits. i do use never-sieze on sparkplug threads, though. and, if you're unfamiliar with the amount of torque when tightening the sparkplugs, use a torque wrench to get a feel for the proper amount of 'grunt' to use. i always fear overtorqueing and screwing up the threads on the aluminum head. -
news Welcome To The New And Improved Faq!
jerry replied to administrator's topic in BMW 2002 and other '02
I can't imagine how much work must have gone into creating this update. Thank you so much for your immense generosity. From what little i've seen, I can tell that it still retains a good deal of its intuitive nature. I've been baffled by other car forums that just don't seem easy to navigate. Although, it's probably just me... 3 cheers for a job well done.. cheer No.1 cheer No.2 and cheer No.3 -
well, i spent about an hour this afternoon finally dealing with a failing clutch. FAQ search lead me to a leaking Master or Slave cylinder. Turned out to be the Slave in my instance. Anyhow, i had a hell of a time getting a 13mm socket to the upper nut. after a fair bit of wrangling underneath using a prybar and wooden wedge i was able to push the tranny just enough to BARELY get the socket seated on the nut sufficiently to engage. i used a short segment Snap-On extension that allows the socket to slightly swivel. the slight movement was critical as i did not have a straight shot. i attached another 12-14in extension to that, upon which i installed the ratchet. my ratcheting wrench was too fat to be of any use. There is a casting boss on the 320i 5spd tranny that impedes a straight shot. if anyone can confirm that it is merely a casting boss and not an intentional feature for internal clearance then i would be tempted to grind it down abit on the next installation i do, for clearance. during installation, i installed the lower nut first to square the Slave to the tranny. then i used a small bit of tape inside the socket to hold the nut while i finagled it onto the top stud. it was a bit of an effort but it worked. Snap-On makes a C-shaped wrench that i would have tried if i had one. i tried to work from above but i found that i'd need double-jointed fingers to deal with the restricted access. My next 5spd install, i'm gonna play around with bending the tranny tunnel a little more downstream to facilitate this effort in the future. What methods/tools have others found helpful. i wanted to avoid dropping the engine or tranny and was ultimately successful.
-
thanks guys for the info. that is exactly the kind of information i was looking for. those sticky tar-wrapped stiff hoses are history. mike's comments have given me a new-found appreciation for the lowly Frigiking unit. i had always considered them 2nd rate. i'm gonna whittle it down to the three consoles and perhaps a fan.
-
for anyone who's gone through the effort to retrofit or return to service a Behr or Frigiking A/C system, what components are absolutely necessary? i have two Behr center consoles with the internals and one Frigiking center console. At one time or another, i'm sure i had the complete units, but i'm reorganizing at present and i'm sick of hanging on to the odds and end hoses, dryer canister and heat exchanger. i know the York compressor is obsolete so they were tossed awhile ago, along with the cast iron bracket (boat anchor). i'm not wedded to A/C where i live, but i'd at least like to know what to hold onto should i ever want to re-install one. and yes, i do have the tii A/C crankshaft pulley,... somewhere....
-
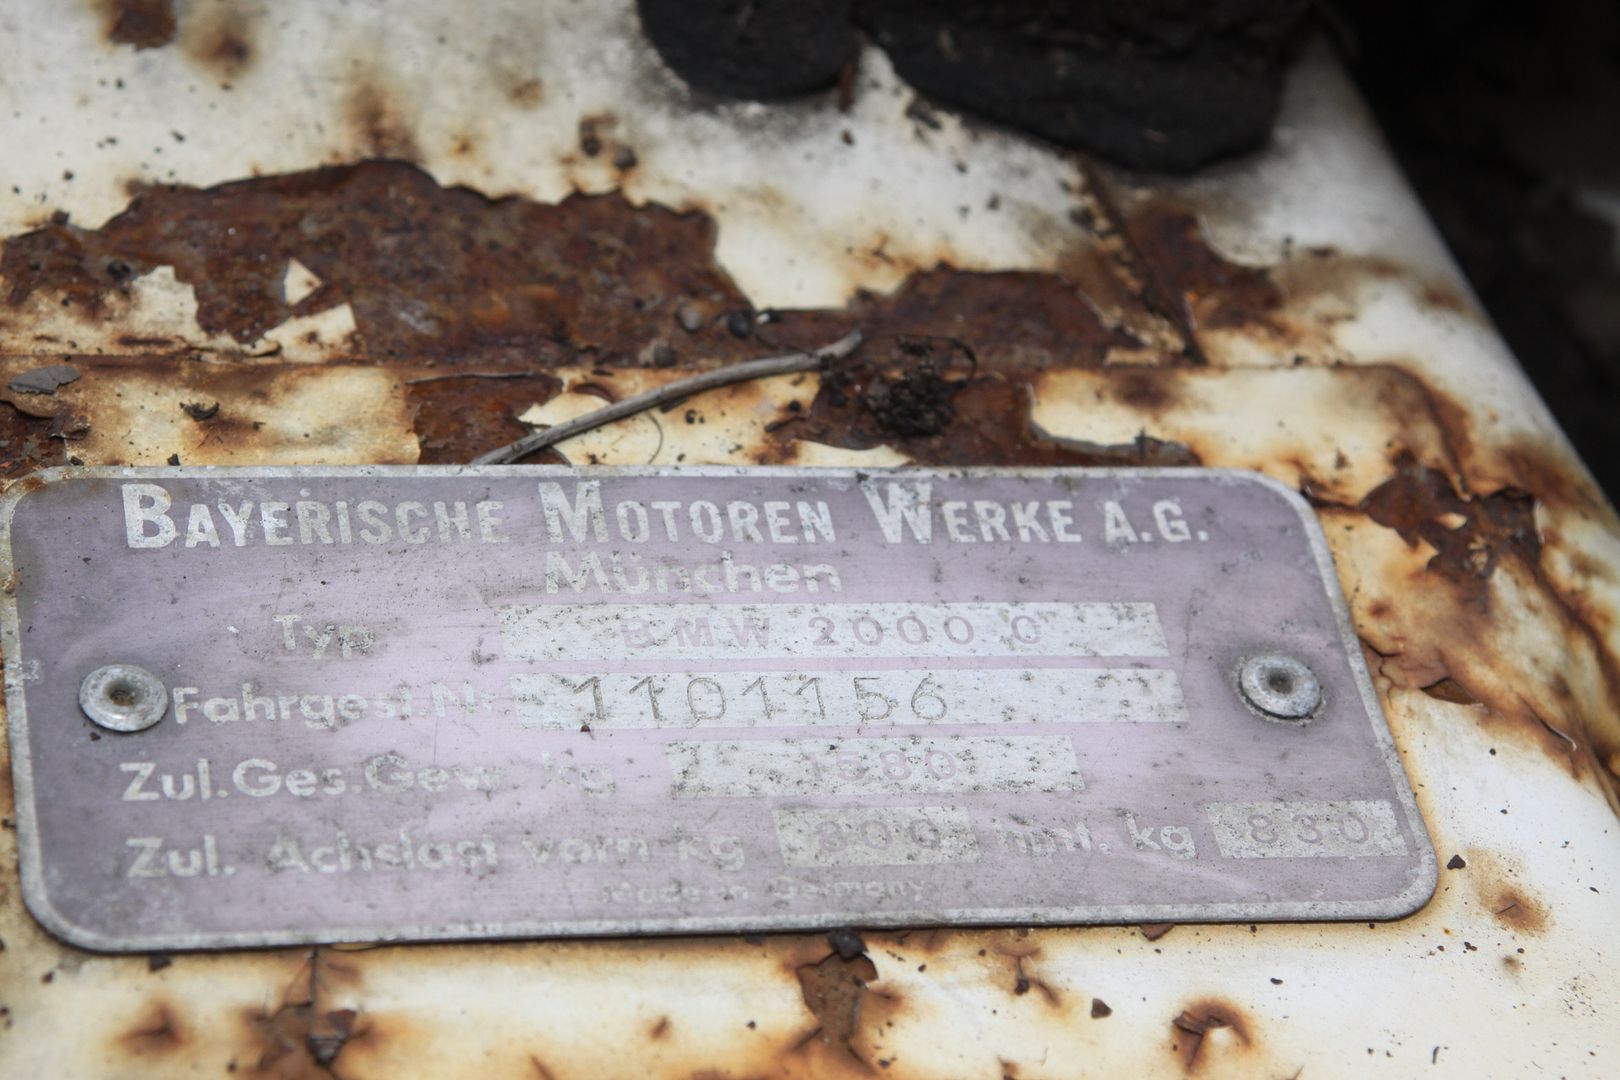 i'd like to get into the head of the person who allowed a supposedly 60K mile car deteriorate into that state. did they just pull into the garage after driving through salted roads and not even rinse it off? anyhow, i'm 2 years into an on-again, off-again major rust restoration of a 72tii that should have been allowed to return to the earth. with patience ( i mean PATIENCE and some talent), and welding ablility, i'd hazard a guess that this car could possibly see the road again. it would require a ton of work just to remove all the rusted out bolted on bits to even get to the stripped down body. looking at the underside of the trunklid did NOT look too bad. the curled up edge seams typically suffer the most with rust, but i didn't see that. sheetmetal repair to flat panels is not difficult and most of this car is relatively flat. however, it's not a ferrari or porsche or alfa so it will never recoup the time and money spent. this is a labor of love... if you could just make it structurally sound and clear-coat it it would be a fun car to drive around in. invest in a soda blaster and see what remains after an afternoon of blasting...
 -
 i'll take it if still available. shipped to CA 94920 jerryallsmanATyahooDOTcom
 -
Rear subframe mount replacement - at an impasse
jerry replied to malagalaga's topic in BMW 2002 and other '02
Whoa...... hold it just a minute. do not go wacking on the the verticle bolt (#8, IIRK). i'm assuming your car is on jack stands at this point. you want to lower the whole subframe assembly down to clear the vertical bolt. that bolt is a press fit into the car body, btw. ideally you want to lower it evenly as it will tend to bind if lowered one side at a time. you may have rust holding it from moving. i've used gentle prying to help it a little. i've never had to use heat and oil, but you might try if it's frozen. once you clear the bolt you can remove the rubber subframe mounts. forgot to mention, the weight of your differential may act as a lever arm exacerbating your attempt to clear those bolts. so just keep in mind that you want to keep the subassembly bolt hole square to No.8 Pin as you lower it. hope that makes sense. -
 brian, it's funny how that car made it back up to the Northwest, where you got it originally...
 -
finding frame rail rust under previous owners solid patches
jerry replied to skylund's topic in BMW 2002 and other '02
if the PO did a decent job of fitting and welding the patches to the rusty frame rail and it doesn't look terrible, i'd leave it alone. work extra hard to create replacement patches where needed and weld them in. i've replaced a DS frame rail. i can't see doing it with the engine and suspension in place. -
i've been playing with a 38/38 for a little while. i've got a schrick 292 and a rebuilt vacuum advance distributor installed. i had to weld a small extension to my existing choke cable and fabricate a small bracket for the cable to use the manual choke feature. i'm using the stock accelerator rods, but i think the peg at the end needs to be relocated 180 degrees if i'm not mistaken, from the 32/36 useage. i've go F-50 emulsion tube 185 air corrector 142 mains 70 pump jet and i believe i'm down to 50 on the idles i'm still running rich. even so, it's a zippy car none-the-less. i think i'll try the F66's. i'm treating my 38/38 as training wheels for my set of Mikuni's...
-
i just pulled my 02 out of a winter slumber and am having an old problem again. i've got the initial tell-tale sign of melting brown wire coming off the back of the 3-prong plug of the alternator. i wrote about this last september and the consensus was a grounding issue which i thought i had resolved. well, cheapo me thought i could buy a generic beefy ground wire to connect from engine to frame rail. i have a secondary ground wire from engine block to connection point adjacent to regulator. also have a ground from alternator to upper timing belt cover. at the time of initial installation, it seemed to work, but i'm back to slow starter cranking and observed that my replaced wire is starting to melt again. i've resolved to install an OEM braided ground strap and split open the wiring loom from alt to reg to check for condition. i was thinking of replacing the regulator for good measure but was shocked to see it listed at $100+ (on sale) at Arizona Autohaus. They have an alternate brand for a third of that, but i'm unfamiliar with it. i've got to get this grounding issue resolved. it's more than just installing thick copper, i'm finding.
-
Selling some things in eBay - BMW Jerry-can and fog lights..
jerry replied to 1971Ginger's topic in Miscellaneous
 i NEED that...
 -
for a car other than a 'garage queen', i'd be hard-pressed to install $500 GLASS headlights up front, and SO vulnerable to all the rocks, pebbles and other debris normally associated with chipped and cracked windshields. it's a danger zone driving on california freeways these days...
-
i've been using a cheap $30 craftsman 4in angle grinder for straight cuts when accuracy is needed and i have the clearance. i also have an electric cutoff wheel similar to an air-powered die grinder but with a motor, made by Milwaukee and is absolutely indispensible. i use 2in cutoff wheels with it. there have been a few, rare times when i needed to get into tight cuts where i resorted to a carbide tip on the grinder and then cut to the line i needed. i ended up buying a 2nd Craftsman angle grinder because for the price of the wire wheel that i wanted to replace, just $10 more and i got the wire wheel and a 2nd grinder. now i don't have to interchange blade, grinder disks and wire wheels as much. a plasma cutter is absolutely overkill and i Never use a sawzall on work i care about. a sawzall is used only for retrieving body panels from dead cars.
-
engine and drivetrain battery relocation cable too short
jerry replied to 02dag's topic in BMW 2002 and other '02
i've got two installations under my belt. i go down the driver's side and up over the wheel well like the factory loom. i mount the junction box to the firewall above the brake booster. i do recall having to ensure that i didn't waste any length this latest install; but i made it work. i don't recall having to do that with my first install. therefore, it is possible that the lengths have some degree of variability... -
Don't be so sure. SEMA is based in CA as are a great many of its members. Members with money to contribute politically. I'd still contact them. No, unfortunately, gr8glfr is right.... Boxer is front and center on the "we know what's right for you...." enviro-police. There MIGHT be some wiggle room with Fienstein, but her base is the MarinCounty/San Francisco 'enlightened' folks. we troglodytes are lucky to have them in our leadership {sarcasm}...
-
why don't you do all of us a favor and just post your stuff up on ebay and then we'll all find out what your 'treasures' are worth? only you know what you are willing to let them go for. if you are worried about underselling them, then put a reserve on them. otherwise, your posting looks like an invitation, (hope) that we start a bidding effort here.
-
very nice job. i hope you get what you are looking for pricewise. i know how much work goes into merely reassembling, let alone refurbishing one of these. the only comment i have is that for these early cars, originality is key. i don't think the spiffy wheels add to the car, as far as selling goes. the interior looks good. if you could find the time to rekindle your desire for it, it would be a good thing.

