Jump to content

2002spaceodyssey

Solex
  • Posts

    75
  • Joined

  • Last visited

  • Feedback

    0%

Everything posted by 2002spaceodyssey

  1. My goal is to build a fun street car, and I recently had a completely new/upgraded drive train installed in my 2002. I set things in motion in August 2020, when I bought a used 1972 2002 motor from Kim in Herdon, VA. In September 2020 I dropped the motor off with Bruce Shelton (Automotive Enterprises in Winchester, VA) and asked him to rebuild it. I was in no hurry, and Bruce worked on the motor over the next year. He had the block machined, provided an E12 cylinder head, installed JE 9.5:1 pistons, a 292 cam, dual Weber 40 DCOEs, a Carter electric fuel pump, and a long-tube street and track step header from Rogers Tii. In September 2021, Bruce called and said the motor was done. I decided to have him install the engine along with a 185K-mile Getrag 245 5-speed that I had bought from ClayW in Silver Spring, MD. I installed an E21 3.91 Limited Slip Differential I bought from Al Taylor in 2020, put my car on a trailer, and towed it Bruce's shop. Bruce sent me some pictures as he was installing the rebuilt motor. Outside Bruce's shop. Automotive Enterprises is something of a time capsule, as it was an imported car parts business many years ago. Bruce races a Pinto in SCCA and supports the racing community at Summit Point Raceway. In April 2022, Bruce was done installing the fresh engine and doing a 5-speed conversion. I bought a driveshaft from Steve at Blunt. I brought my "new" car home. (The front air dam had to be removed to go on the trailer.) Once I got my car home, it needed some sorting. The header was hitting a castle nut on the drag link. I had to file the corner off the castle nut until it cleared. Note my washers on my drag link (or whatever it's called) have come apart almost immediately as mentioned on this site. I also had a sticking throttle, the result of rust in the tube that the gas pedal passes through. I cleaned out the gunk and installed new bushings and a new return spring...problem solved. I had to properly secure the console to the transmission tunnel as it was flopping around. The Blunt 5-speed conversion kit includes a BMW Z3 shifter. I had a list of little things that had been waiting. I installed a brand new pair of flag mirrors that I bought from W&N a couple of years ago. I made a template a drilled the door for the passenger-side mirror. I used riv-nuts to mount it, of course! I installed new door buffers and replaced some missing door handle gaskets. I put new webbing under my Recaro driver's seat. The old webbing was shot. I painted the supports behind the grille the current body color and replaced the grille "hooks" which were missing. I bought a set of underhood decals. All my original decals were painted over. My license plate light lenses and taillight lenses were old and cracked, so I installed new ones. I was doing all this work as the run-up to the Carlisle Import Show in May, but on the day of the show, the car wouldn't run right. It wouldn't idle and would eventually stall unless I kept my foot on the gas. When I tried to drive it, it stumbled and wouldn't accelerate. I guessed the problem was the old Crane XR700 ignition, so I order a new one (now FAST XR700.) Of course, once I installed it, it took a couple days of fiddling with the optical sensor before I could get it to run, but now it runs good, so the ignition was the problem. My SiennaBraun paint is showing where the old Crane unit was mounted. Well, I missed the Carlisle show, but I'll be at the Hunt Valley Cars and Coffee this summer!
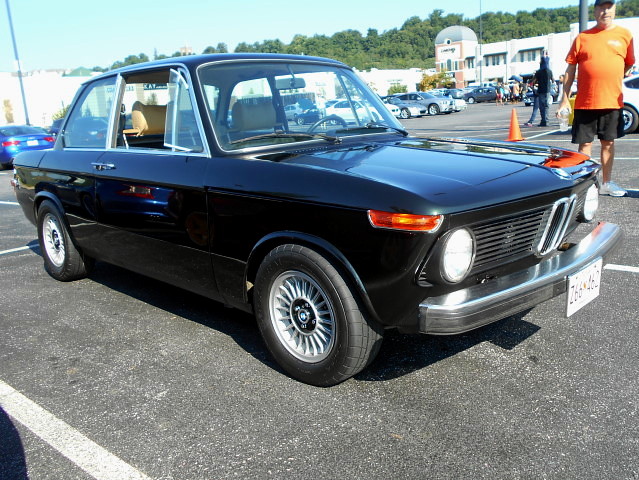
  2. I started this thread. I took my caret to a professional cleaning service, and they refused to clean it. I cleaned it myself.
  3. Steve- The exhaust system was installed on my 1974 car when I bought it. According to the decal it's an ANSA Sport system. I have nothing to compare it to, but I don't find it loud at all. I have the Mid "muffler/resonator" and the rear muffler. Obviously my car was modified to allow the center exit (brackets were welded in). Regards, Doug
  4. I asked my wife for an Ireland Engineering fiberglass rear bumper for Christmas last year. I almost changed my mind when I saw that the shipping cost from CA to MD was about $100, but I went ahead. I had already purchased Blunt's early bumper conversion brackets for my 1974 car, and I decided to use a piece of aluminum U-channel to bridge the distance between the mounts and give some structure to the installation. Being enamored with Riv-Nuts after using them to install the front air dam, I used four of them to secure the rear bumper. I was very disappointed with the fit of the bumper. The ends were nowhere close to the body. It's a shame they couldn't have made the bumper fit the 2002 body contours. Since I don't have fiberglass skills, my first idea was to trim the middle portion of the bumper so the gap would be more like the ends. I made a scribe so I could trace the body contour onto the bumper. I used a Rotozip tool to cut the bumper to a uniform distance from the car body. After the bumper was trimmed, it had a uniform (but large) gap with the car's body. When I took my car to East Coast Restorations in Finksburg, MD, the owner (Mark) said the bumper should fit flush with the car and he would cut both ends off and re-form them tight to the car. He moved the bumper forward until it fit under the small overhang on the rear valance. He then painted the bumper to match the body and filled in the stock exhaust exit, which was on the right side. As a reminder, here is what Pierre's front air dam looks like. I recently added euro front turn signals. Thanks for lookin'!
  5. I have one I'm not going to use. Sending you a PM. Doug
  6. I have a question for the collective expertise on this forum. This year I bought an E21 3.91 LSD to put in my 2002. I sent my output flanges off to IE as cores and got a pair that's drilled for 8mm hardware and spacers so I can use my recently refreshed 2002 half-shafts. Since I had the output flanges out, I decided to replace the output shaft seals. The seals were more-or-less flush with the outside of the differential case (see fist picture.) Not watching the depth, I drove the new seals in with a bearing/race driver, and they seated approx .165" deeper that the ones I took out. In the second and third pictures you can clearly see the "lip" above the seals. So, have I driven the new seals in too deep? I noticed on other BMW forums there is discussion about seal seating depth (says to mark your seals and seat new ones to the same depth), but this seems to be discussing later models/ M3s.
  7. Updating my post - Air Dam Painted. My body shop filled in the front bumper mount openings and painted my air dam to match the car (which is very dark green, not black.) I also used black button-head bolts and black stainless finish washers to mount it. I wanted to post some pictures of the finished project.
  8. Seeing as how I have 2 trailing arms in my parts stash with rusted out spring perches, I would be in the market for a pair if they were available.
  9. Yep. Both of my trailing arms were rusted out there. Steve at Blunt hooked me up with another pair that were ok.
  10. Money sent via PayPal. My address sent via PM. Did you receive everything ok? Thanks.
  11. Looking for a short, early rear bumper or an Ireland Engineering fiberglass rear bumper in the Mid Atlantic area. I'm considering painting it body color so surface rust may not be an issue. Thanks.
  12. I recently installed one of Pierre's Kamei repro air dams. I bought it a couple of years ago, and finally got my car on the road. Pierre suggested using rivnuts to install it, so I bought a tool on line. This was my first experience with rivnuts, and they worked very well. I ended up using 9 rivnuts in 6mm size. My 1974 2002 has cutouts for the big bumper brackets up front. It was suggested the air dam could cover those openings, but installing it that high made the ends come up short of the fender lips. I will have to have the openings filled and painted later. Here is what the rivnuts look like: Here is rivnut installed on a washer to show what the backside looks like once installed: This is the tool I bought - Astro Pneumatic Tool Company 1427. It worked well, no doubt because it had "Astro" in the name. I laid out the 9 holes on the air dam, and then used it as my template to drill the car's valence. Here are the rivnuts installed. I found some thin 1" wide rubber tape and used it between the fiberglass air dam and the car's paint. Pierre's air dam fit extremely well with almost no space between it and car. Once installed, the height from the ground was a uniform 6.25". I will have the air dam painted soon (right now it's in gelcoat as received.) I've also ordered some black stainless steel washers and button-head 6mm bolts. And (sigh) I live in MD so I need to figure out how to mount a front license plate. Here are some gratuitous pictures of my car with the air dam. UPDATE 31 May. I needed to install the front license plate and I found a quick-release front license plate bracket that allows the front plate to be quickly removed for car shows, cars & coffee, and track events. I settled on Big Mike's STO N SHO. They are vehicle-specific, and I looked at the designs on-line and used the 2016/17 Ford Focus RS design to mount the plate to my air dam. Here is what the installed plate mount looks like. I have read on the FAQ that the Kamei air dams came with aluminum brackets to reinforce the lower lip of the air dam. Most of the old posts I found referencing these brackets had broken photo links, so I could never see how they were installed. Given the lack of something to copy, I made my own brackets out of 1.5" wide, 1/8" thick aluminum stock. I used the bolts that mount the STO N SHO license plate mount to hold the brackets. I was going to then drill the brackets and screw them to the car's front valence, but they fit so tightly that I don't believe they need to be bolted to the car. They are quite rigid. The front plate can now removed and reinstalled in seconds without having to reach for the screwdriver! Additionally, the front air dam is very solid. You can't push the lower lip inward. Thanks for lookin'!
  13. Pete- Do you have any additional info on this motor? Was it running when pulled? Any idea on mileage? Do you think it would be a suitable core for rebuilding (both block and head?) Thanks, Doug
  14. Like Mike said, they will fit with the washers and circlips, but a large vice will help and you may have to shave a little off the urethane bushings with a razor blade to get the circlips in. I also just installed the Blunt bushings in my 1974.
  15. Can't resist piling onto this thread. I'm impressed by the quality of work done by members here. Love the gray ones, by the way. I think these subframes are way better than they were when they left the factory! Before: After:
  16. Try this useful link: Get off the bus! upgrade your '02's steering wheel. - Bay Area 02
  17. I'll take them. Sending PM. Thanks.
  18. The slide hammer got my old inserts out, This is what one looked like: The inside of my strut tubes had rust inside, and wouldn't let my Billy HD inserts go in all the way. I had to run a cylinder hone on a drill down inside the strut tubes to clean the gunk out.
  19. Pipe wrench and Mapp gas to loosen nut. Slide hammer with vice grips attached to get tube out.
×
×
  • Create New...