


StarboardM
-
Posts
18 -
Joined
-
Last visited
-
Feedback
0%
Content Type
Profiles
Articles
BMW 2002 and BMW Neue Klasse Wheels
Colors
Steering Wheels
Production Years
Models
Registry
BMW 2002 Vendors and Shops
BMW 2002 Books
The Hack Mechanic
Forums
Blogs
Gallery
Events
Store
Books
Community Map
Videos Directory
Everything posted by StarboardM
-
Fall has turned into winter, and now spring. Progress has been slow, life always gets in the way. Parts are slowly being removed, boxed and labeled. Thankfully, I have a spare "bedroom" in the basement that we use for storage. Parts of the BMW and my other project can be stored without being in the garage, which is only a single car garage. Exhaust was removed. Took a bit of fanagling to get it out of the rear suspension with the wall of the garage so close. As far as I know, this was the stock exhaust, and had quite a few holes in it from rust, and a couple dents from hitting what I assume would be speed bumps too fast. I cut the pipe in half to see what was inside, and it looked like a simple glass pack. Figured some might find it intersting. Showing the routing of the gas tank wiring. The tape is at ~3'' and 10-1/2" from the inner edge of the tank. Mmmmm, dirt! Gas tank removed. Tank looks brand new on the top, bottom has some small dents and undercoating on it, but should clean up nicely. The foam BMW used to seal the trunk and gas tank held water and grim and allowed the trunk to rust a bit. Once I removed the tank, I hit the rust with my 4.5'' grinder with a wire wheel on it, got it down to bare metal, and used some spray paint to prevent any surface rust from coming back. The car will be media blasted eventually, so the spray paint is just temporary. Close up of the rust. Looks worse than it is. I bought a air hose reel from Harbor Freight and wanted to hang it from the roof. I was attaching additional supports in the roof, when the screw bit fell. Apparently it landed tip down, right on the rear glass. POP! I swore quite a bit, and didnt step foot into the garage for awhile in disgust with what I had done. After I used the shop vac to get all the junk out of the trunk, I hit everything with a wire wheel. Looks much better, and thankfully I found nothing more than surface rust (except the spare tire well, which I think I can patch with plug welds. Got a birthday present from the parents. I actually had a Clymer book my dad bought and gave to me with the car. Unfortunately, it was in my Jeep when it was stolen from my house, and the perps decided they needed it. Glad to get a full set, should be useful when everything goes back together. My dad came out over my birthday and helped me insulate and drywall the roof of my little garage. Not the greatest job, but it helps so much when its freezing outside. Since the weather is now warm, Im hoping it keeps the heat at bay as well. Ive also installed more lighting and makes a world of difference. The pooch helping out. Removed the driveshaft, took me longer than I expected. Working alone, I had to put the car in neutral, crawl under and move the dshaft so I could reach the bolts. Crawl out, block the rear wheels, and put the car in gear, get back under the car and unbolt. And repeat eight times. Took dang near every sized wrench down there with me, and used one. Im not sure what this is called in the BMW world, but I know it as a carrier bearing in the 4x4 world. Think I can still use it? Seems to only have about an inch of play, should be fine..... right? Took the front glass out. Here is a link to show what others did. Sharp knife, and it popped right out. http://www.bmw2002faq.com/topic/151353-removing-02-windshield/ The rear glass, as mentioned before, broke, so I tried to get it out without causing as much of a mess as I could. Shop vac cleaned it off the rear deck once I did this. And the best part.....! Got the engine out. Borrowed a engine hoist, and bought a engine stand from HF. From start to finish took me about three hours. Not too shabby if I do say so myself. I ended up removing the engine by itself, and the tranny through the engine compartment. Engine hoist and wall/garage door clearance dictated this, otherwise I think I could have pulled it as an entire assembly. Working alone, it was a bit of a pain to separate the engine and tranny, but got it done. Out, waiting to be torn down. Not sure how much I will remove right now, engine will need to be rebuilt, but thats one of the final steps. Thats the latest update, the above progress has been over the last couple months. Next step is the dash and the rest of the interrior. Suspension will be the last step, need to figure out how Im going to move the body around when it goes in for blasting/paint/body work. Latest list: -Remove dash -Wiper motors -Front fenders (debating if I keep the stock ones, which are beat or find some better ones) -Doors need to be removed and gutted -Throttle linkage -Pedal box -Everything else?
-
Does the hipster style come with the car, or do I have to pay extra for it? What steering wheel is that? Just an aftermarket wheel with an Aplina sticker and M center cap?
-
Everything has already been mentioned, but as most have said, its a pretty easy task. Took me about three hours to do everything from starting to unhook hoses and such to having the engine bolted to a stand. Working in a small garage prevented me from using the engine hoist sideways, so I had to go in from the front. The legs of the hoist wouldnt fit under the lower A arms, and even with the hoist extended all the way, the hook wasnt quite centered. Also came dang close to hitting the garage door before the engine came out, but I got lucky and missed. I couldnt get the alternator out of the car with the engine still installed, so I unbolted it, and used a zip tie to hold it under the battery box. Im sure there was something I missed on that, but it worked out. The OP is just pulling the block, so it should be a snap!
-
body and interior Removing '02 Windshield
StarboardM replied to StarboardM's topic in BMW 2002 and other '02
I have JB Weld, should be fine? Its only got a little crack..... -
body and interior Removing '02 Windshield
StarboardM replied to StarboardM's topic in BMW 2002 and other '02
As you guys mentioned, a knife to the seal, and she poped out. Took about 10 minutes, including putting a new blade in the knife. Easy as pie! I was worried I might scratch something under the seal, but I took a deep breath and I did it. Cutting and pulling, combined with cracked gasket Mmmmmm, yummy. A slight push, and shes all out! Set aside, this weekends project will be a simple rack to hold all the windows until I figure out what to do with them. Oh, and here is the back window... -
I seem to have met my match on removing the front windshield The car in question is a '73 tii that sat in the California sun for 15 years. I have removed the hard "rope" as well as the chrome clip at the middle bottom. I have tried pushing on the windshield, but it does not seem to be budging. The gasket is hard as a rock, and flaked off when I removed the retainer rope thing. I would like to remove it in one piece, even though its cracked, and will most likely need to be replaced. Do I need to push harder? Feet on the inside pushing while spreading the load across as much glass as possible? Did I miss any hidden clips? I unfortunately broke the rear window and it came out in shards, but it apears to be the same style of gasket/retention system. Help!
-
If anyone needs help collecting parts they are due, I live just a couple blocks from this address. However, this address is a strip mall. Thinking he might have a PO box at the UPS Store there? Does anyone have an actual address?
-
Update 2 of the day. Took the rear bumper off. The rubber/plastic covers are sandwhiched between the body and the bumper brackets. Where we were at this point. One tail light taken out, and rear bumper off. Hood is upsidedown sitting on the roof as well as some random junk. Decided to move onto the frozen rear brakes. Years of sitting in one place was not good for the brakes, both front and rear. Spent close to an hour trying to beat the drum off, using a ton of PB Blaster, and had no movement. Then I remembered I had a air chisle. Took more time to hook the air hoses up than it did to get the drum off this time. Picture of everything together. Once that was done I went back to the rear end. Showing the plate light wiring. Close up of the detail At one point the cover on the plate light was broken or removed on the passenger side. Also noting the plug on the inside of the light. Guessing this was for the euro plates? BMW emblem Routing of the wiring Locking mechanism Wiring plug. Thicker side was to the outside of the car. Tail light wiring Gas tank. Looks brand new from this view, with no visible rust or corrosion on the interior. Bottom has minor dents from road debris. Side marker wiring. After unplugged its obvious which wire goes to which. And the filler neck. And, stripped. Need to find some boxes for storing the parts. Moved back into the interior, and pulled the rear seat back. Two phillips on the floor and the seat slides up. Took the seatbelts out as well. They will not be put back in as I will not be carrying anyone but maybe the dog in the back seat. The rear speakers look like they were hacked out with a butter knife. Wiring was run around the floor randomly. Not what I would call a quality install. And that wraps up this update. Next steps and thoughtsR Remove the exhaust and driveshaft to prep for the engine removal. Need to figure out how hard it will be to remove the tranny while in the car or if I should bring it out with the engine as one assembly. I am going to keep the car as a roller for the time being. My dad is coming out next month and help me drywall the ceiling of the garage so I will have to push the car into the alley to do so. Should allow for cooler temps in the summer and warmer in the winter. Where do I put the engine once I have pulled it? Dash removal is looming in the not too distant future, should be interesting. Working in a small garage is becoming a PITA, but not as bad as I thought it would be.
-
Ladies and germs, its been awhile since I have updated this blog with any progress. Life and lack of motivation always seems to get in the way. After a long day of work, I always seem to only have enough motivation to turn on the 'ol boob tube. As the weather has cooled off, and a coworker also trying to restore a car, I find myself getting amped up to go out to the garage. No real ground breaking work, but there is something being done. First step was removing the botom portion of back seat. The awesome blue leather hides the NASTY seat frames and deteriorated stuffiing. Found some mail from my parents that was stuffed under the seat. Baby, oh Baby! 1993 Victoria Secret catalog! Moved to the rear end, and took the spare tire out. I was worried about rust as I saw a lot of these being rusted out. Not a good sign when the nut wont come off with hand tools. PB Blaster over night seemed to have no affect so I hit it with the impact. Guess the rust was stronger than the spot welds holding the bracket on. And..... rust... Underside of the tire: [img[http://img.photobucket.com/albums/v483/StarboardM/2002/20121201_120241_zps755c5d0a.jpg[/img] Used the 4.5" grinder with a wire wheel to take as much of the rust off as possible Not bad rust, but still some holes. Will see if I can patch these with the welder, or if I will have to cut it out and replace with new.
-
Couple people have already posted what I was thinking of doing when the time came. Im sure most have seen the new A8s running around that have the 3rd light at the top of the window: Im sure the engineers did this for the same reason others have stated, new cars are so high they are often missed over the hood. I was thinking of doing similar to what was posted before, but adding the ability to flash one side or the other with the turn signals.
-
Well, a lot has happened over the last couple months. 1. My Jeep got stolen from the front of my house. It was recovered, still having to deal with insurance. 2. New job, working 50-60 hours a week, but its starting to get back to normal. 3. House work 4. Life..... Starting to take more things out. Got the passenger seat pulled, and it was as disgusting as the drivers side. But it had something under it that was plugged into the wiring harness. Anyone have any idea what it is? Looks like a pair of chop-sticks. Started vacuuming out the crud, and found a piece of paper. I started to pull it up.... Wait, is that what I think it is?? Is that a window sticker......? Got all excited reading it, about the P345/45ZR17 High Performance Tires, Articulated Sport Seats with Power Lumbar Support..... Wait, what? Since when did a 2002 come with a 5.0 HO engine? Turns out it was a window sticker for a '93 Mustang SVT Cobra. Sticker price, $21k. Can that even buy a base Mustang these days? Started pulling stuff out of the trunk, and found a pretty cool item. Looks to be the stock tool kit, mainly complete with just some slight surface rust. And take a look at that stamp on that wrench. Just for my info, the truck deck spring is help up with this combo of washers and nut. Body--Washer with larger hole--"Spring Holder Thing-- Washer with smaller hole--Split washer--Nut Interior of trunk without the wooden cover. Other side, with the spare 4 speed I picked up from a friend who is going to turbo his own '02. And finally, pulled one taillight. The threaded spacers are place with the larger spacer on the bottom most stud, and smaller on the upper. Next steps are to pull the rest of the rear trim off, rear bumper, and then check out the rear brakes which I think are seized. Trying to get motivated to pull the engine and tranny, but Im struggling with storage of all the pieces that come off the car.
-
Makes sense having the struts be symmetrical. Good to know. I am going to take the engine out, then roll it into the alley and wash it all off. The entire thing will be soda blasted, so dirt isnt so much of a worry for me right now. No real updates thus far. Got the coolant drained with no evidence of oil or other contamination in it. It was low, but green (actually had coolant in it and not strait water). Got the radiator out and set aside. Its surprising how small it is. Im used to working on Cherokees where they are twice as wide, and half as tall. And all the cooling issues associated with that headache. Then I drained the oil. Again, it looked "clean" with no milkiness, or crud. It looked like it hadnt been changed before it was parked which might be an issue, but I was happy to see no evidence of a blown HG. And..... Its a Tii! With a vin of 2764382 Have a good weekend everyone!
-
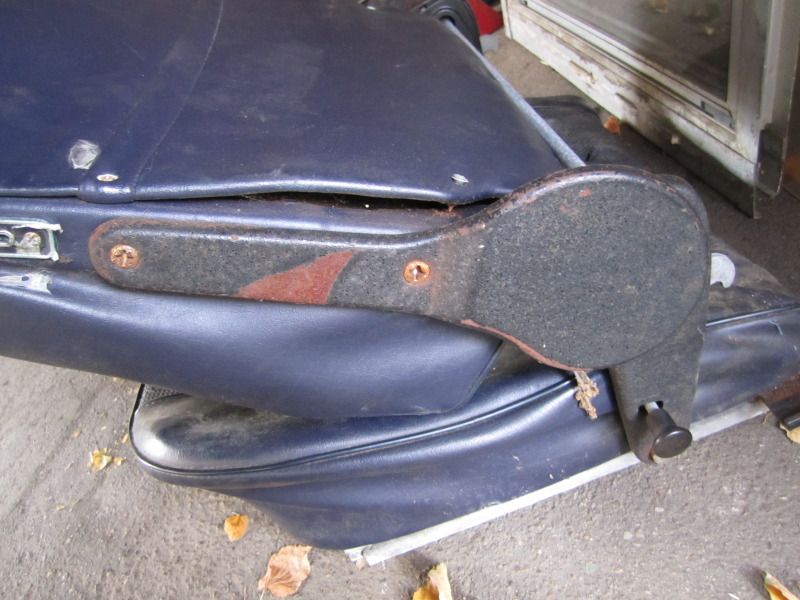 I am trying to get rid of the stock seats out of my '73 Tii. They are trashed, leather is ripped or missing, and the "foam" is deteriorated. They are really worth something only for the hardware. I have driver and passenger side. I will be throwing them away in one month, so let me know if you want them. Yours FREE if you pay the ride for whatever parts you want off them. I am not sure if anyone even needs these, but if you do let me know ASAP. The girlfriend is not amused that they are sitting outside in her parking spot!
 -
These first couple months are going to be random updates with a lot of random pictures so I can keep track of all the little details. I am stripping the car down to a bare frame for soda blasting so everything has to come off. First up, old, dry rotted M&S tires in the 185/70R13 tires. They all surprisingly held air. 13x5 Tii wheels. Front brakes. Both drivers and passenger had the pads seized onto the rotor. On the drivers side, the lower line on the caliper goes to the rear fitting on the strut. Top line on the caliper goes to the front line attached to the strut. Looking at the Klafkluckensteriferkan pump. The intake was taken off, and I would like to do some sort of CAI. Battery will be relocated into the truck. Huh, what do you know. More evidence of mice. Or rats. The only damage that I can find right now from the rodents. Ate through some wires by the battery. Fuse panel sticker, warning stickers, and general maintenance found on the hood. Door tag. At some point this car was supposedly resprayed by the dealer. Apparently the stock paint job bubbled or started to oxidize and my grandpa had it painted. Well, whoever did it failed miserably. The paint is terrible, and you can tell they did it as quick and as fast as possible. As I mentioned before, stock seat is gone. Im thinking some PRP or Corbeau seats to take its place. Factory AC. Hopefully I can get it back up and running. While it doesn’t usually get that hot here in Colorado, its always nice to have. Question of the day. This is the driver side dust guard looking from the front. The caliper bolts bolt onto the strut with two bolts. It looks like the dust shield is only held on by one bolt, with one either missing or just an empty hole. I will not be reusing the stock brakes, but is this normal? I have not taken the rotor off to see behind, just I was just curious. Tonight I will leave you with this. Hood emblem missing all its luster. I almost like it though. As I said, its going to be a long build. I estimated 5 years, wouldn’t be surprised if that drags on for many more.
-
I suppose I’ll start this build thread with a little bit of history on this specific 1973 2002 Tii. It was originally purchased October 10, 1973 at Import Motors of Concord, California by my grandpa as a company car. He ordered it with stereo and air conditioning as well as it being a Tii. It was delivered with a clean bill of health and 22 miles on the odometer. My grandpa put about 84k miles on the car until he gave it to my uncle in late 1979 or early 1980 as a 21st birthday present. Up until this time the car was in pristine condition, all maintenance was done, with no body damage at all. In 1986 my uncle drove the car from California to Oregon for a family Christmas get-together. My dad purchased the car off my uncle for a plane ticket home and some cash. At this point, the car was neglected, beat, and worn out. All the dents that the car has happened in those years. My dad enjoys telling a story about helping my uncle change the oil one Christmas and questioning when the last time the oil was changed. My uncle responded, “Last Christmas when you helped me change it.” Because of this, the original motor finally died on my dad in early 1987 and a factory reman was put in. We moved from Oregon back down to California in November 1990 and it became a California car again. In 1996 my dad, who didn’t learn his lesson the first time, bought a 1989 Jeep Cherokee off my uncle and parked the 2002. He then drove the Jeep, and had plans to restore the BMW. To this point, this car had done almost 235k miles. It has not run since. Just a side note, that Jeep was then sold back to my uncle who drove it for a couple years. It was given to my grandparents, and then given to me for a car to drive when I turned 16. About five years later, I put a new engine into the Jeep due to long term lack of maintenance finally taking its toll. Fast forward to present day, and my dad trailered the 2002 from California out to Colorado for me to start working on it! I am the fourth family member to own it, and third generation. As a family, we have owned it its entire life. The ’02 is now stuffed in my small single car garage as I restore it. I am going to be doing a “resto mod,” but keep as true to the ’02 heritage as I can while still making this car better. Because this car is not number matching, and fully restoring this car just isnt my style, Ive decided to go a specific direction. Current plans that change almost daily, and will continue to change throughout the build: -Big brakes -Potential to swap to 5 lug -14 or 15 inch wheels -1-2’’ drop -Larger sway bars -Roll cage -4 point harnesses -Bucket seats -Rolled fenders -5 speed transmission -Minor engine work -Turbo spoiler -Knee trim delete, possibly lower trim gone as well. -Nice, clean interior -Etc, etc, etc I am a slow worker that has no experience with BMWs. Im estimating this build to take 5 years, mainly due to funds. This is where I started a couple weeks ago. A neglected ’02 with faded Polaris paint, shoved into my tiny garage. Mostly stock engine, with a lot of aftermarket mouse poop. Mouse house in the cowl. Made with leaves, sticks and an old tarp that we used to cover the car for several years. First step was to take the front bumper off. With such a small workspace it made it a lot easier to move around the front of the car. Also took off both front wheels to find seized rotors on both sides. This is also a good time to explain the name. My name is Matt. And this car is hazardous. Example number one. Went to vacuum out the headlight buckets, and felt the vacuum loose power. Pulled up the hose to find the skull. Pulled the skull off, put the hose back down, same thing happened. Pulled it up, and found the jaw. Example number two. Pulled the drivers side seat last week one night after work. I was using a worklight to look around at the interior mess, and almost pooped my pants when I saw this little guy staring at me. Turns out, a lizard died on the tranny tunnel, but his body was “petrified.” Im not one to be scared of dead animals, but it took me by surprise! Hazard+Matt=Hazmatt Moving on, here is the interior. Blue seats and door cards with gray carpet kit. Seats are TRASHED, the leather is torn and the cushioning has fallen out all over the floor. The carpet hadn’t been cleaned in at least two decades. It’s a rough start, but it has NO RUST!
-
 Will you take $25 shipped? Shoot me an email. mm wr 87 at comcast dot net Remove the spaces and put the @ sign!
 -
 Do the fans spin freely? How much would shipping be for one fan?
 -
Any updates on this? I also recall seeing the picture of the Celica and quads being posted somewhere else. Are you on Pirate by any chance?
