


scanner
-
Posts
173 -
Joined
-
Last visited
-
Feedback
0%
Content Type
Profiles
Articles
BMW 2002 and BMW Neue Klasse Wheels
Colors
Steering Wheels
Production Years
Models
Registry
BMW 2002 Vendors and Shops
BMW 2002 Books
The Hack Mechanic
Forums
Blogs
Gallery
Events
Store
Books
Community Map
Videos Directory
Posts posted by scanner
-
-
appears to get its main power (30) via the green wire from the ignition switch through the fusebox, this stops high current going through the light switch but the ignition switch will still have the full current through it? This seems to defeat the purpose of a relay, should i add an additional relay to reduce current to the ignition switch or am i missing something?
-
My low beam has separate fuse for each side at the fusebox question is can i run the 2 wires to a single relay to control the lights or must i keep them separated and use 2 relays?
-
Following the excellent FAQ heater box rebuild continues

Foam on flaps replaced with closed cell foam, red rubber grease used on flap grommets
Assembled to test cable movement - all good, success!
Mockup of wiring in engine bay
Showing relay box and Pos and Neg terminals (Battery to be trunk mounted) using modified original loom
Mocking up additional relay box and Megasquirt relay box(Cardboard version!) Plan is to run a seperate loom for Megasquirt EFI
Another trip to Pickapart - spent 2 hours removing the loom from an old Merc, not sure of the year but had lots of nice wiring that looked similar gauge and color coding to the 2002 so i now have a good supply of sutiable wire!
Mercedes wiring to be put to a better use!!
Started repairing wires that had been cut into or used as power takeoffs for additional electrical stuff. Trying to get the origional loom back to factory
-
Mines a 1987 KE70 Toyota Corolla 2 door wagon, only 125000k on the clock, standard apart from Advan wheels and 2" lowered. Not sure if you got these in the US? Basic reliable transport - I love it.
The rooster just wanted to get in the glamour shot!
-
Took a trip to pickaparts and lifted about 200 hoods, came away with a few bits and pieces. BTW there are no 2002s at NZ Pickaparts and BMWs are few and far between, stiil you work with whats available
Distribution Box from a 5 series, not an E30 one but will do the job
Relay boxes from a couple of Toyota Corollas, they take Bosch type relays and i thought looked quite neat
A couple of cables from Honda Integras which i hope to adapt to acctuate the Throttle body using the 2002 Gas pedal
An assortment of Faston .250 connectors, covers and adhesive heatshrink from Digikey. Only took 3 days to arrive from the US- great service. The terminals were chosen after reading this http://www.ratwell.com/technical/Terminals.html Paladin crimper is on its way purchased on Amazon last week!
I now have no excuses and need to get stuck in to mocking up the layout for the engine bay and repairing original wiring
-
The heater box is fairly beaten up but the core looks ok and i need at least a demister so i have started to do a cheap but functional refurb, started with a bracket for the heater valve
I subsequently read on the forum that the valve will function supported by the hose only but i had already done most of the fabrication so on it went.
Some damage to the case meant the cables controlling the demister and footwell flaps were not attached and not opening the flaps
The problem
Bracket bent up from some 16gauge and painted with Hammerite ( Im not a big fan of Hammerite but was OK for this)
And in position, it will be rivited on, the idea is to spread the load and reduce pressure on the brittle plastic - hope it works!
-
Sorry accidental double post deleted
-
Can someone ID this throttle body, it came with the E30 318i inlet manifold but i dont think its a bmw one? Its also been butchered by the PO but is a good size for my application, im just interested what it came from! Body size is approx 52/53mm Heres a few photos
Any ideas?
-
Ive been sidetracked! My long term project is on hold while i try to finish off someone elses unfinished project. The attraction was it needed alot less welding than the 72, it will need alot less paperwork to get it back on the road and it has a few enhancements that i like but didnt want to do to the 72 as i want to keep that 'factory'.
The plan is to get it on the road asap, leave it alone cosmetically, do what is necessary mechanicaly, not cut too many corners but not worry about origionality - and to end up with a reliable beater with a bit of hot rodding thrown in
A few pics to get the ball rolling
How all good projects arrive!
Megasquirt relay board
Megasquirt Brain
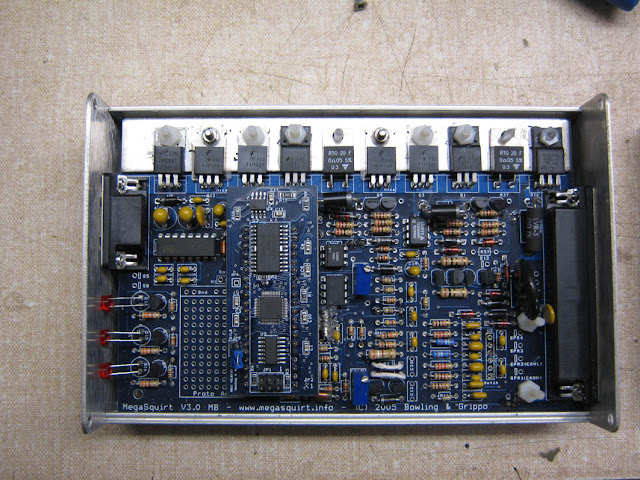
Inside Megasquirt V3.0 with MSII Board
Ford EDIS (came with coilpack, VR sensor and crankshaft toothed wheel)
Wiring nightmare
faded but untorn and complete moulded carpet
Honda Integra Seats - match the blue interior nicely
Carpets lifted to reveal floopan rust (sand is from PO sandblasting engine bay!)
Chassis rails are OK
Repair begins
New frost plug and flywheel skim on the 'to do' list
80 amp alternator
Engine and chassis numbers match
Distributor blocked off
Damage to Heater box
Wiring clean up begins
I plan to rewire keeping the origional loom intact and adding the Megasquirt/EDIS/FI wiring totally separate in its own loom
Spent most of last week seperating the looms and wire tracing and continuity checks on the original loom, good news is it hasnt been badly hacked and has all the original color coded wiring intact
More to follow!! -
My name is Chris and I'm a 2002oholic! Spotted a '73 2002 for sale last week, i had viewed it a few months ago and took the plunge. Photos and justification on my blog! http://2002bmwinnz.blogspot.co.nz/2012/09/sidetracked.html
Definately haven't given up on the Roundie, just wanted another one that i could use as a beater, hot rod a bit and get the 2002 driving experience as soon as possible.
Im oldschool - carbs and points so the whole Megasquirt?Edis/EFI thing will be a steep learning curve, i am keen to go with it though, so forum members be prepared for lots of dumb questions!!
-
Fantastic, price sounds good. Could you email me at chris_gibbs@ymail.com and i will send you my shipping details. This is going to be a huge help to finish the rebuild, many thanks. Chris
-
I admit defeat - the rust damage to the C Pillar areas on my project is beyond my mediocre metalworking skills - i need a couple of rust cuts. The rusted area can be seen on my blog http://2002bmwinnz.blogspot.co.nz/2012/08/hofmeister-kink-rust.html and the cuts i am after can be seen on the fantastic 2002tii-restoration.org site http://www.2002tii-restoration.org/images/quarter_driver_41.jpg
As 2002s are like hens teeth here in NZ im hoping someone would be prepared to send something over here
Thanks Guys
-
Yep its a NZ new car, i dont know the owner or where its shot but the rego is still live, vin is 1655083 (found using carjam!). If the owner is lurking on the forum it would be cool to make contact - not too many 2002s in Enzed so always good to find fellow addicts! Nice vid BTW
-
This thread is worth a read http://www.bmw2002faq.com/component/option,com_forum/Itemid,0/page,viewtopic/t,293361/highlight,/sid,6b1f01027ac8112588c14e21bf12c5f3/ im looking at the megajolt option but i have lots of time to think about it!
-
If you are down to bare metal with the engine out i wouldnt waste the opportunity to epoxy primer and then topcoat with the same color as you are painting the exterior. IMHO the overall effect of a matching engine bay and body color cant be beat - it shows the thoroughness of the restoration/rebuild
-
Wanted to commemorate this auspicious milestone with fellow addicts, shes undergoing some major surgury atm, but hope to see her out and about again by her 42nd!
-
Walloth and Nesch in Germany do a nice patch panel for this area http://www.wallothnesch.com/e/frameparts.htm look under Bodywork. Pricy though esp when freight is added
-
DO NOT DRILL THE FRAME. Just reread the advice from Bill Williams, Mike and others. Its the Head of the special carriage type bolts that slide into the slots on the frame (the threads face outwards from the frame). Then the bumper bracket and the nut are put on. Good luck
-
Nice job on Cyrils windscreen, good skills! Have you considered learning to weld, it looks like this project will need a fair bit of rust repair work and it may be worth considering. It was the best thing i ever did to help with my car projects. Cheers Chris
-
Thanks for the input,the dolly is now built and works well after a minor disaster! Wrote about the saga in my blog - http://2002bmwinnz.blogspot.co.nz/
The dolly will make life a whole lot easier, next on the to do list is a rotisserie!
-
I find it interesting that, apparently when you get down in the upside down part of the world, 2 x 4s become 4 x 2s.
Bob Napier (with 50 yrs. experience in the construction industries)
This may help with your confusion, apparently you dont realize you are the upside downer!!
-
I want to build a car dolly to enable me to turn the car around in the garage both with and without the subframes attached. The inner sills and floors are in good condition, outer sills good apart from the last 3 inches on either end.
I will support the sills along their whole length with 4x2 timber mounted on a steel frame, i will also put carpet on top of the 4x2s to help spread the load evenly.
My question is if the sills are in good condition are they man enough for the job?
-
Could someone identify where this part from the Walloth catalogue goes on the car? https://picasaweb.google.com/105528953083937093443/Walloth#5740271703551559378 Part im looking to ID is 41/6/1 I just can't work it out!
-


Factory Low Beam Relay
in BMW 2002 and other '02
Posted
The existing BMW low beam relay appears to get its main power (30) via the green wire from the ignition switch through the fusebox, this stops high current going through the light switch but the ignition switch will still have the full current through it? Should i add an additional relay to reduce current to the ignition switch or am i missing something?