


scanner
-
Posts
173 -
Joined
-
Last visited
-
Feedback
0%
Content Type
Profiles
Articles
BMW 2002 and BMW Neue Klasse Wheels
Colors
Steering Wheels
Production Years
Models
Registry
BMW 2002 Vendors and Shops
BMW 2002 Books
The Hack Mechanic
Forums
Blogs
Gallery
Events
Store
Books
Community Map
Videos Directory
Posts posted by scanner
-
-
Progress has been slow but the end is in sight for the bodywork/paint

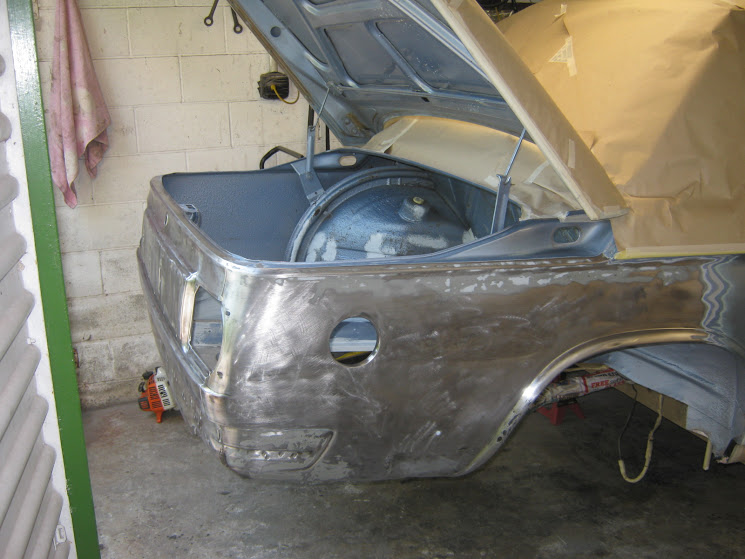
Rear Quarters taken back to bare metal
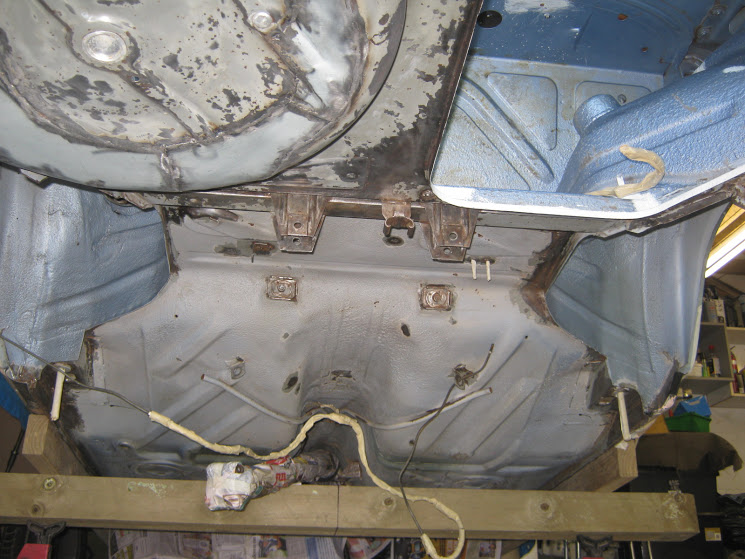
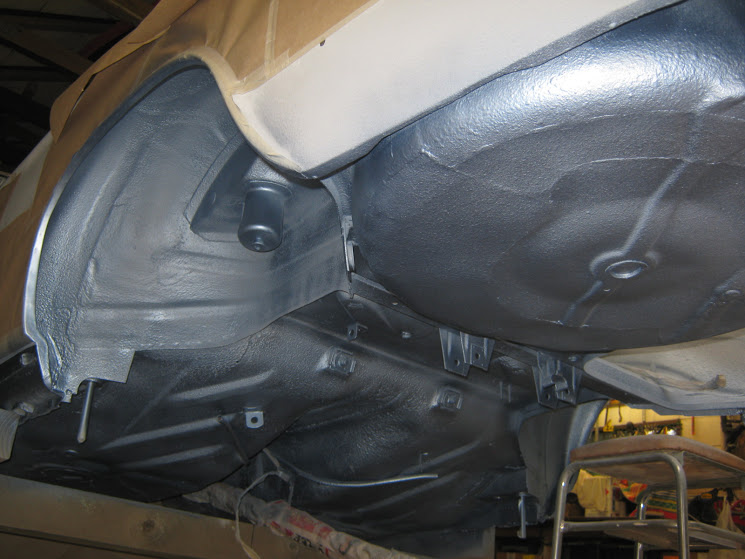
Underside cleaned and loose paint and rust removed, where the factory primer/underseal was sound it was retained.
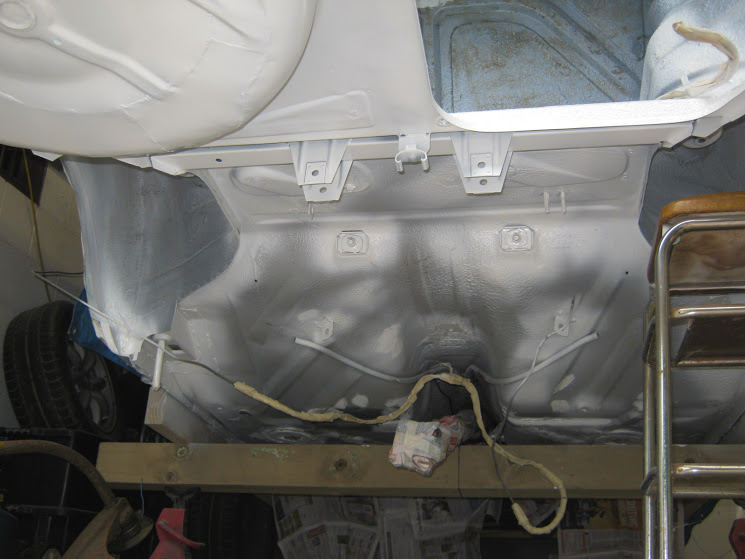
Bare metal in trunk spot primed with epoxy primer
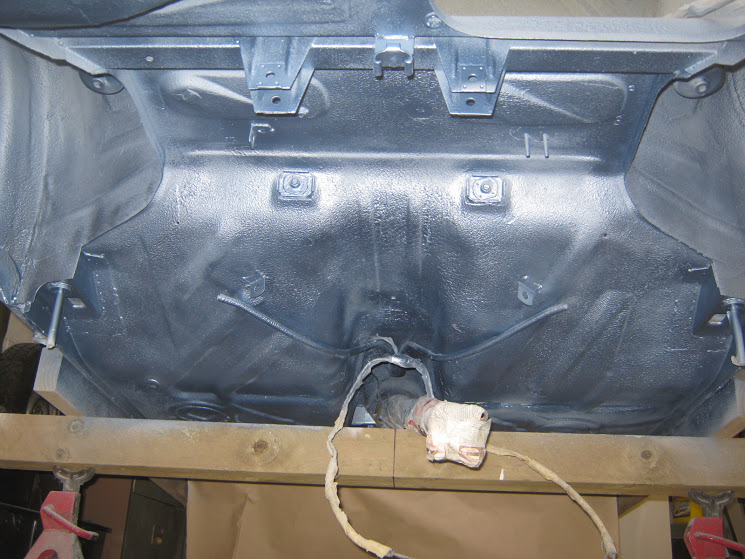
Underfloor bare metal epoxy primed
And rear quarters epoxy primed
I decided to epoxy prime before using filler, Auckland has a very humid climate in summer and the epoxy seals the bare metal effectively. There was evidence that rust had started to form under the filler the PO had applied to bare metal, so i hope this will be a better solution.
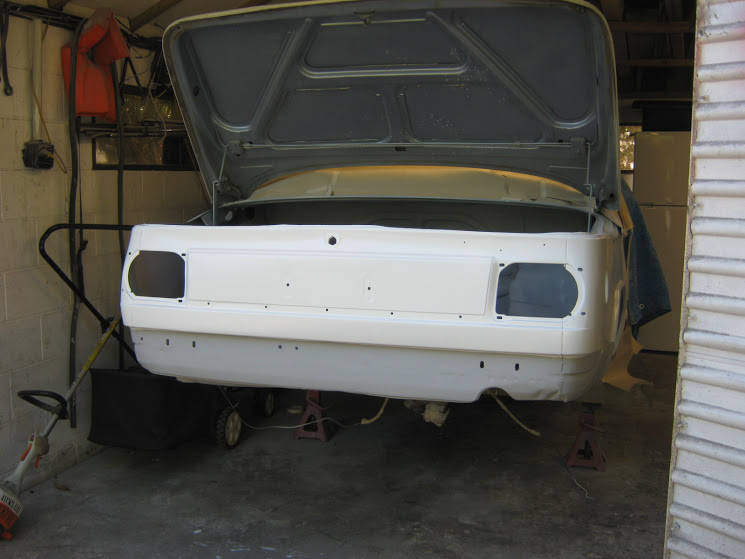
Masking before applying stone chip
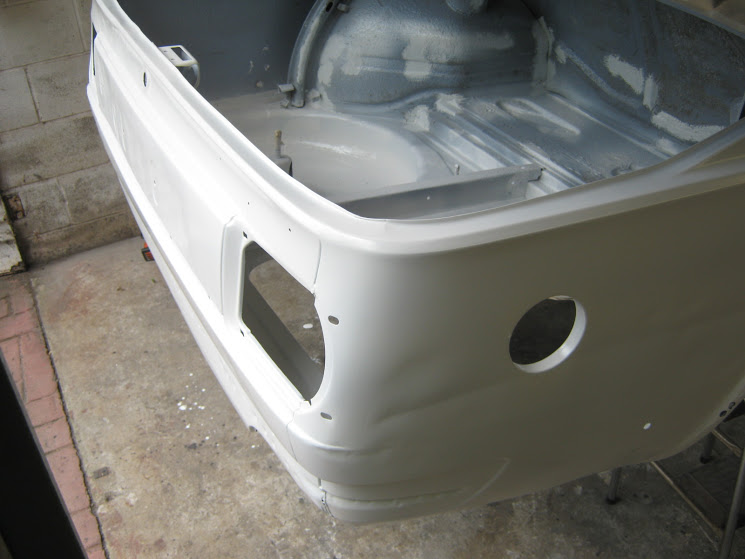
Stonechip applied - Nice to see in a uniform colour!
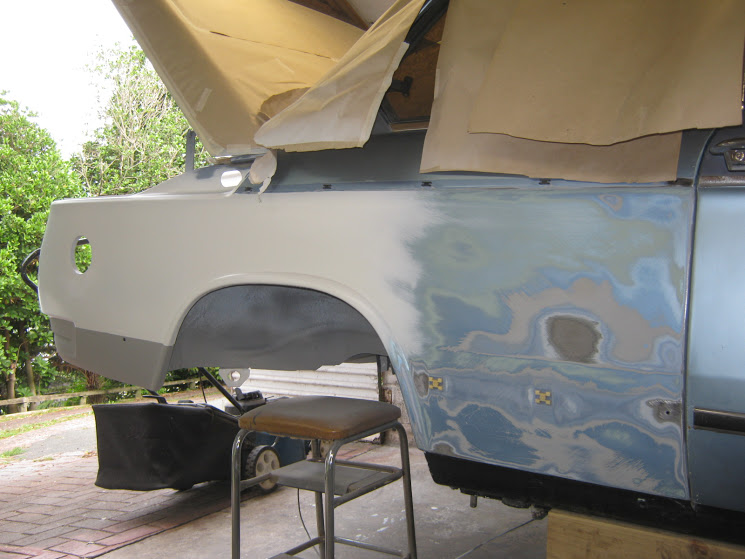
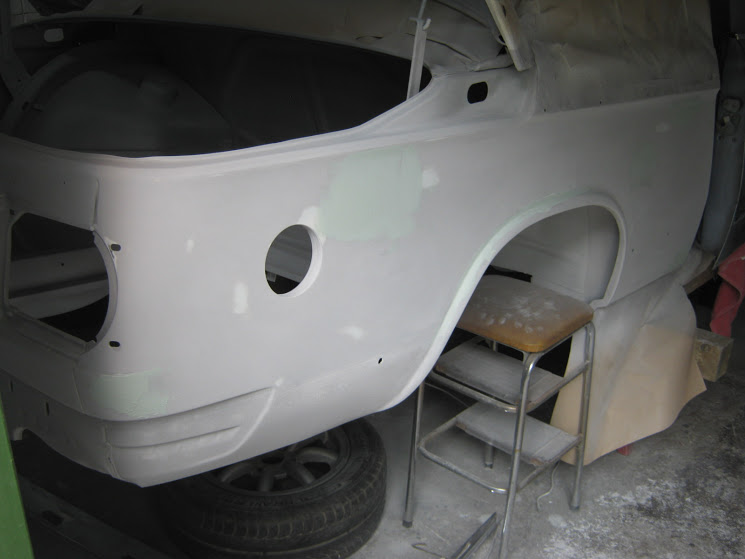
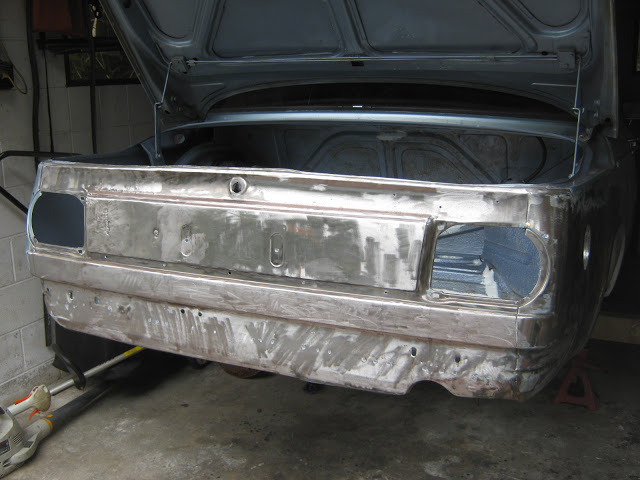
At this point project creep took hold again - i realised it was a mistake to stop the repairs at the wheel arch and decided to tackle the complete rear quarter both to be sure all rust had been removed and to enable the whole quarter to be faired/block sanded. Waist and knee trims were also removed.
At this point many applications of filler (Evercoat Z Grip) were applied and then sanded off with 36 grit, a professional would probably got it straight in 2 or 3 applications, i probably took about 10! Once i was happy with the basic shape i then went to 80 grit and finally 120 grit before applying 3 coats of filler primer, apologies for the lack of photos for these stages, you wouldnt see much through the clouds of bog dust anyway!
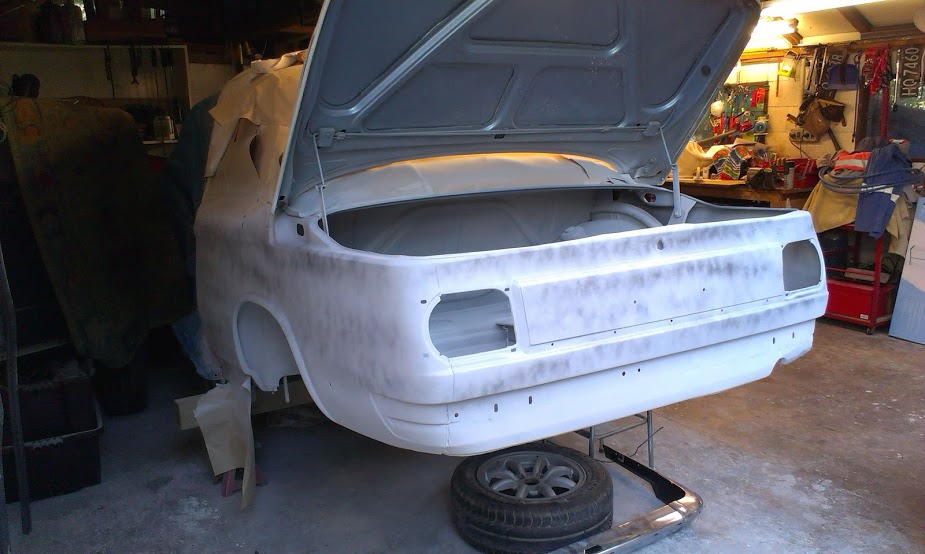
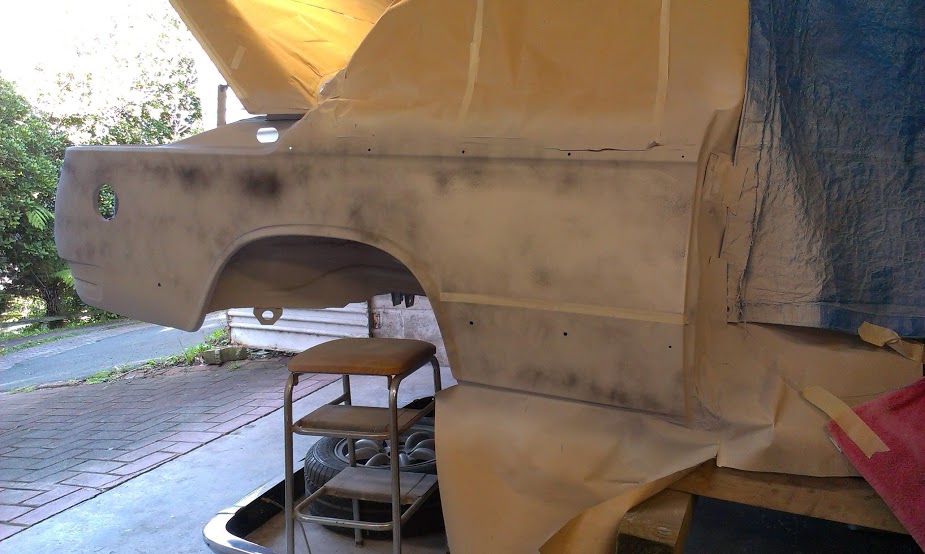
Primer filler was guide coated and block sanded with a 16" board using 180 grit
Which revealed highs and lows that required a feather coat of filler to remove, further application of primer filler, guide coat, blocking with 180 then 320 grit. At this point i was happy with the straightness of the quarters and moved onto removing sanding scratches from the primer filler with 400 and then 600 grit using a soft sanding pad.
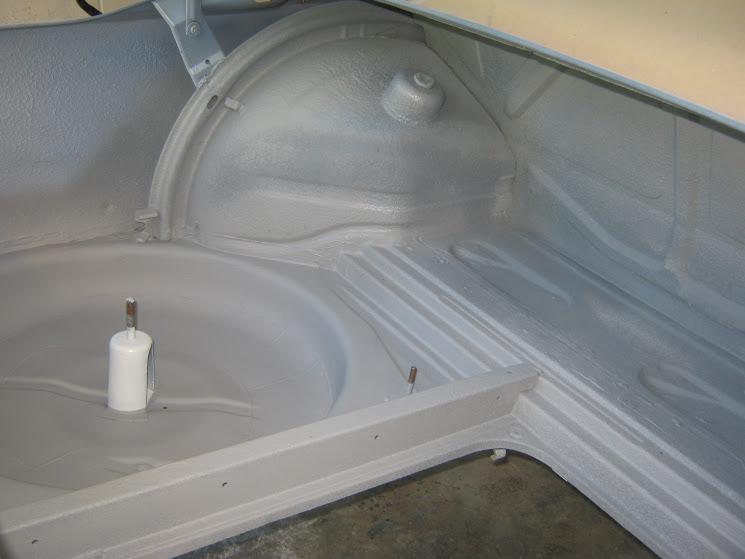
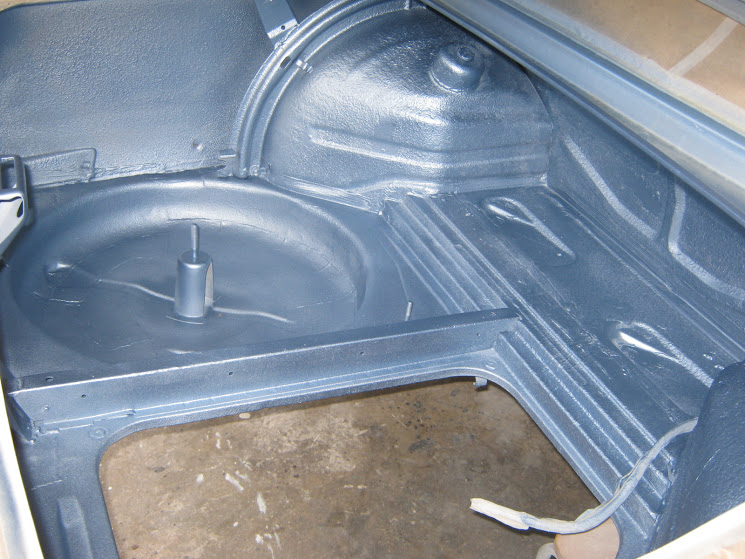
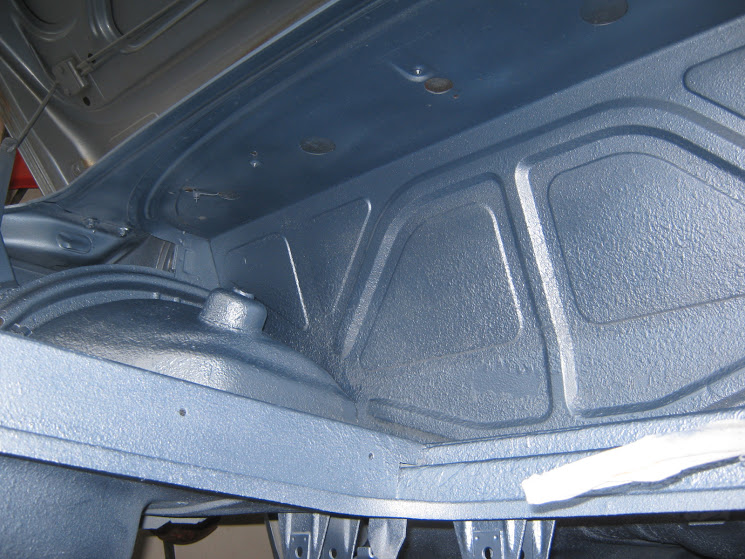
After masking the quarters and as specified by the manufacturer (Metalux) I added 20% of catalysed clear coat to the basecoat for the underbody and trunk.
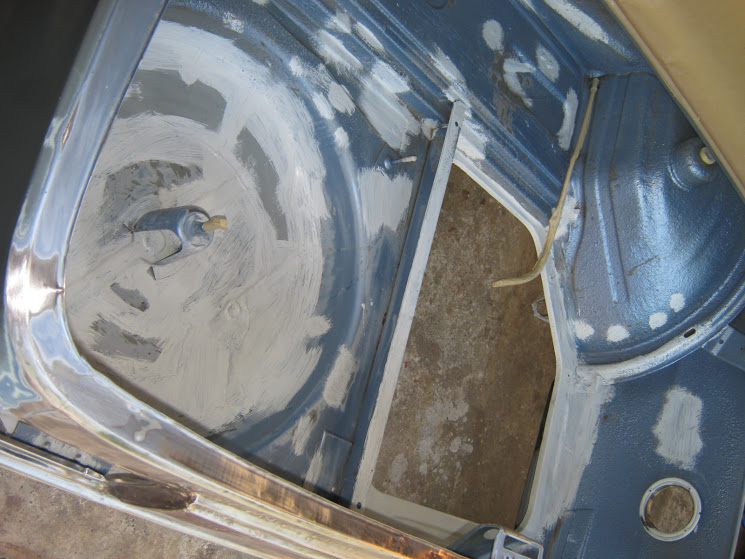
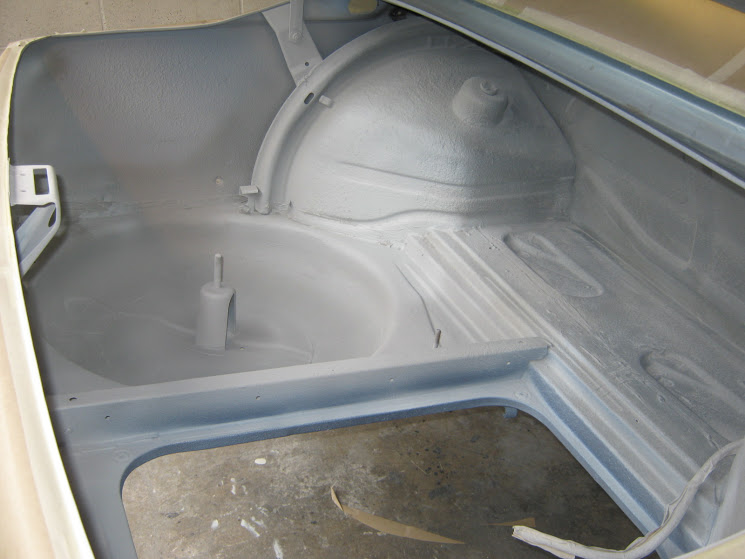
Trunk before
And after
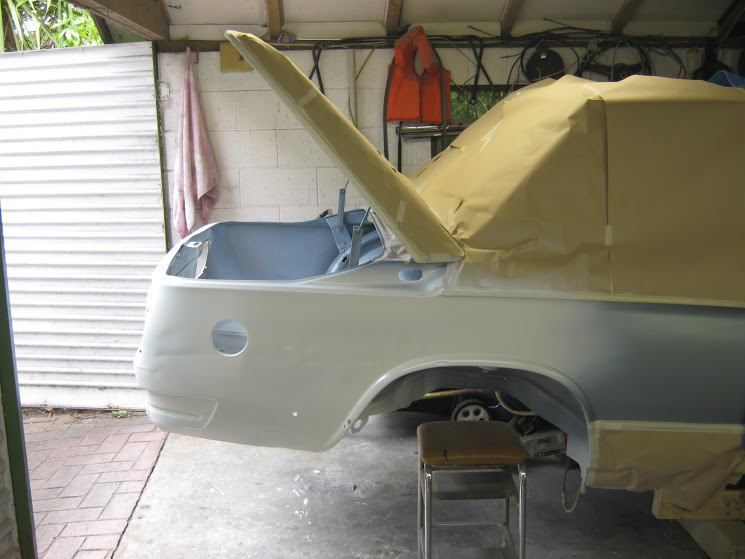
Next - Basecoat/Clearcoat the quarters, and i can finally put parts back on!
-
Update time, progress has been slow but steady, involving some necessary project creep.
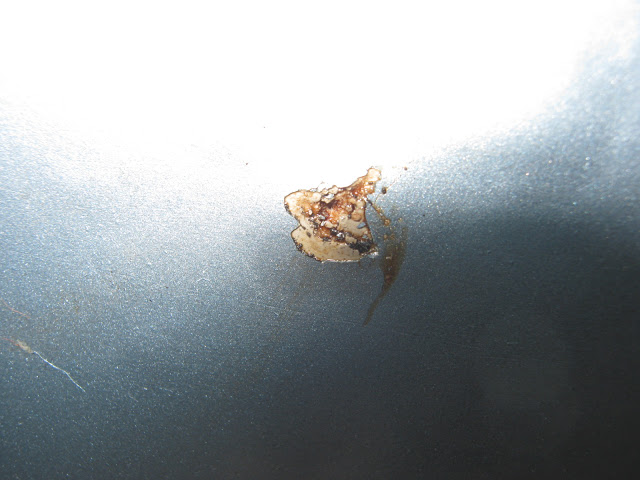
Bubbling of paint on rear quarter required further investigation
Bubbles were popped to reveal rusty moisture
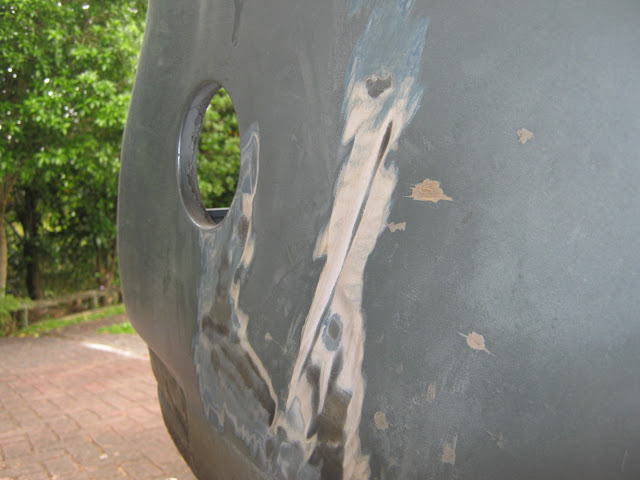
Went to work with a grinder to reveal bog half an inch thick in places
Bog removed to reveal solid metal, apart from a small patch along the bottom, very happy with the minimal rust. The bog was there to cover a long dent in the quarter which i managed to straighten a bit
There was some oil canning where metal had been stretched, removed it by shrinking the metal with localised heat.
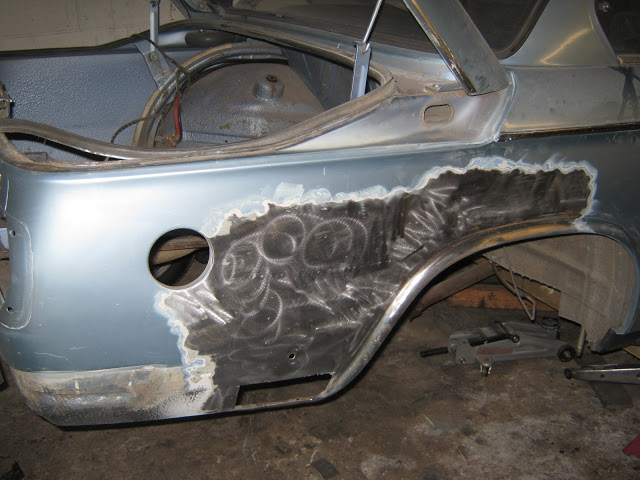
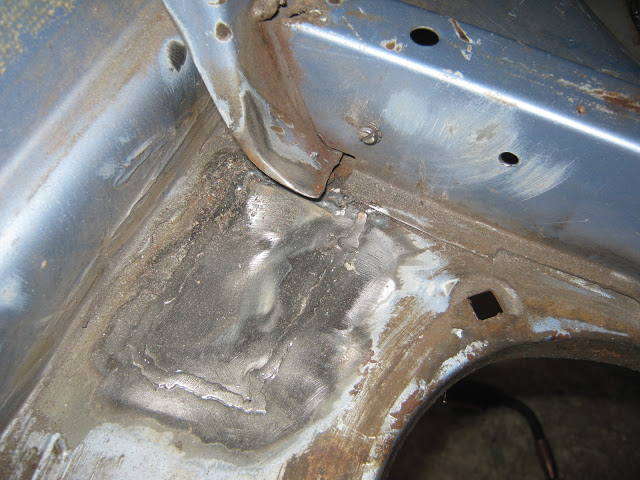
Decided to strip rear to bare metal as previous repairs by PO had started to show signs of rust
Removed old lap welded patch
And replaced with butt welded patch
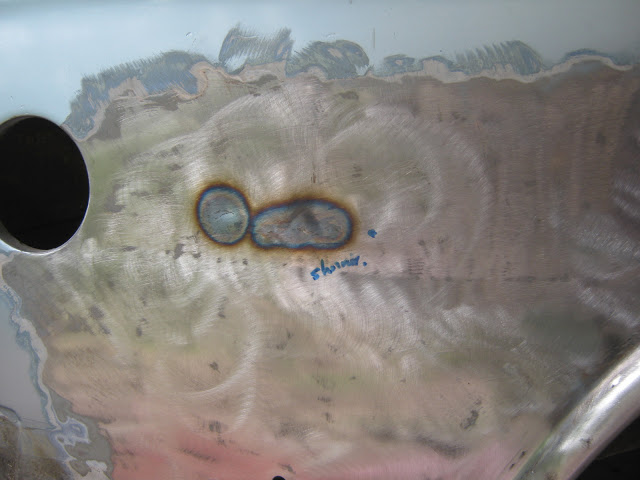
Repaired area where exhaust hanger had torn the boot floor
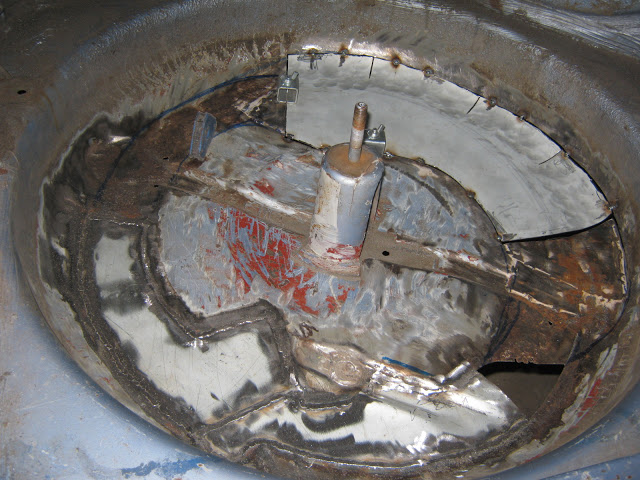
The wheel well was the next problem, it had been repaired previously with lap welded patches but other areas were now perforated, choices were to 1) delete the wheel well, decided againsted that as i wanted to retain some originality. 2) Buy a new trunk floor - too expensive. 3) Source a decent 2nd hand well or from an E21 - Hens teeth, especially in NZ, 4)Fabricate a wheel well - skill level out of my range, or 5) patch the well
Half completed patching, lots of welding but will be solid when completed and epoxy primed, total cost about $15 including welding gas (about $300 if i charged myself out!!)
After lots more cleaning, grinding, wire brushing and repeat i am at this stage
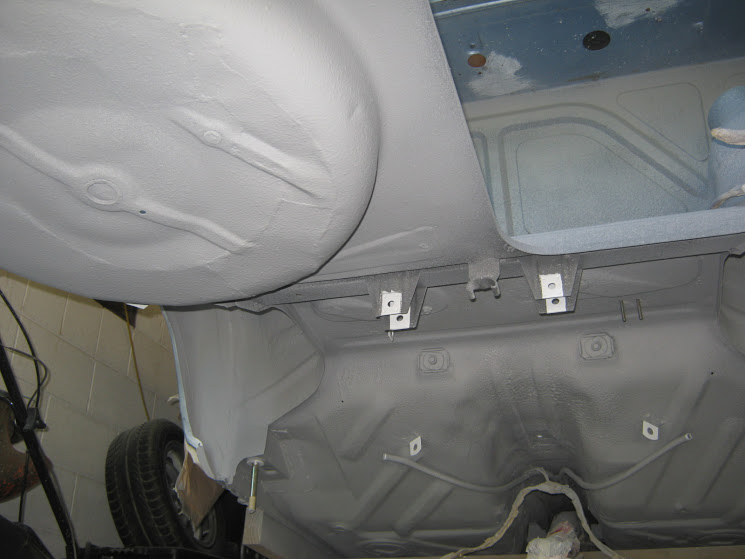
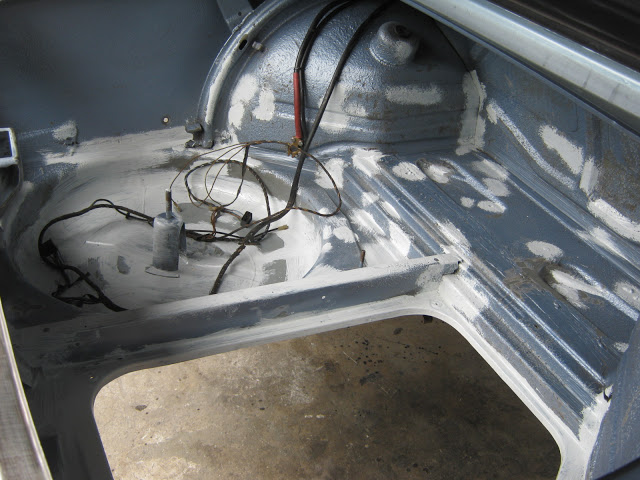
Trunk patched and bare metal spot primed with epoxy primer
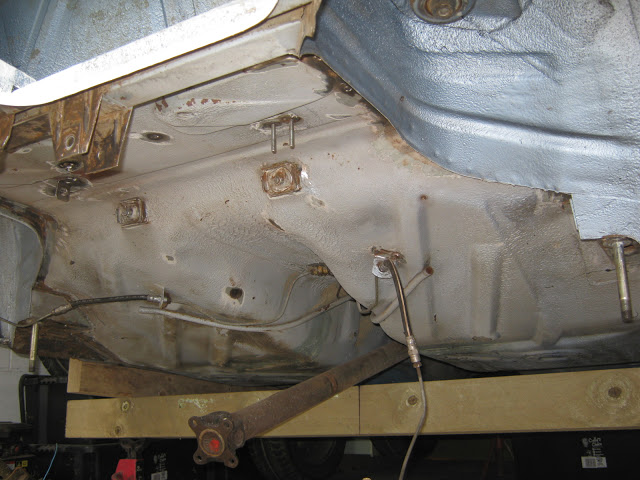
Rear underfloor cleaned and in the process of wire brushing surface rust areas
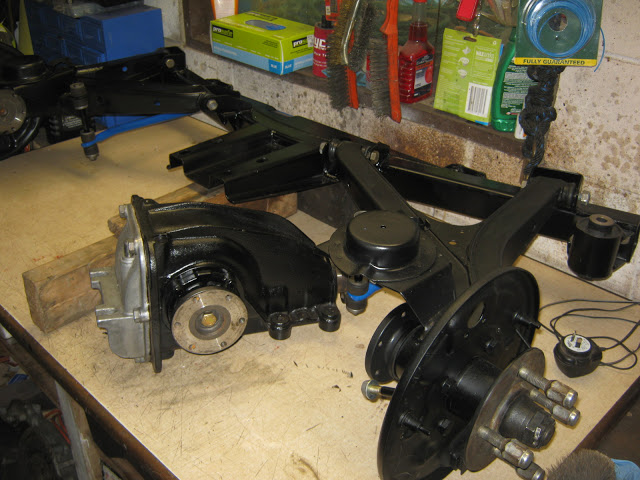
Subframe, trailing arms were all cleaned and paint stripped, all in good condition apart from
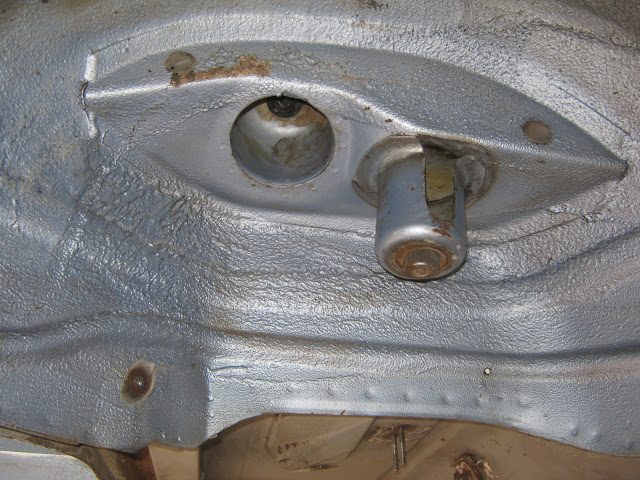
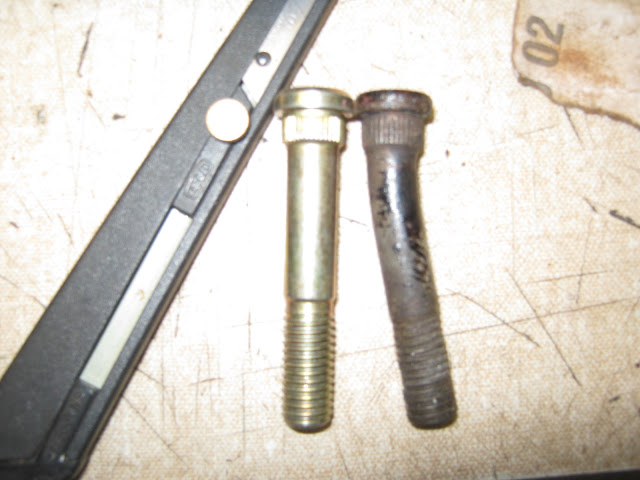
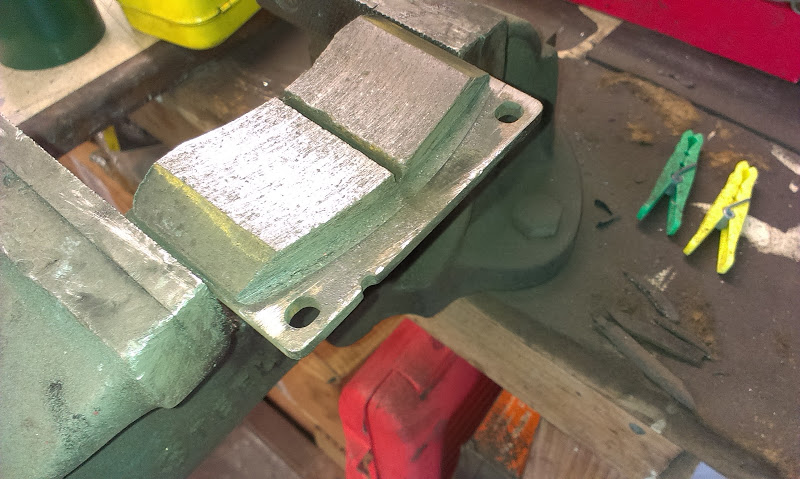
One shock mounting bolt which needed replacing
It can be done without removing the rear hub, just loosen the brake back plate and you will have enough wriggle room to slip the splined bolt in.
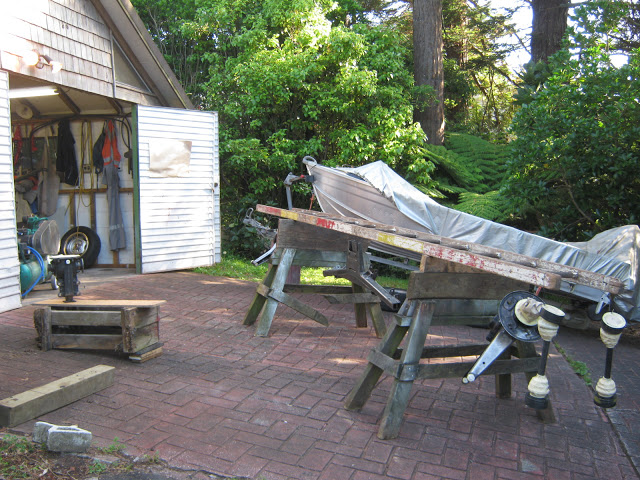
Spraying station set up in the back yard and all subframe components sprayed with black epoxy primer
And bench assembly of subframe begins with all new rubbers. Rear hubs were in good condition so they have been left alone - project creep resisted!
Next update should see things looking alot prettier with trunk and underfloor painted, meanwhile it's back to the wire wheel!
-
As of now, cylinder 1 and 4 is on top, 2 and 3 bottom. OT mark is visible, so it should be on TDC. Can I just turn the crank pulley to get the last two teeth I need/want, and put the cam in?
No, you need to keep the crank/cam settings as factory spec, changing that relationship could be messy or terminal.
With the engine at TDC as per factory you need to either move the VR sensor so it is 9 teeth before the missing tooth
or
leave the VR sensor where it is and take the 36:1 wheel off the crank pully and reposition it on the pully so the missing tooth is 9 teeth from the vr sensor
This guide might help, its for Megajolt but the toothed wheel positioning is the same http://www.autosportlabs.net/MJLJ_V3_vehicle_installation_guide
-
EDIT:If you have managed to get the motor to run you can use the Embedded Ball (BB) on the flywheel to check your timing, it is 25 degrees BTDC, so if you set your timing in studio tuner fixed at 25 degrees you should see the Ball in the gearbox window (using a non adjustable timing light)
-
Humm, it has been a long while but I thought I just loosened the backing plate and was able to replace that splined bolt. Do not remember taking everything off but maybe I did.
I can confirm that the splined bolt can be removed without cutting by loosening the backplate, making hub removal unnecessary ( I just went to the garage and did it!) Thanks again Bill for pointing us in the right direction
-
No update for a while, so time to remedy that!
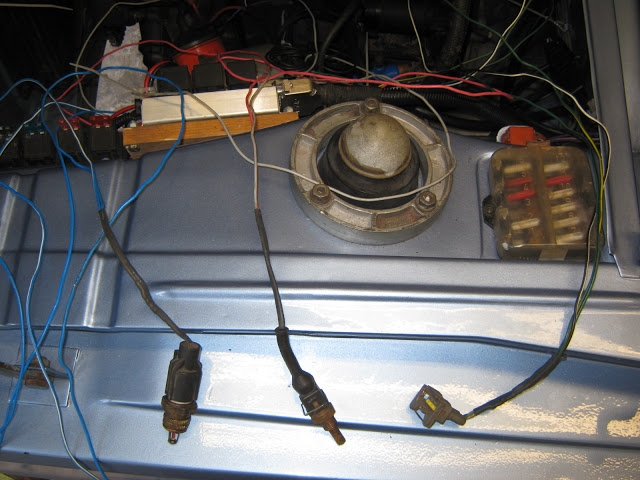
Did a few odds and ends to prepare for the FI side of the Megasquirt
Tested sensors were reading correctly - Coolant and Intake temperature and TPS
Now the EDIS has been working for a few months without any problems i finally got round to removing the distributor and replacing with a plug
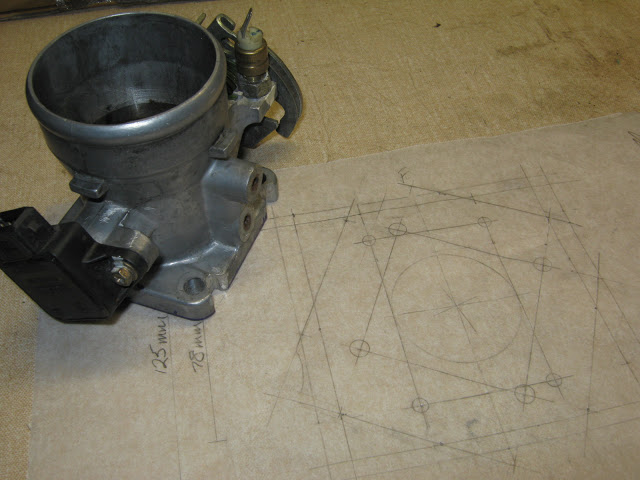
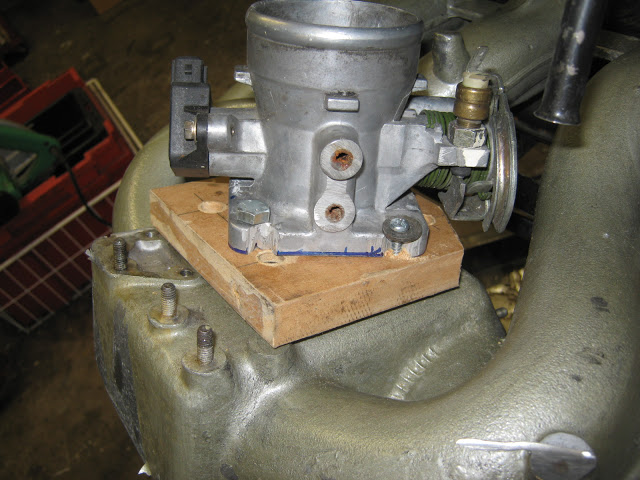
Mocked up the adapter to attach the Throttle body (from a Hyundai Elantra!) to the 318i manifold
Mockup made from MDF
And a heavy (but solid) throttle cable linkage welded up.
Haven't progressed much further on the Megasquirt side of things, planning to go to FI next year, meanwhile
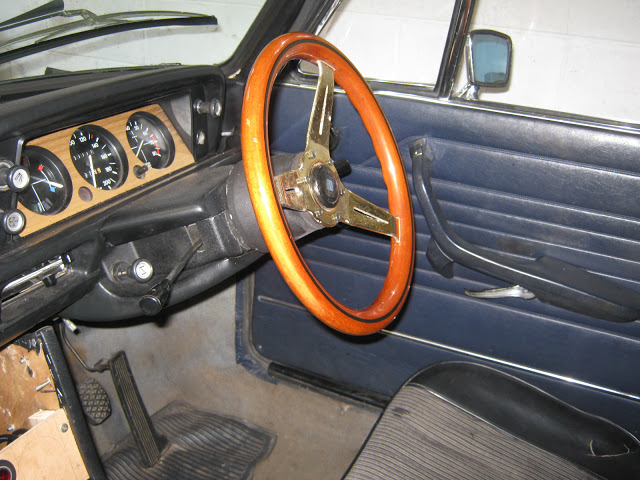
Changed my Nardi for this wooden one from a MX5. I prefer the look of the Leather/Aluminium one i had on, but this size is just perfect for me so it stays on!
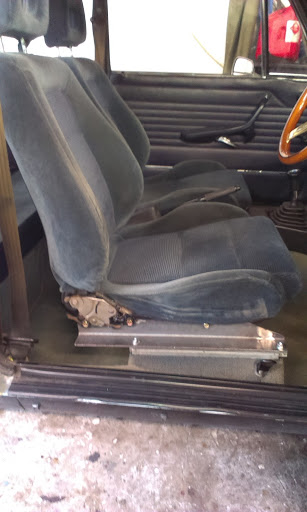
After suffering from sitting on the tired and sagging standard seats, and weighing up the cost of refurbing them (not cheap), i decided to use the Honda Integra seats i already had. The problem i had with them is they did not adjust far enough back and using the Honda runners the seat was not centered on the steering wheel, which bugged me when i was driving. I fabricated mounts to enable me to use the BMW adjusters and also centre the seat - they work perfectly, now i just need to find a way to cover them up!
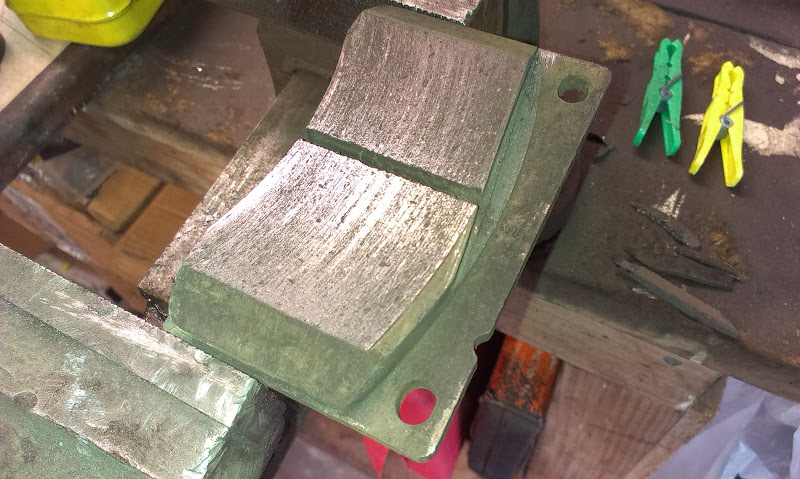
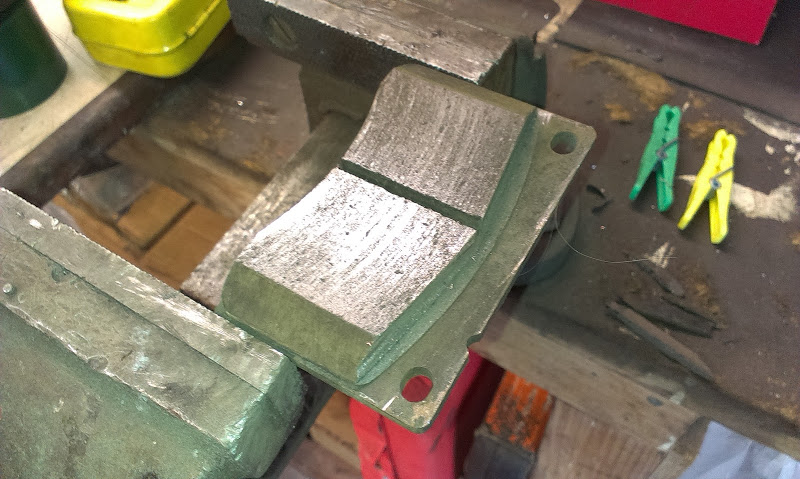
I also trimmed down the brake pads on my Volvo BB conversion, to avoid the overhang not wearing down and interfering with the movement of the pads.
One edge cut with a hacksaw, you can see on the uncut part where the edge of the disc is
Both edges cut
And smoothed over
Obviously not the ideal solution as pad area is still lost, but the benefit of larger vented discs is still there.
My focus then moved for a month to my daily driver - a Corolla KE70, the engine was on 3 cylinders and the water pump sprung a leak so i took the opportunity to upgrade to a 5K engine with a Weber 28/36 carb and mild cam - very happy with the final result
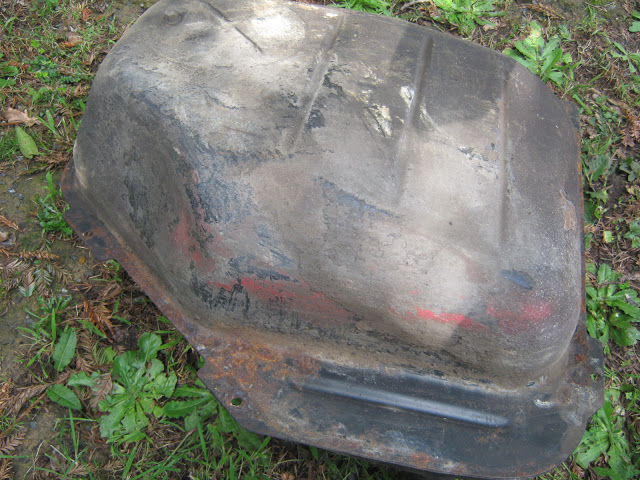
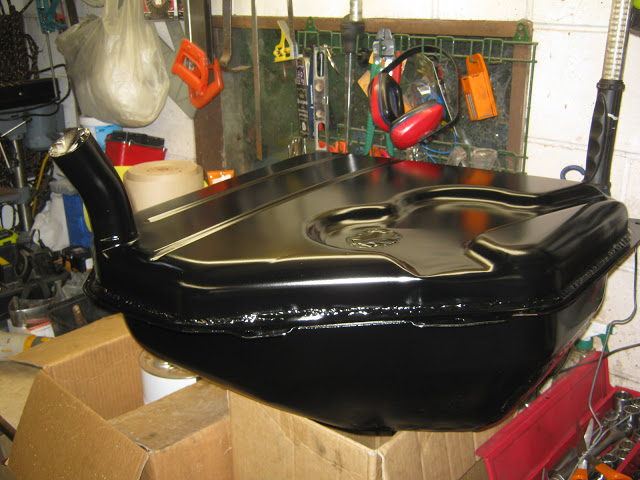
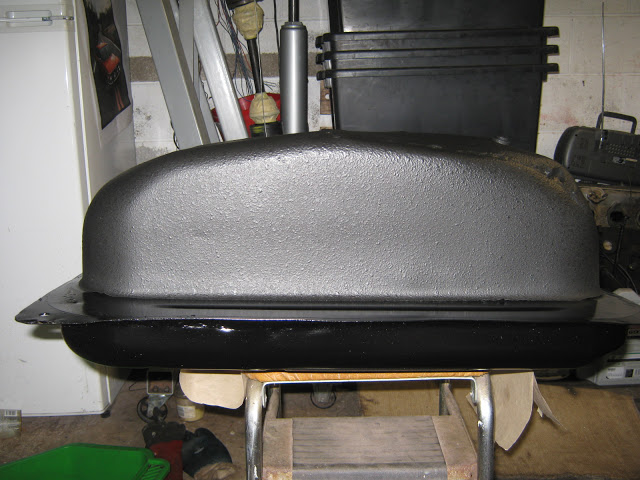
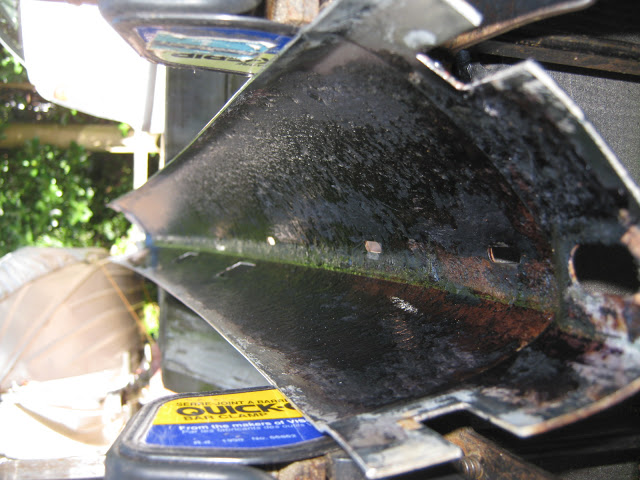
And then back on topic - next stage in the project, rear end refurb and tidy up. I thought i would try refurbing parts as i removed them so when it came to the rebuild i wouldn't be waiting on cleaning stuff up and tempted to cut corners. First off were the petrol tank and rear bumper.
As removed
Paint stripped off - surface rust only, revealing previous repair, looks like a professionally done brazed patch, didnt leak before so alls well!
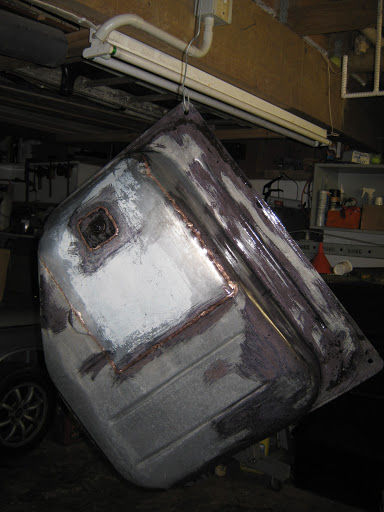
After treating with phosphoric acid, Brunox epoxy applied to previously rusted areas
And 2 coats of Epoxy primer sprayed on
And finally stone chip coating applied to the underneath only
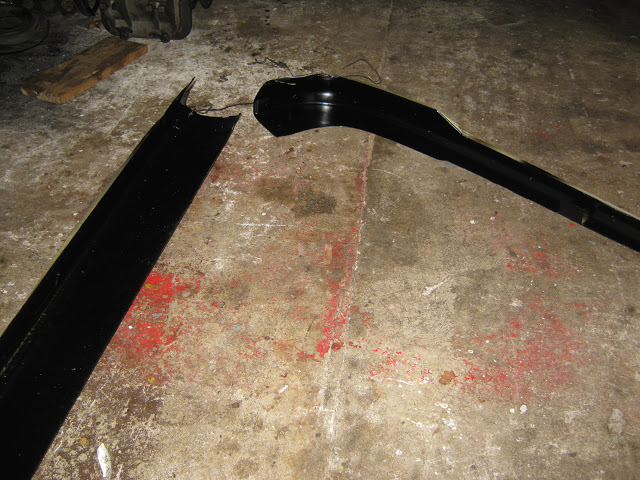
TBh the rear bumper was pretty rusty on the inside, so without going to the expense of a new bumper i did the best i could
Worst of rust removed with wire brush on an angle grinder and then treated with brunox
And then 2 pack epoxy primer
Rear end now supported by the sills ready for subframe removal.
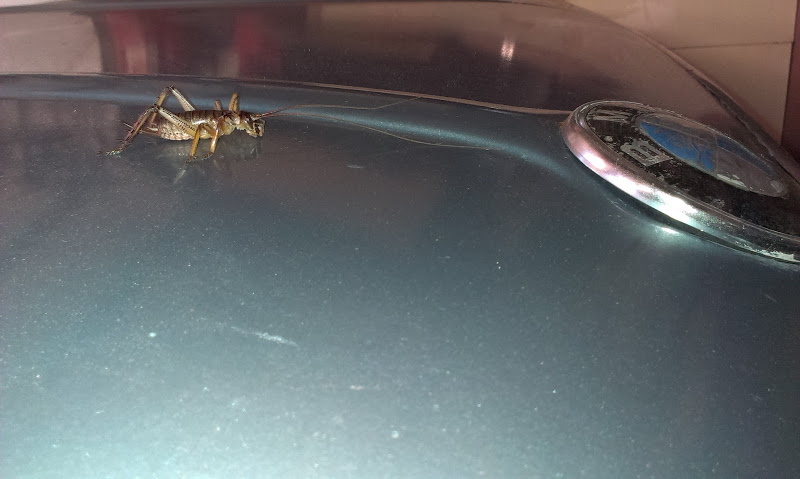
And finally a NZ Native Weta decided to pay the BM a visit so i took a photo - he was later released into the wild!
-
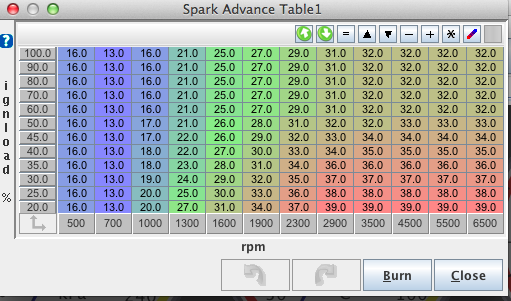
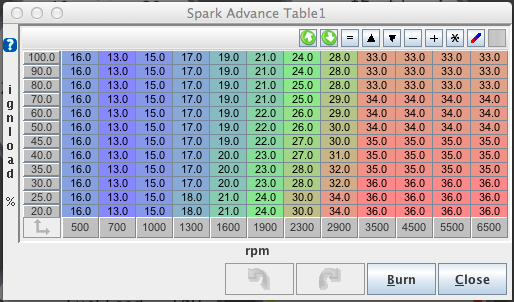
This was my starting point (very conservative), you are welcome to use it but this was for a standard engine with a Solex single barrel carb! Also make sure your advance shown on the Megajolt is actually same as the advance on the crank pulley checked with a timing light! Screen+Shot+2014-03-20+at+6.43.06+pm+V1.png
Also heres a link to my blog with a bit of stuff about how i did the EDIS install http://www.bmw2002faq.com/topic/134019-73-fjord-with-megasquirt/page-2
-
I dont think you will regret getting this setup, the adjustability and rock solid timing are fantastic. If you havent got one already i would consider investing in a wideband O2 sensor which makes tuning much easier, especially if you can datalog (not sure if you can do this with Megajolt?). I started off with a conservative curve, basically copying a distributors advance curve and then started adding a couple of degrees of advance, by about the 8th version i had a pretty nice curve which transformed the performance. Of course the best way would be on a Dyno, but im cheap!
-
And if you thread the line from the front with the engine in disconnect the battery first- ask me how I know!
-
+2 on timing check - hot exhaust manifold can indicate timing too retarded
-
I used the bread trick and it worked perfectly for me, i watched this YouTube clip before taking the plunge
-
I followed this novel method for removing the pilot bearing, it took 2 slices! I have used grease before but this was more effective (and cleaner!)
-
i followed this video from DIY Autotune
My MS is sitting at the centre console and the relay board down the side of the engine bay http://www.bmw2002faq.com/topic/134019-73-fjord-with-megasquirt/page-2 3/4 of the way down the page. Sorry just thought mine is RHD so positioning may not work so well, its there for what its worth! -
Ive recently added edis and a megasquirt to my M10, running ignition only atm, details here http://www.bmw2002faq.com/topic/134019-73-fjord-with-megasquirt/page-2 (about half way down the page) and it has transformed the engine - the original distributor was poked though! Along with the nice stuff from 02again i think you will be happy with the final result. Also highly recommend adding a wideband to your wish list, will help with tuning heaps.
-
One step back, two steps foward!
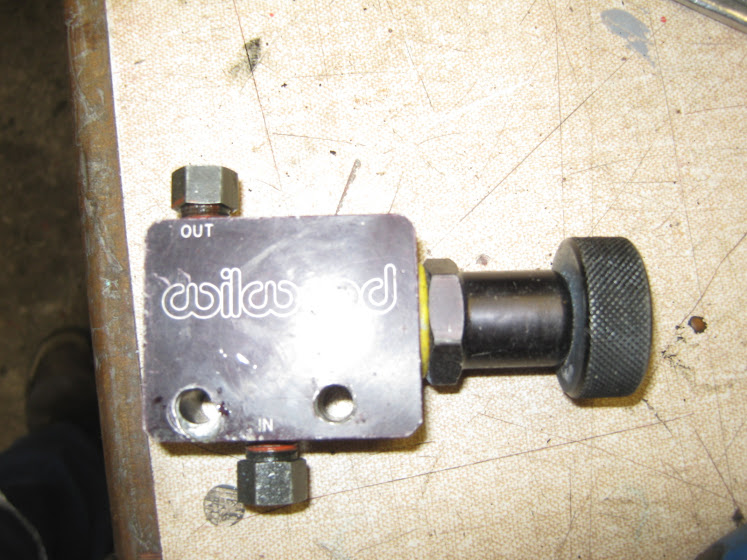
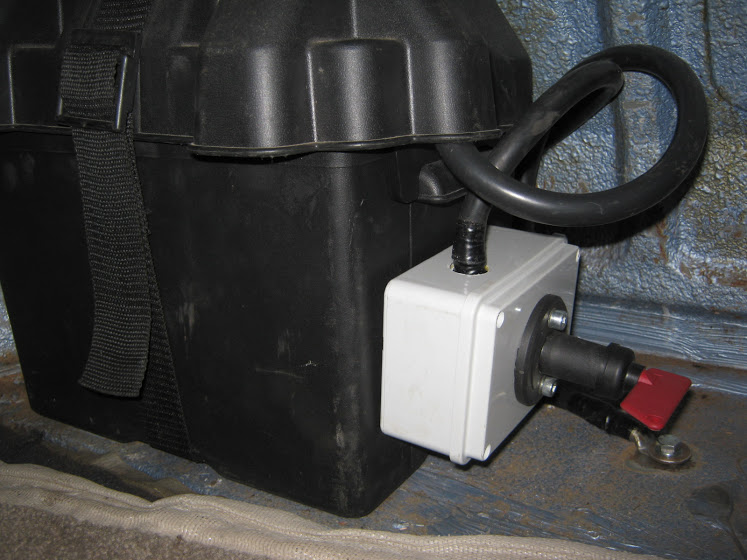
Had a minor setback that could have turned into a major, i needed to remove the adjustable brake bias valve (illegal in NZ without a cert)
i replaced it with a straight run of pipe and decided the best way was to pull it through from the front via the engine bay, along the gearbox and reconnect with the T near the rear axle. Unfortunately while pulling the pipe through it contacted the starter motor positive feed (direct from the battery in the trunk and grounded itself on the first piece of metal it touched which happened to be the dipstick - arc welding sounds, flames and the smell of burning rubber ensued. I crawled out from under the car, grabbed the fire extinguisher and after emptying the contents of it into the engine bay put out the small fire on the top of the dipstick, i then went to the battery and disconnected the negative terminal. The result -
Hindsight is a wonderful thing - what i should have done was disconnected the battery before starting, lesson learned so i installed (rather crudely) a battery isolator
The good news was most of the pink powder from the extinguisher blew off easily ( theres still some there to remind me of my stupidity) and more importantly no electrics including the megasquirt were damaged. I needed to replace the dipstick and but a new piece of brake pipe - which was installed without drama
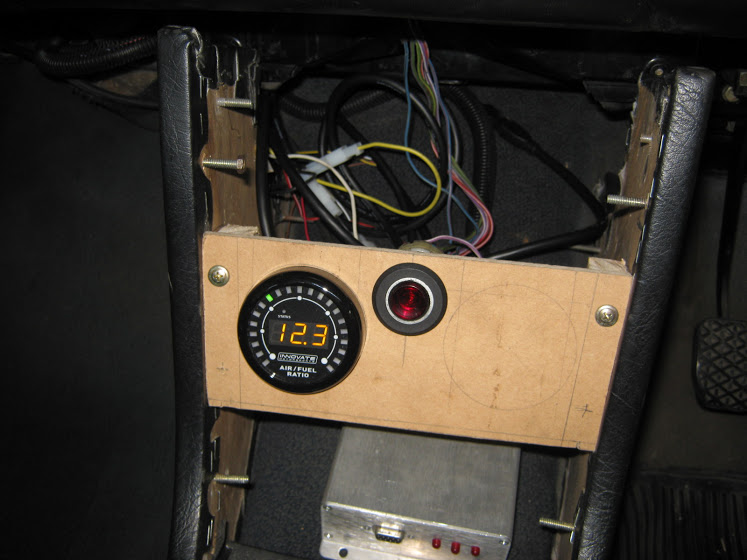
My main focus has been tuning the megasquirt, first i had to install the Wideband
Gauge temporarily installed in the console with the megasquirt box sitting under it, after calibrating the O2 sensor was screwed into the bung (at 12 o'clock behind the 2 into 1 collector). Tested it standalone and then connected to the megasquirt, all working well although there is a small difference in the AFR on the gauge and that showing in Tuner Studio, i need to adjust the calibration in TS.
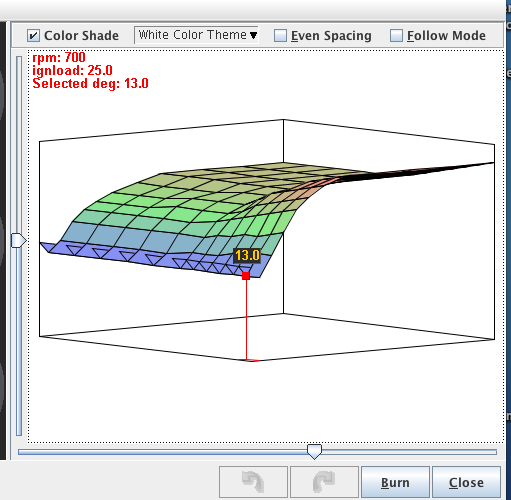
Over the last couple of weeks i have been gradually adjusting the advance curve map. I realise that the only way to relly do it properly is on a dyno but for now the seat of the pants, looking at logs and very gradual adjustments will have to do because 1) I'm too tight to pay for a dyne and 2) Im fuel only ATM and wont put it on a dyno until the injection is done because - refer to 1)!
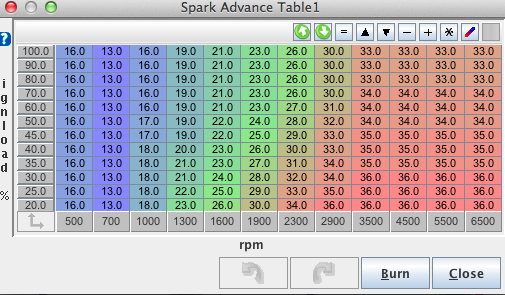
Very happy with the results of the testing so far. There was a huge improvement in the first place simply from changing from a worn out distributor to edis/megasquirt giving me rock steady timing instead of a wildly bouncing flywheel ball. I set the timing to a fixed 25 degrees and strobed the inspection hole and there it was -the ball bearing sitting steady in the correct place. That confirmed the toothed wheel/VR sensor were positioned correctly. I then changed back to use map and started with this very conservative map, based roughly on a standard distributor curve
and the 3D map
After a few runs to work with the laptop on the passenger seat im on the 5th version of the map
Plenty more work to do but i feel like im heading in the right direction, certainely the engine has started to come alive. Its only running a single barrel solex so not much room for adjustment there, i set the idle jet using the Wideband it now idles at around 14:1 , cruises at about 13.5, under acceleration between 12 and 13.5 and decelerates (on overrun) around 16 to 17.
If anyone has any input it would be gratefully received as I'm a total newbie to the tuning by laptop experience.
-
Looking for some borrani / alipina rims if anyone has any floating around or enkei classics.
jeff (wellington)
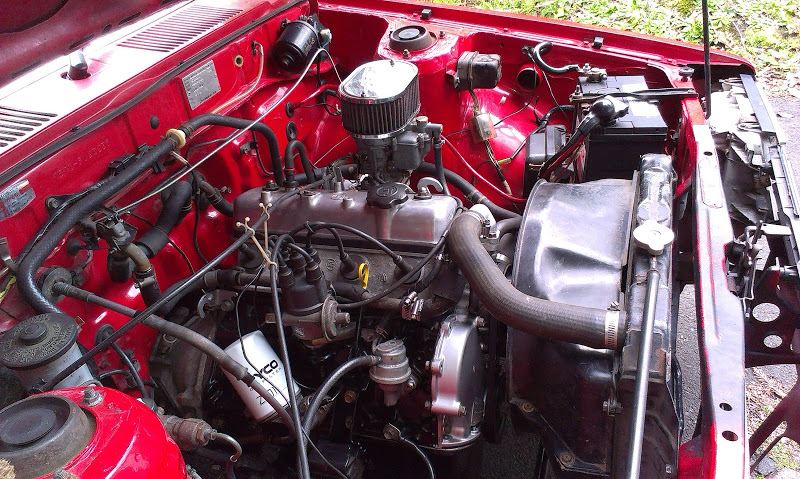
Nice clean motor you have there - im officially jealous! What carbs do you have on there?
-
I thought all the big Ford trucks over here got imported from the US? Theres a place called Bunce Motors but i think they only deal with GMC trucks. F450/350s are a pretty rare beast over here, maybe Aussie could be a better bet? Sorry i can't be more help, good luck with your search.
-
Thanks Guys, great info - this Forum rocks.
-
I received an email from Walloth and Nesch today, they have added solid rubber rear suspension mounts to their catalogue http://www.wallothnesch.com/gummilager-ha-motorsportausfuehrung-haertere-gummimischung-voll-ausgegossen-aussen-links-rechts-passend-33-18-09.html?___store=eng they are sold as 'for motorsport' but any opinions of the suitability of solid rubber for street use? My current rear setup is Jaymic lowering springs (30mm drop) and Billy Sports.
-
Very nice work!!! Very impressed with everything!!!
Thanks for your kind words. Glad to see (on MSExtra Forum) that your MS issues are getting resolved, i still have the fuel side of things to do
! -
Megasquirt Hookup
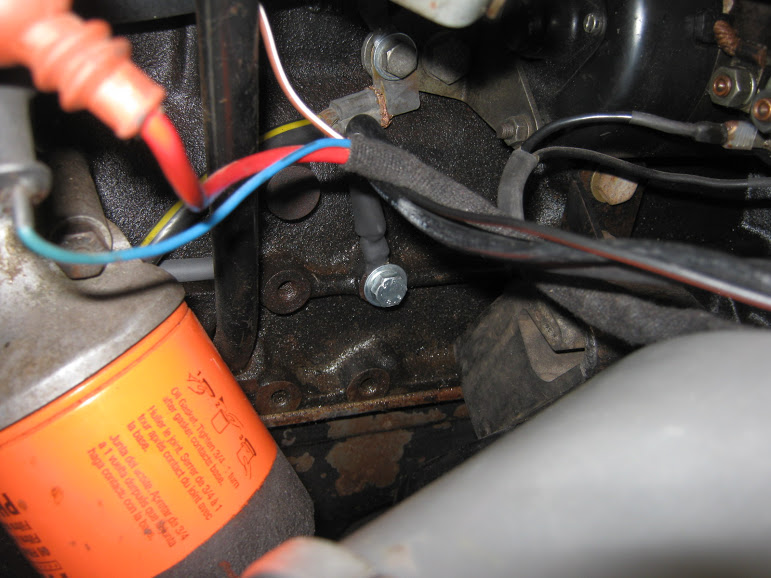
Next stage was to hookup EDIS module (already confirmed to be working in limp mode) to the Megasquirt.
Only 2 wires to connect to the relay. PIP which is the Tach signal in and SAW , the signal Megasquirt gives the EDIS to vary the spark advance.
Before testing i tidied up the ground connections, EDIS and MS grounds all converge at the engine block.
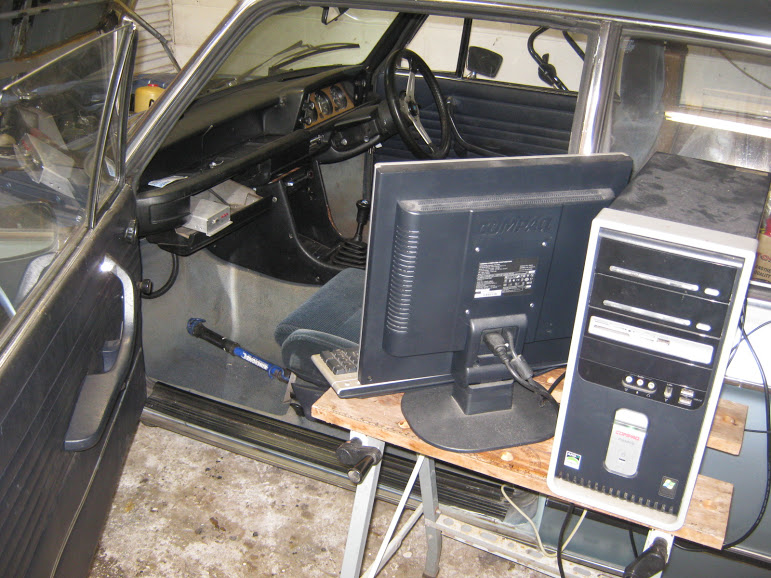
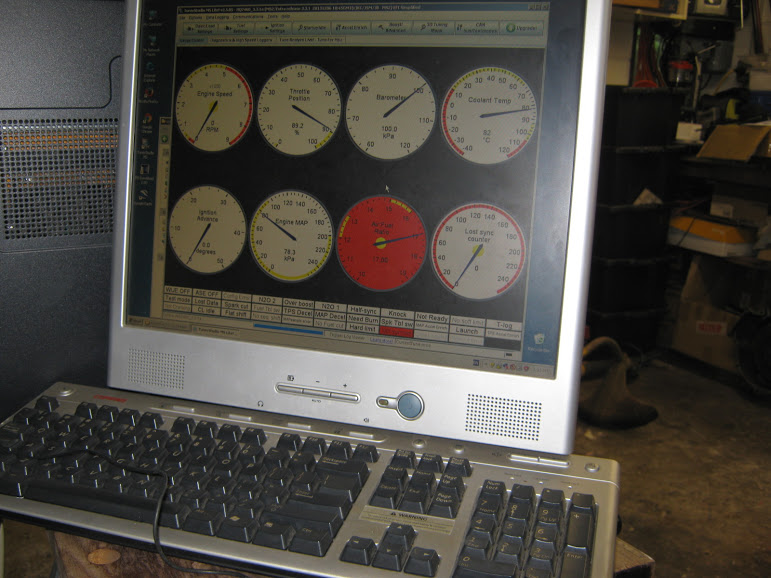
At this stage i hadn't access to a serial to USB to use my Macbook so bought out the desktop Windows PC to the garage! BTW i believe a Windows OS was needed to load the latest MSExtra Firmware to the MS, there isnt a Mac based loader available. Latest firmware loaded perfectly and so was ready to startup.
Using Tuner Studio software and from info i gleaned from http://msextra.com i setup the ignition settings for EDIS and initially set the Fixed Timing to a fixed advance of 10 degrees and with everything crossed started up - motor fired up and after warming up i changed fixed advance to 15 degrees, burnt to controller and like magic the engine revs changed!!! Controlling my 40 year old Beemer from a computer, what a hoot
. Map sensor was also showing me load from the takeoff below the inlet manifold so now i could build an advance table.
Based on info from Megasquirt forums, FAQers posted tables, BMW distributor curves and a bit of guesswork i built a (hopefully) very conservative table shown above.
I've been for a couple of short test drives and even with this unrefined table there is a marked improvement over the old worn distributor and with full spark advance control things should get even better.
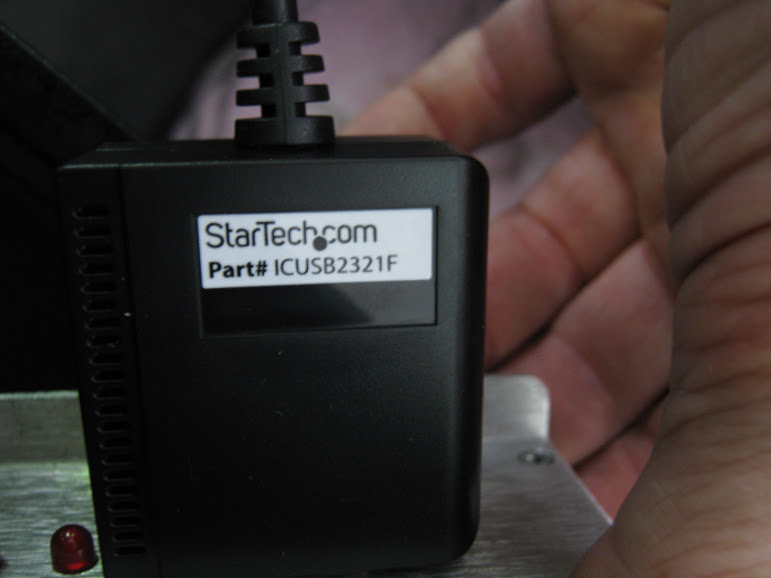
Package arrived from Amazon containing this USB to Serial cable (FTDI chip based) hooked up to my Macbook running 10.9 Mavericks and fired up Tuner Studio, went to communications tab, hit the detect button and it found the Megasquirt immediately. At this stage is working perfectly which is a relief as there appears to be a few USB/Serial/Mac issues out there.
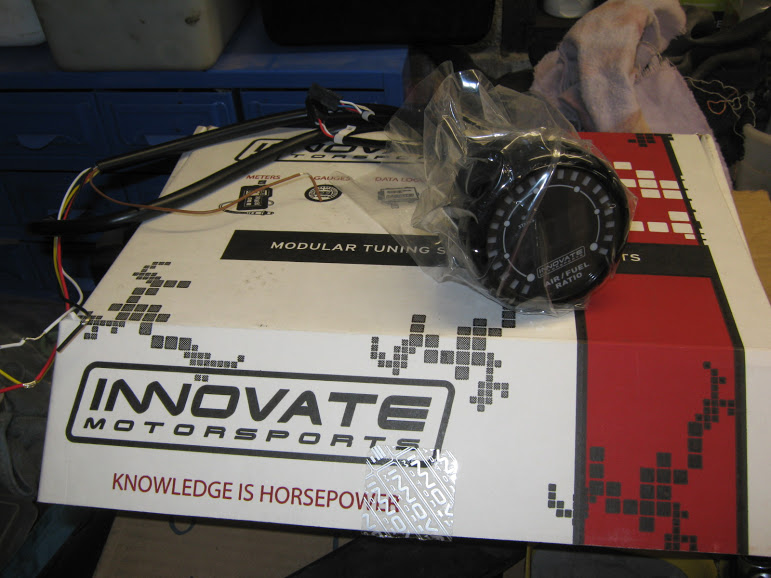
Also in the Amazon page was this http://www.amazon.com/Innovate-Motorsports-3844-Complete-All-In-One/dp/B004MDT8MW/ref=sr_1_2?s=automotive&ie=UTF8&qid=1389481703&sr=1-2 with free shipping to NZ on this it was too good a deal to ignore
Next project sorted!! -
Excellent, thanks guys, onwards and upwards!!
-
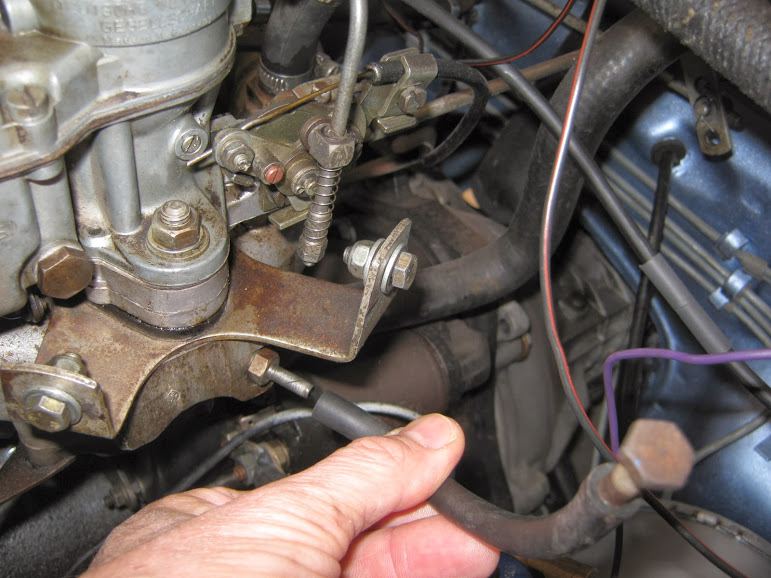
EDIT: Sorry Guys for wasting your time - i had another look this morning and found what i think is the perfect place to get manifold pressure from
Is this a good spot to supply the map sensor with vacuum info?
-
I'm in the process of adding Megasquirt and the first stage is to add EDIS ignition http://www.bmw2002faq.com/topic/134019-73-fjord-with-megasquirt/page-2. I am unsure if i am able to use the vacuum take off from the Solex PDSI Carburettor to supply vacuum to the MAP sensor. There is only one take off on the solex and it is located just above the throttle butterfly. Or is there a more suitable point to get the vacuum from?
This wont be the final fuel solution, i will either go to 318i Manifold or maybe ITBs but will run it for a few months in this configuration so it needs to be a useable but not necessarily perfect solution.


 !
! 
73 Fjord with Megasquirt
in Project Blogs - Archive
Posted
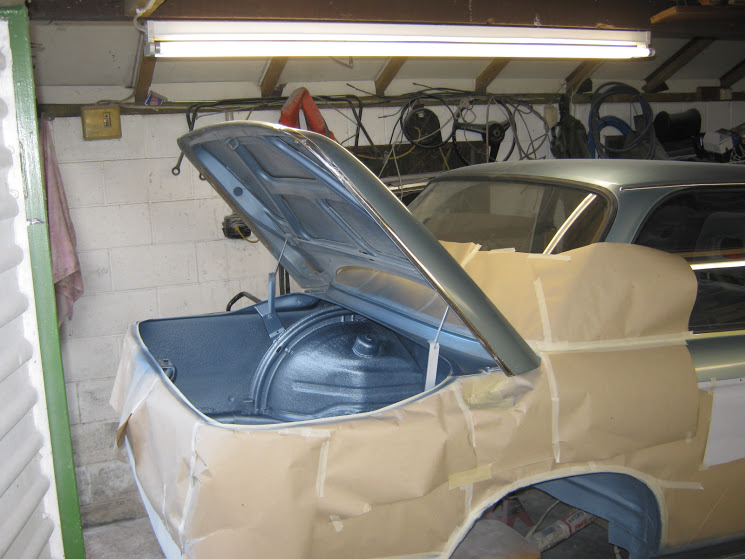
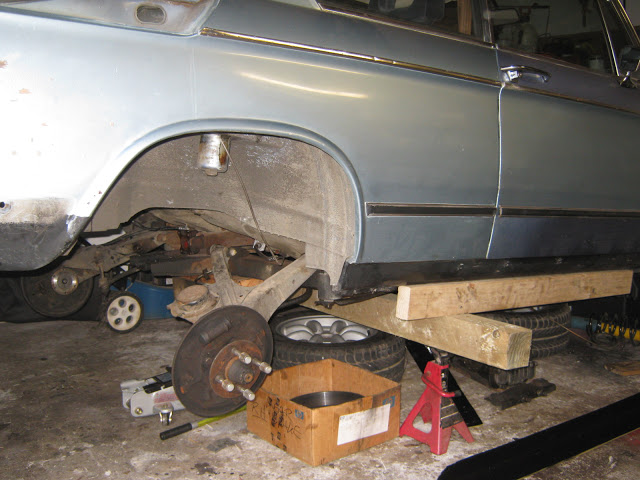
Painted!
3 coats of basecoat followed by 3 coats of clear, a few nibs to remove and a couple of small runs but overall happy with the result in not ideal conditions. The main problem now is the new paint on the rear makes the rest of the paint look even worse!
While the paint hardened i put the mechanicals back on
Added a Volkswagen Passat Fuel filter and bracket for future FI conversion
Wiring tidied up
Subframe mounted, new rubbers throughout, turbo handbrake cables for 320 drums, new rear brake cylinders.
New lock nuts on driveshaft
Gas tank in, using 3M strip caulk to seal.
CVs and old exhaust added, a new exhaust with turbo type muffler is on the wanted list but will have to wait!
Final shot up on stands, its been 9 months since it was on the ground
On the ground, still work to do but good to see it rolling again