


66Vette
-
Posts
83 -
Joined
-
Last visited
-
Feedback
0%
Content Type
Profiles
Articles
BMW 2002 and BMW Neue Klasse Wheels
Colors
Steering Wheels
Production Years
Models
Registry
BMW 2002 Vendors and Shops
BMW 2002 Books
The Hack Mechanic
Forums
Blogs
Gallery
Events
Store
Books
Community Map
Videos Directory
Posts posted by 66Vette
-
-
Ok, I am getting committed to tearing into my sunroof to get the mechanism working properly. I have read about as much as I could find and there is one detail I can't resolve. It has to do with the sunroof sliders in the rear. There is a small rod that sticks out from the sliders. I'm not exactly clear what the function the rod plays (maybe to raise/recess the sunroof?). Plus, there is conflicting information on whether the rod goes between the roof and the sheet metal strap, or outside of it. I've found two resources that have it different.
Here's a couple of pics of what I am talking about. And if it makes a difference, I have a 1975.
Thanks, Cris

-
Conkitchen, I will PM you. Unfortunately my interior is gutted right now (no windows, no dash, no carpet) so it is not really mobile.
-
Karl:
Thanks, I had already reached out to them. They recommended a place called Wardell Auto Upholstery. I have a call in to them.
I also left a message for William at Bay Area Motorworks.
Hami at Auto Dynamik is another resource I looked into (he did a great job on my heater refurb). He has done them in the past but would prefer to stay away from them.
Cris
-
I have a 1975 02 and the sun roof only kinda works. I've got a ton of stuff on my plate getting the car back up and running so I'm looking for an expert to get it sorted. Does anyone know of someone who works on these...... and can maybe make it operate even better (more reliably) than new? I'm in the SJ/SF Bay Area.
Thanks, Cris
-
I needed an excuse to get out of the garage and commiserate with other 02 owners with project cars. Ay carumba, bad timing for the rain
-
 1
1
-
-
Wow. The more I dig into these cars the stranger it gets. I'll pull the buzzer and tie the wires neatly away.
Thanks guys
-
Mike, really great explanation.
While we have the column experts, the door buzzer on my car was unmounted and sitting in the bottom plastic cover. I am assuming since it has a mounting tab, it was supposed to be screwed down somewhere. Mine is electrically disconnected and I want to keep it that way, but I'd like to secure it in the proper manner.
Thanks, Cris
-
John:
I think that answers it. I have the top piece (with VIN tag). I have the main plastic piece that holds the ignition switch, horn ring, etc. What I am missing is the bottom finish panel....doesn't surprise me!
I am not sure I'll miss the bottom finish panel, but I'll start looking for one.
So the bottom plastic piece is held to the column with the two B screws. The top piece is held on with the four A screws that go to into the bottom plastic piece.
Thanks, Cris
-
John, there is a "finish" panel that is separate from the bottom plastic panel? And it gets screwed to the plastic panel shown in my pic? (The C and D holes are different types and diameters.)
Thanks, Cris
-
Guys, thanks.
I think bergie33 has the "D" hole mystery solved.
visionaut, I did not notice the "C" holes were threaded, good catch. Did they mount something from the inside?
-
Visionaut, thanks. The drawing only covers the "A" and "B" screws. Do you know what the "C" and "D" holes are for?
Thanks, Cris
-
I'm working on a 1975 2002 that was never quite put together properly. I am trying to figure out the steering column bottom cover screw holes. From the attached picture: The "A" holes take what looks to be a wood screw into the top cover (?), the "B" holes take a machine screw into a bracket on the steering column, but "C" and "D" are the mystery holes for me.
Thanks, Cris
-
In a former life, I designed some custom electronic instruments for a client of mine. I was always a fan of how older electronic instrument panels looked.. They were all done by engraving and then filling the letters/numbers/images with paint. You will also see this technique used on military equipment and aircraft. This method is very durable because you cannot rub off the engraving and paint (the paint is recessed in the engraving).
I found an engraver near me who not only did engraving for trophies, etc but also did electronic instrument panels. He did my panels which included a logo and letters. The detail and appearance was exceptional. Much nicer than a silk screened panel or decals. Cost was in the neighborhood of $50 per panel. My panels were aluminum, though he did all the proofs in plastic.
-
1
-
-
I am pretty much done with the driver's side footwell. This took twice as long as the passenger side. I have a little over two hours in it. The good news is there was almost no rust on the driver's side. The passenger side had a coating of surface rust. Maybe the "gooey" tar on the driver's side helped protect it.
Ultimately, I'm glad I pulled the underlayment in the footwells. There was enough rust in the passenger side that if left unchecked might have caused some issues. It will get a good coating of Rustoleum, which should keep any issues at bay for decades here in California.
Keep us posted on how well the dry ice trick works. There are mixed results on the web. Some swear by it, others have abandoned it. It may have to do with the type of underlayment. Hopefully it works on the 02.
-
JQ02:
I am using an all metal blade, it has a smooth chiseled edge. I did the passenger footwell in no time, but I just got out of the garage after stripping the driver side footwell. The driver side is not coming off as easy as the passenger side, lots of tar like goo. I've got an hour into it and it still needs some touch up.
Let us know how the dry ice works.
-
1
-
-
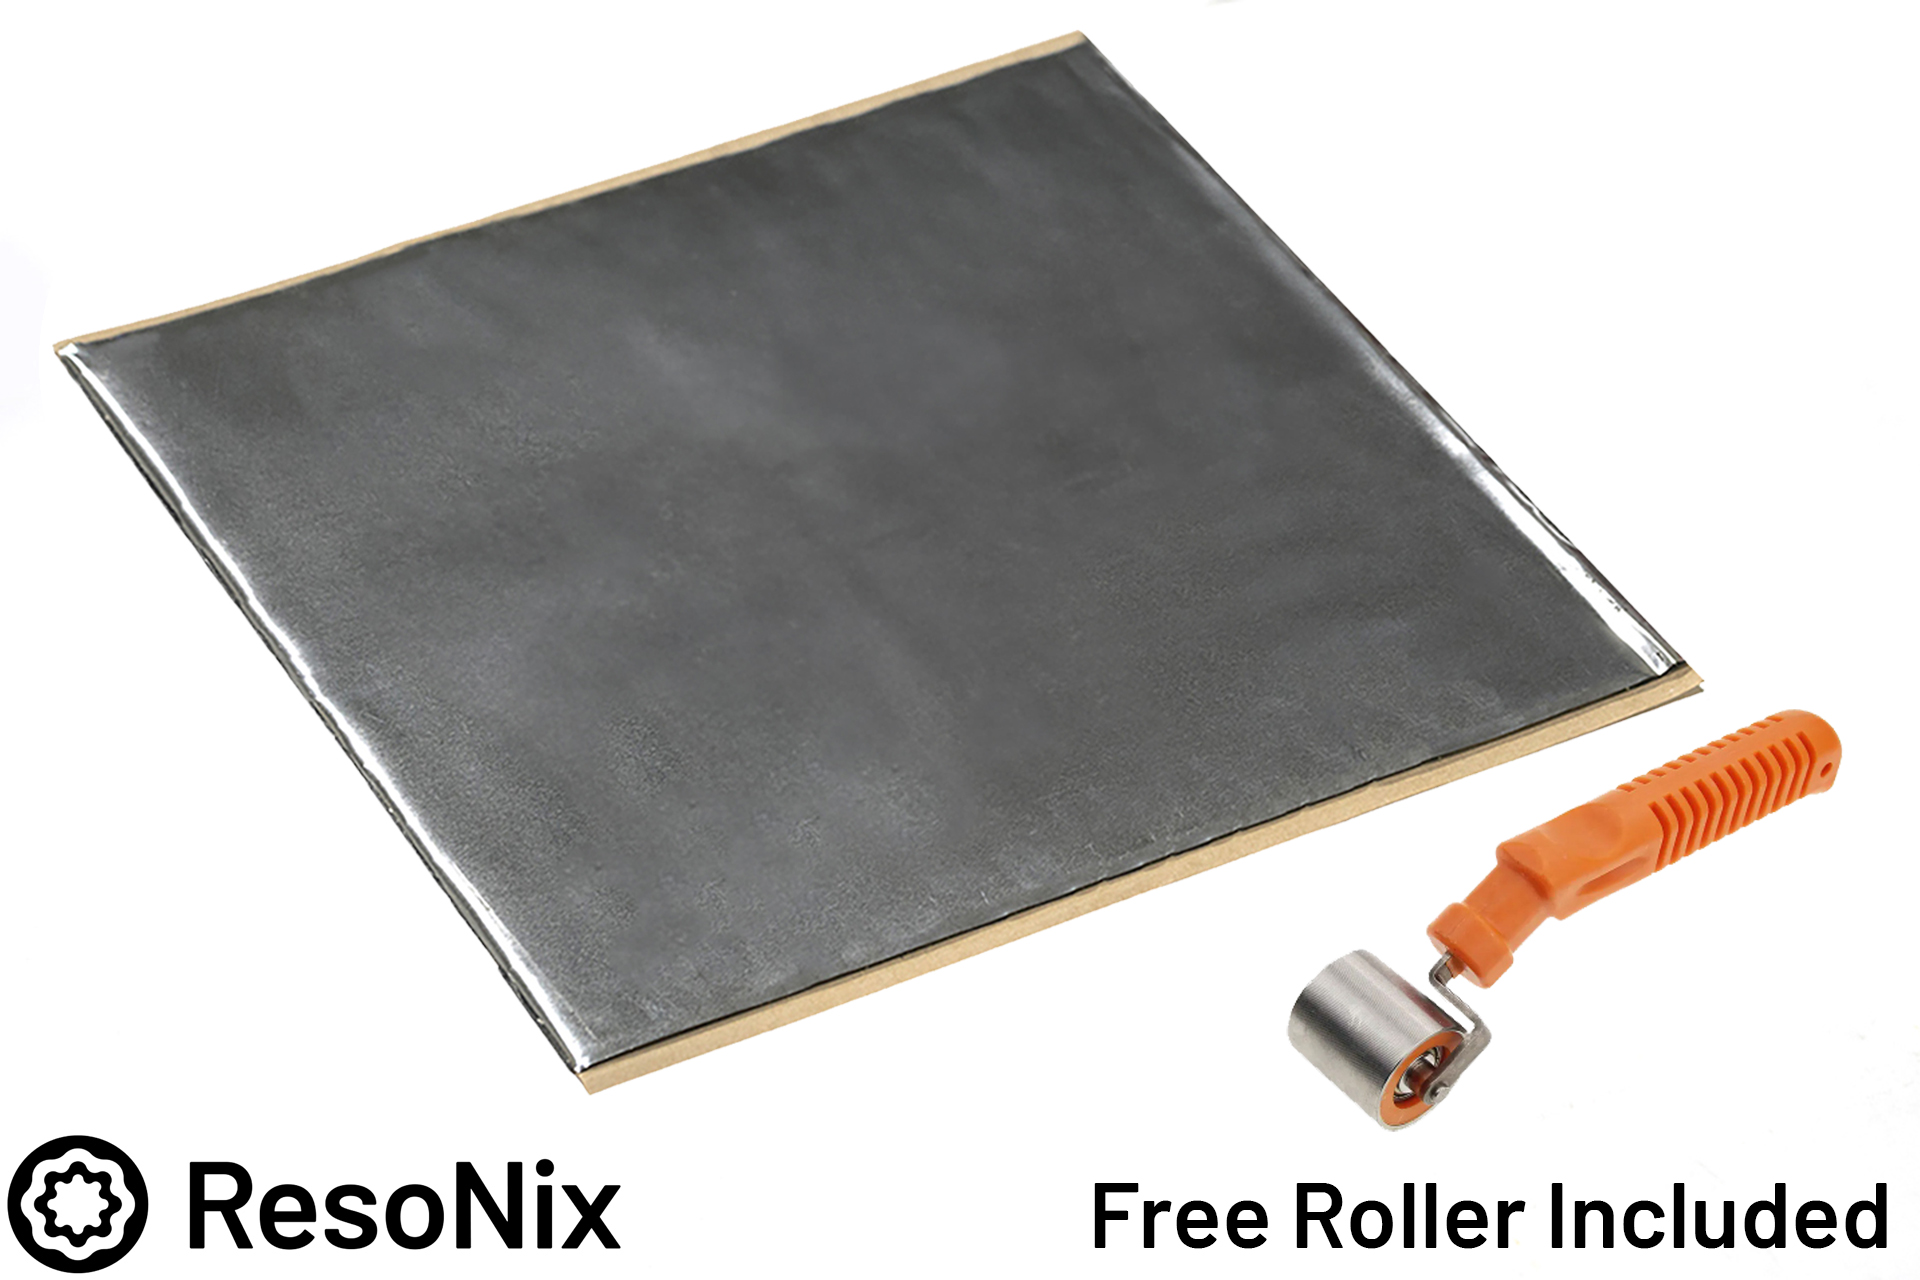
Has anyone used this product before? It seems well made, they have a testing set-up to allow comparison to other products like Dynamat, and it has a good following in the audio sound business. I've just never heard of them before and I am looking for sound deadening options.
 ResoNix Sound Deadener - CLD Squares - Full Box: 40 Pieces (40 Square Feet) - ResoNix Sound Solutions
RESONIXSOUNDSOLUTIONS.COM
ResoNix Sound Deadener - CLD Squares - Full Box: 40 Pieces (40 Square Feet) - ResoNix Sound Solutions
RESONIXSOUNDSOLUTIONS.COM
ResoNix CLD Squares are the very best Constrained Layer Damper on the Sound Deadener market. Made with one factor in mind: Performance! Made In the USA! -
I have the unenviable task of removing the old tar paper underlayment from the front foot wells. I had read about dry ice, heat guns, and solvents and I was not really looking forward to any of these methods. I have used a multi tool or oscillating tool to remove caulk before and it moves through caulk like butter......so I tried my multi tool on the tar paper underlayment and it mows through it with ease and leaves a clean surface underneath. You use the blade with a smooth edge. Give it a try, it has worked great for me.
-
3
-
-
I'm in the exact same situation. Is anyone using Resonix? Seems to have a solid reputation, and they have test results vs other manufacturers (albeit not independent tests).
ResoNix Sound Deadening Materials
RESONIXSOUNDSOLUTIONS.COM
ResoNix Sound Solutions offers the best constrained layer damper sound deadeners on the auto, marine, industrial, and aerospace markets. -
I am in the same situation. I have a 2002 with an M20 swap that I am trying to make quiet and smooth for the street. My car has been cut up for flares etc, so I am thinking of cutting out the spare tire carrier (which I will never use) and getting some room for a real muffler. I am partial to Walker Quiet Flow mufflers. They come in a variety of configurations.
-
1
-
-
I've never used this program so can't speak to the user interface, but this is used by many engine builders for header design.
MaxRaceSoftware
WWW.MAXRACESOFTWARE.COMI have used Engine Analyzer Plus. If I remember correctly it allows some of the header parameters to be specified and you can see the impact on HP and Torque. This program was pretty accurate predicting HP on a small block chevy build. I feel its best use is to evaluate differences when making changes like cam specifications, not so much on nailing down an exact HP figure. For an M10, you may have to be creative in entering things like intake manifolds. And remember, GIGO.
https://www.performancetrends.com/
-
VW:
I kinda like the look of those mats. Did they fit well? You happy with them? Looks like they make ones specifically for the 02.
-
I know it sounds red neck, but the old tire method works well. I would recommend you remove the alternator and any other bits that hang out and are not reasonably stout. I use a relatively wide tire, lay foam pads on the bottom and insides of the tire, and slowly drop the engine into the tire. The tire kinda forms to fit the engine shape. I use ratchet straps to tie the engine down securely from there. I've moved a handful of engines this way from small block chevies, a chevy inline six, and a BMW M20.
-
1
-
-
Mike, I have to remove the sound deadening/vibration dampening pads on my 75. I was going to try my multi-tool as well. By flexible blade do you mean the one with a smooth cutting edge? I have used mine to remove caulk and it does a truly amazing job, peeling it up like it was buttah.
Did you try adding heat at all?
Thanks, Cris
-
Piston to wall clearance is measured as the bore diameter - piston diameter.
How To Check Piston To Wall Clearance
BLOG.DIAMONDRACING.NET
Checking piston-to-wall clearance is a critical measurement every engine build should include. Here is a detailed walk through of how to measure your piston-to-wall-clearance.


Sunroof Assembly
in BMW 2002 and other '02
Posted
Thanks guys! My “green” photo looks like the winner.
When I checked mine, the pin is not like the green photo, it is like the red. That is, the pin is outside the spring clip.
I’m hoping this has something to do with my sunroof malfunction. Mine opens smoothly and will return perfectly if you only open to 1/4 or so.
If you open past half way, it jams and needs some help to close. When I open it this far, as I begin to close, it almost seems like it lifts early and jams itself against the roof.