
The BMW 2002 sunroof models enjoy the perfect combination of open air and security. Designed before wind tunnels and coefficient drag ratios were considered, it was placed squarely over and *in front* of the driver's view. Peripheral vision included whatever is happening in the sky overhead as opposed to modern day sunroofs which are positioned over and slightly behind the driver due to a raked roofline. When new, the sunroof option cost an additional $276, which doesn't seem much for a car with a base price of $2850 in 1972 dollars (some didn't even come with a radio or air-conditioning, so BMW 2002 first-buyers must have been a frugal bunch). That said, sunroofs are also probably the leading cause of rust as these models get older and the drain tubes get clogged or the car is inert for long periods of time outdoors.
When I began researching this operation I didn't find much, if any, information or how-to's via Google or my club contacts. A few offered the 'cut and weld at the pillars' idea, but the more informed ones warned of weakening the overall structural integrity by taking shortcuts. I agreed. What made the most sense was to do it as if it was factory original by cutting away and replacing the roof skin over the unibody skeleton.
Clearly it's a tedious procedure and requires fortitude and determination, but it's no more difficult than replacing a quarter panel- in fact, in some ways it's easier.
In terms of retrofitting a Golde sunroof to a BMW 2002, this isn't the only way or the best way to go. It's just how I did it. I made mistakes and recorded them as well- I hope it helps your effort. Be sure and read the whole thing before starting because I made some 'discoveries' that will save time if you take them into account beforehand :-)
Tools and things you'll need:
- 1. Cutting/Grinding tool with about 10 or 15 cutting discs and a grinding disc.
- 2. At least two 3/16 DeWalt Pilot Point Impact-ready drill bits (SKU# DD5012). Trust me on this. Regular drill bits will wear out fast and test your patience. I’ve done a bit of this before with quarter-panels, and drilling out the spot-welds and separating the skin on two roofs (yours and the donor) will be the most tedious and time consuming part of this process. I’ve tried several brands and types and these held up well and consistently punched through fast. Also a 3/4" drill bit.
- 3. A stiff spreader blade for wedging between and separating the metal between spot welds. If you can’t find a better tool more suited to this purpose as I couldn’t, get a couple- these will get trashed as you hammer on them. Spot welds have an annoying habit of holding fast while all the surrounding metal gets split, bent, and torn. Be patient!
- 4. Acetone or some good paint solvent.
- 5. A decent welder or a friend who has one and can use it better than you can (clearly, my welding skill is amateur-level)
- 6. POR15 spot patch (http://www.autobodytoolmart.com/por-15-paint-products-c-1435.aspx) and POR15 paint.
- 7. a tube of Blacktop Filler (Lowe's Hardware) that fits in a caulk gun. I liked this because it will dry flexible.
- 8. 3/4"ID and 5/8"ID plastic tubing. 7 or 8 feet of each. More would be better. (CHECK ON THIS)
- 8. other typical hand tools like pliers, a small wide-blade crowbar, etc.
I began by cutting the old roof skin out with the cutting tool close to the edges of the drip rails and front and rear window openings.

You can go ahead and cut further down on the A and C pillars than I did at first at this time if you're comfortable doing that.

You can see there's a place on the roof skeleton underneath the top of the rear side windows that protrudes up and out to the edge of the driprail. I cut through this by accident, but filled it back up with POR patch. :b

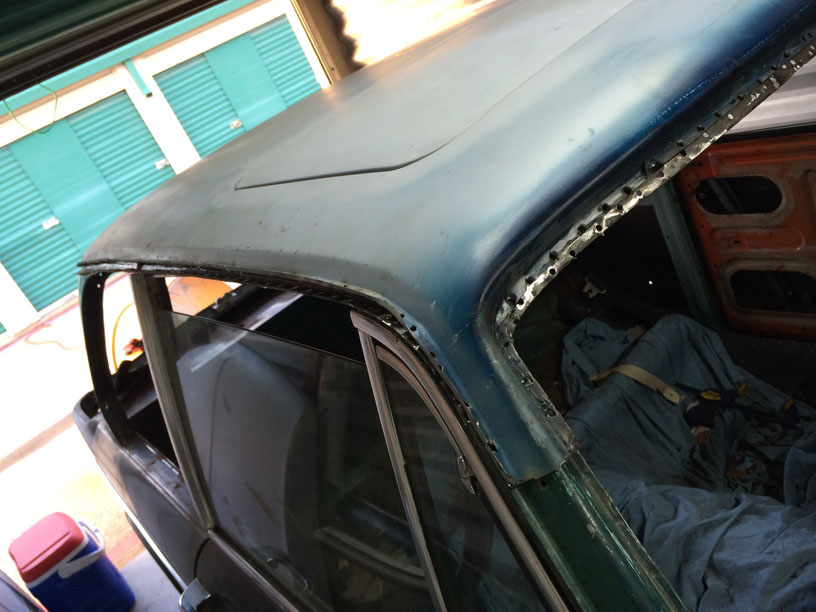
When it came to separating the old roof skin from the drip rails, I sacrificed the roof skin to try and keep from mangling the lower part on the roof frame. Some welds I drilled out, some I simply ground down with the cutting disc or grinding disc.

I came back and cut further down the A pillars (check your clip to make sure you have enough to cover the area) so that the length of the repair would be as small as possible.

After I cleaned up the area on the car I'd cut away, I got to work on the clip.

Here, I worked to salvage the other side of the driprail- sacrificing the bottom part to keep the top part as smooth as possible.

There's no quick and easy way to drill out the welds, you'll just have to be patient and do them one by one. It helped to reveal where they were hidden underneath several layers of paint by rubbing some Acetone on the area until enough paint was removed to show the spot welds.


You'll want to be careful with these support brackets and cut around them to separate the sunroof part. These will need to be cleaned up and welded to the inside roof structure of the car.


I shielded the roof skin from the cutting disc by wedging my crowbar in between and using it as a stop.

The old skeleton parts should separate easily once all these areas are cut.


Go ahead and cut away the slicktop cross beams and open that baby up. Ahhhh...

Now lay the sunroof section on top of the car to test the fit.


Since your car didn't come with a sunroof, you'll need to add the drain tubes. Remove the front fenders and drill about a 3/4in. hole just in front of the rear (vertical) wing support. Feed the tube bottom to top by using a straight metal rod (I used a headliner bow) through the A pillar and alternate shoving/pushing the tube up through the small passageway. It will take some messing about to figure out what I mean, but take your time- it will work.


The side with the antenna mount (in my case the passenger side) will take a bit more patience. Loosen the lower mount to clear the passage a little.

The passenger side did not have a pre-drilled hole in the A-pillar to pass the draintube through the top, so you'll have to create one.


Next, I squeezed out some Blacktop Filler on the roof frame to mate the sunroof section.


You'll need to carefully bend the side brackets on the sunroof in a little to make them fit inside the car roof frame. They're going to bend back out after you do that, so be careful how far you go. They won't break, but once they're bent they're bent.

Check fit all around after you've got the new rood settled in place.

This was tricky. I waited to cut the A-pillar overhang after the roof settled to make sure I didn't cut too much. In doing so, I melted a bit of the drain tubes- luckily, I'd left plenty of extra on the bottom to shove up through the passage and replace that burnt part :b Obviously, you can make the final cuts to fit the roof *before* you secure it so you can work in the draintubes.. I have no idea at the moment why I didn't do it that way. Just leave plenty of extra tube at the bottom and be careful welding over the A-pillar sections after the tube is up in there.

The rear tubes are a no-brainer

After you're satisfied with the fit, start spot welding the roof in place. Use some POR patch to fill any gaps, and be sure and wait the full 96 hours for it to cure. It will be hard as a rock- literally, but you can sand it down easily with an orbital sander and some 80-grit.
Now you can begin the grinding, Bondo, block-sanding phase to blend the new roof into your car.

AFTERTHOUGHTS:
I've had really good luck with 3M Body Panel Adhesive (3M#8115) gluing areas of the quarter panels, etc.. It boasts 4000lbs. of twist strength, dries rock-hard, and you can sand it down with a rotary disc sander if needed. It's used by new car manufacturers on non-structural body parts- sometimes in addition to welding (but not overlapping the two as the adhesive is flammable). If welding is not an option, I wouldn't hesitate to substitute this stuff- although I will add that I have not tried any competitive products that make the same claims. Make sure you have plenty of clamps and give it the full cure time.


Recommended Comments
Create an account or sign in to comment
You need to be a member in order to leave a comment
Create an account
Sign up for a new account in our community. It's easy!
Register a new accountSign in
Already have an account? Sign in here.
Sign In Now