


2002GT3CAR
-
Posts
96 -
Joined
-
Last visited
-
Days Won
2 -
Feedback
0%
Content Type
Profiles
Articles
BMW 2002 and BMW Neue Klasse Wheels
Colors
Steering Wheels
Production Years
Models
Registry
BMW 2002 Vendors and Shops
BMW 2002 Books
The Hack Mechanic
Forums
Blogs
Gallery
Events
Store
Books
Community Map
Videos Directory
Posts posted by 2002GT3CAR
-
-
5 hours ago, Furry Camel said:
I'm not questioning the authenticity, I was thinking that when they changed the blanks, maybe they subbed out the grinding and the new grinds match the specs, while the older stock was slightly different. Show where you took measurements, and I can measure mine, since I have a new version available to measure, if that's valuable information to you.
Using my digital calipers the smallest diameter on both the intake and exhaust lobes measures 25.2mm. The peak of the intake lobe is 34.4mm and exhaust is 34.1mm. That’s how I’m getting 9.2 and 8.9mm. Maybe this isn’t precise but it’s enough of a difference from published specs that I noticed. I’m trying to get every last hp out of this new build so if there is a more aggressive 336 version I want THAT lol-
 2
2
-
-
It says schrick as a raised part of the casting. It’s an older unused cam I bought off Eric Kerman. It’s clearly a 336 it’s just the the specs I’m getting on the lobes using digital caliper method fall short of published specs.
-
I was measuring an older NOS 90s Schrick 336 cam I bought a few years back and noticed the cam lobes don’t quite measure the advertised 9.5/9.2mm intake and exhaust lift. Im getting 9.2/8.9 as best as I can measure above the base circle. The serial number certainly is 336 but it’s measuring somewhere between 336 and the current 328.
Were there changes to the schrick 336 specs over time? I notice now schrick quotes it as 9.5/8.5 on their website even.

-
Willing to pay fair money for a very clean 380mm Petri wheel for 2002.
Ed
-
Looking for a good crack free 318i block for 84-85 e30 (m10). These blocks tend to crack around the head bolts so inspect that carefully. Local South Florida is preferred but I’m willing to pay shipping.
Thanks,
Ed
-
I’ve seen your car back at the Pittsburgh Grand Prix in 2018. Didn’t realize the hood was aluminum! Very nice job! Yeah it takes huge time especially stuff like the grills and inner structure. I’m trying to make mine so that it uses the factory hinges in front and those period rubber racing T straps in the back. Using 16ga definitely would be the way to go for a skin but with an inner structure 0.050” is enough strength. My goal is for this to be as close to a factory hood as I can realistically get without a press but I knew utilizing the rear factory locking bar and ramps was just going to be too difficult.
-
Hopefully he’s ok I’m speaking with a UK tuner who’s also trying to get information. He seemed perfectly fine and energetic when I spoke to him in late May.
-
 1
1
-
-
I’m having the same issue too. Spoke to him a few months ago but no luck reaching him since. Hopefully he’s ok
-
My new Bead Roller arrived this week which will allow me to make some pieces outside of the classroom environment (hopefully to get this across the finish line faster!). After experimenting with some of the step and tipping wheel dies I figured out the combination for the grill sections.
If you study that part, there is a small step forward of the grill and a slightly larger one after toward the windshield. The larger step carries around to the outside of the grill area.
Made a flexible shape pattern yesterday to make a practice piece. I am able to reproduce the steps nicely. The issue is the actual pieces I machined have .125” thickness around the grill holes to give the illusion of depth and then drop down to 0.050”. I’m a bit concerned about how this will affect the actual pieces and the ability of the dies to properly mesh but hopefully I can make it work.
It’s all part of the process
-
5
-
-
Yes minimum $20k to have a pro make this even. Hard to justify unless 02s start pulling in 70s Carrera prices! I want to build some custom flares after this but one project at a time….
-
Oh it’s definitely going on my car not my wall haha. The hood will be painted too because imo it would look a bit weird to have bare aluminum and steel together? Regardless I’m aiming for a finish nice enough that it COULD be left unpainted….
-
1
-
-
1 minute ago, markmac said:
Now for the aluminum doors and deck lid. Get cracking man........
Those won’t save much weight it’s more about bragging rights 😂
-
1
-
-
His shrinking discs were definitely employed on the sides where the hood meets the fender. Welding those pieces in while clamped created massive distortion that I spent DAYS fixing with dykem, a slapper and dollies. Then you go over it with a special phenolic shrinker disc because metal will scar the aluminum. I had days where I couldn’t close my hand after holding a dolly all day. But it will all be worth it I hope 😅
-
2
-
-
It’s all standard 3003 aluminum which is commonly used for panel forming on cars. I can say unequivocally that none of this would be remotely possible without the help of Wray Schelin @proshaper up in Charlton, MA. Yes I’m doing 99% of the work but when I get stuck a few minutes of guidance from him gets you on the right course again. Plus his facility is unbelievable. It’s not a stretch to say that few places on the planet have the equipment he has. 19 English wheels for starters! Highly recommend his classes…
-
Regarding the inner structure, my plan is to replicate the factory structure with aluminum as closely as possible and bond it to the skin. Welding would create too much distortion. I will use the factory hinges in front but I’m going to ditch the rear cable rod lock in favor of 60s type rubber dog bone straps as used by many BMWs and Porsches in period. I’ll see how it goes when I get there.
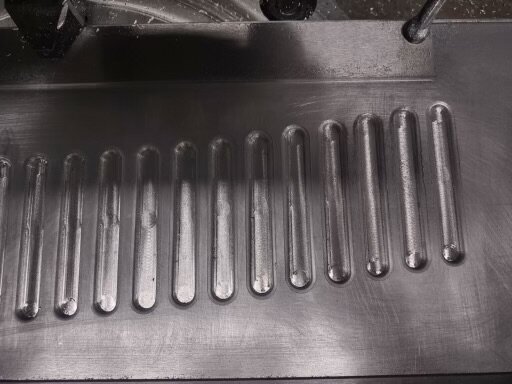
The biggest initial hurdle to this hood (besides starting at zero on coachbuilding knowledge) was how to make the grill sections. My 79 year old father is far more clever than me and figured out that it would be easier to machine those holes rather than try to perfectly press each hole on a curve with a custom die.
The solution was to start with 1/8” plate aluminum and mill radiused holes at full depth to create the illusion that they are punched, and then flipping the piece and having the machine mill down the backside to a finished thickness of 0.050”. We had a CNC machinist friend make these it took him a few days and several chewed up test pieces (the machine cutter would sometimes grab the backside and want to tear corners). Anyway, that was a rabbit hole but every single aspect of the hood project has been that way 🤣
-
6
-
-
It’s not as light as say Carbon Fiber but it’s pretty feathery. I’m aiming for 12-14lbs complete with the inner structure
-
1
-
-
Just thought I’d share a project I’ve been working on. About 2 years ago I started the big task of making a hand formed aluminum hood for my 2002. It’s quite a challenge because this was never meant to be made by anything other than a press!
I’ve been chipping away at it - taking a ton of coachbuilding classes and working on it at the class every 2 months or so (mainly because he has every piece of metal shaping equipment known to man)…I’ve built out my own workshop now to have most of the critical equipment so hopefully the rest gets finished soon but I thought I’d share some pics. It’s going to be about 400 hours total to build (about 200+ so far into it) so obviously no rational person would do this for money but it’s a passion project
") I’ll be posting about this more on my IG handle @carsandwhisky as progress continues!
I’ll be posting about this more on my IG handle @carsandwhisky as progress continues!
-
25
-
-
I’m looking for an excellent/near mint 35cm Petri Sport steering wheel with Bmw horn button and 2002 hub.
Thanks,
Ed
-
I spoke with Matt today he doesn’t have a hood unfortunately. The 69 is a roller I bought it without a hood. It’s got a later style trunk lid on it that I want to replace too.
-
1
-
-
Looking for early style (pre-72) hood and trunk for my 1969 02. Want to do local pickup because shipping for these would be pretty expensive. Driving distance from Hartford, CT area.
Thanks,
Ed
-
Sorry I just need to clarify I’m looking for the e30 M10 318i block from 84 and after. Not the e21 block from a 80-83 320i.
Thanks
-
Sorry I was away for the holidays. PM sent. Thanks
-
Looking for a good 318i M10 block with no bolt cracks or big overbore/decking. Local preferred I’m in CT.
-
Looking for an early gauge cluster to fit a 69 2002. Must be in good cosmetic and working condition.


Different 336 Schrick Versions?
in BMW 2002 and other '02
Posted
Interesting that the new ones range quite a bit! Mine is almost spot on that older one. I’m probably going to buy a new one and compare for myself -measure actual lifts and durations on the valves installed in my head