

Entry posted by joysterm
1,625 views
I wish to start out by saying this part of the build, replacing the headliner, I wanted no part in doing. For those who have done their own, I remain in awe of your ability to do so. In my case, I am somewhat limited with space to do the work but more importantly had no confidence nor trust I could do the job justice. So I decided to have it done by someone with more experience. After seeing his work I was more than happy to hand off another part of the build to him.
The next confession I wish to make is that I wanted something different than the stock option. For the purists who may read this post will likely question my choice for the headliner but the OEM replacement would simply not work in my view.
Given the lengths I am taking for this build I did not want to take a cookie cutter approach to the headliner.
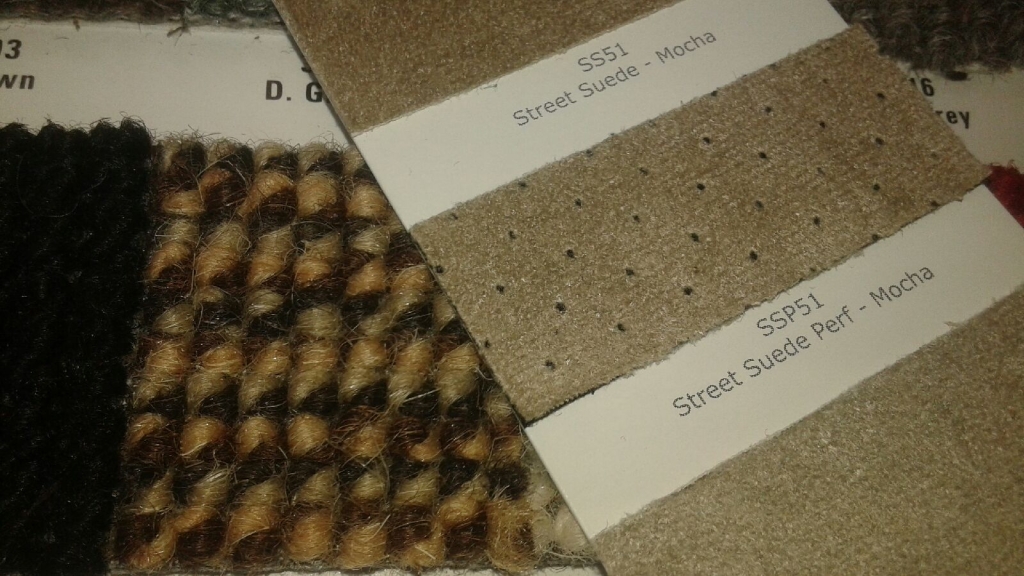
I had looked at countless samples when trying to narrow down my options but kept coming back to one. Alcantara was the one that checked most of the boxes. For those not familiar with the name, it has a suede type feel but synthetic material...but not cheap and in my situation not that practical of a solution given the cost and availability for my upholstery guy. On another recommendation I found a good substitute, a product named Street Suede- Mocha. It had a good look and feel and worked well with the plan.
The material had good stretching ability too, making a nice tight fit when done properly. Reasonably priced and making a smaller dent in an "already" blown budget. Although hard to see in the pics, I went with the perforated style with black backing.
I think it fits well with the colour pallet I have chosen for the car as shown below. The seats will be done in a brown mocha leather similar to that found in the 2014 M series cars(below). This pic was the inspiration of the design. I know brown over black is a not a typical approach to a typical Colorado resto but I think it works well.


The carpets will be a German Square weave. I am not sure what will be done with the door cards at this point but I am leaning towards the upper portion of the cards done in black vinyl to tie everything together with the dash and the parcel shelf.
The console will likely be done in leather...still have a few options to decide on before I am ready for send it off to be finished.
The headliner install itself was not much different than others that have been featured here. Although I have added a wrinkle. I am not sure if others have wondered why slick top cars were blessed with those dinky side lights rather than the larger one used in the sunroof version. My guess it was cheaper and less time consuming to mount it in the bulkhead rather than mount it near the front of the car using a piece of hardboard. So with the help of Patrick O'Neil once again, he fabricated a bracket for a light I rescued from a parts car a while back.
The cool part now is the dome light is on a 30 delay. A small lil modern day feature for my ol' German classic.
.JPG.089bdabbb53e5136f4036cc13fdfbafa.JPG)
.JPG.b68d2ca01f8ca105c57a88012924f41b.JPG)
.JPG.810fc7128a4b8b6860eb7bf52c07dac3.JPG)
Here is the rest of the project.........
.JPG.522a00052eac7331ab238fac970239dc.JPG)
.JPG.5e317e02f8c5c6fcbeb1cd6799a0985c.JPG)
.JPG.62ba8185deb6e8e83632090e602f0512.JPG)
.JPG.1763aacb17cd751e10b3ebbe8c34d48e.JPG)
All new seals and the glass is all in ..... pinch moulding too.


Just the grab handles and mirror left to do. Visors will be re-upholstered.
Thanks for your time....regards
0 Comments
Recommended Comments
There are no comments to display.
Create an account or sign in to comment
You need to be a member in order to leave a comment
Create an account
Sign up for a new account in our community. It's easy!
Register a new accountSign in
Already have an account? Sign in here.
Sign In Now